Form configuration
The Old view button is at the top right of the view. If needed, it opens the earlier view: it opens a window where you can write why you need the old view (this is optional). Then press Old view in the window. Amphora remembers the choice for your next login too. In the old view, New view returns to the new view. The old view is described in the Form configuration guide.
Contents
- Forms list
- New form, copy, state, delete and versions
- Form settings
- Fields
- Options and classifiers
- Default values, formulas and field actions
- Sub-forms
- Panels
- Rights
- Print templates and read view
- Check and save
- General metadata fields
1. Forms list
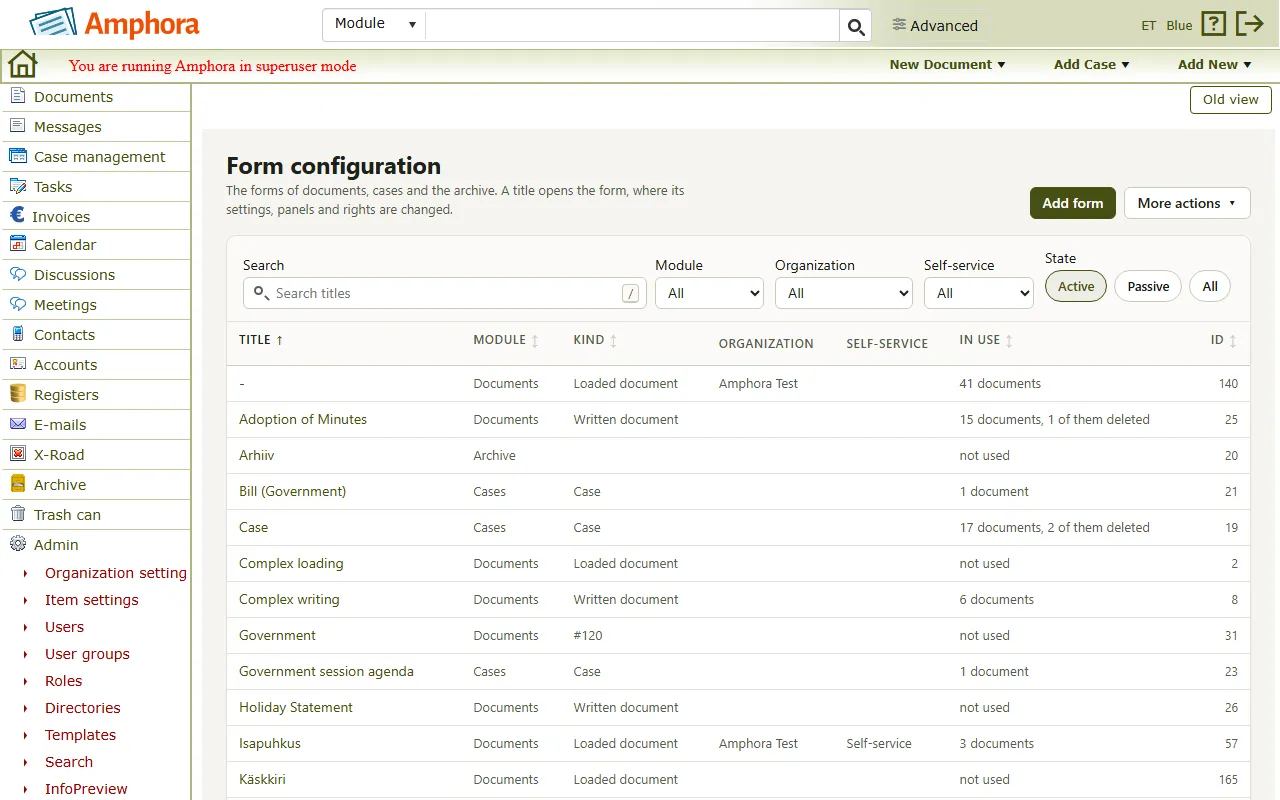
The Form configuration view shows the forms of documents, cases and the archive. A form's title opens the form, where its fields, settings, panels and rights are changed.
Above the list are the filters:
- Search titles – searches the form titles. The / key also moves to the search box.
- Module – shows only the forms of the chosen module, for example Documents, Cases, Invoices or Archive.
- Show sub-forms – sub-forms are hidden in the list by default; the tick shows only the sub-forms. The Module filter is then not applied.
- Default folder's organization – shows only the forms whose default folder is in the chosen organization; No organization shows the forms without one. When Show sub-forms is ticked, this filter cannot be chosen.
- Self-service – Offered shows the forms offered in self-service, Not offered the others.
- State – Active, Passive or All. Active forms are shown by default.
When no form matches the filters, the Clear the filters button resets them. The filters are kept in the browser address bar. From a form, Back returns to the list.
The columns of the list:
| Column | What it shows |
|---|---|
| Title | The form's name. A passive form is marked passive. |
| Module | The module where the form is used. A sub-form shows Sub-form. |
| Kind | The kind of the form's loading method, for example Loaded document, Written document, Case or Sub-form. |
| Default folder's organization | The organization of the form's default folder. |
| Self-service | Whether the form is offered in self-service. |
| In use | How many documents were created with the form (and how many of them are deleted) and in how many forms it is a sub-form; otherwise not used. |
| ID | The form's number. |
Pressing a column heading sorts the list by that column; pressing it again reverses the order. Below the list, you can choose how many rows a page shows (Rows per page) and move between pages.
With the keyboard, the j and k keys move between rows; Enter opens the chosen form.
The More actions button opens two more actions:
- General metadata fields – fields that search profiles can use in every module.
- Generate read views – generates the read views of all active forms again in every language. Custom read views stay as they are. The run can take several minutes; Stop stops it, and at the end you see how many forms got their read view and which forms failed.
2. New form, copy, state, delete and versions
New form
- Press Add form above the list. The New form window opens.
- Choose the Module: Documents, Cases or Sub-form.
- Choose the Loading method. Only loading methods that no other form uses are offered. If all are in use, press Add loading method, choose the Type, enter the Name and save. The new loading method is saved at once and stays even if no form is created. Only a superuser can add a sub-form category.
- Press Create form. The form is created at once and stays even if you make no further changes.
The form takes the loading method's name. The name can be changed later in the form's settings; it belongs to the loading method, so every form with this loading method shows it.
Important
If the Estonian name is left empty, the Estonian forms list shows the module's name instead of the form's name.
The form header
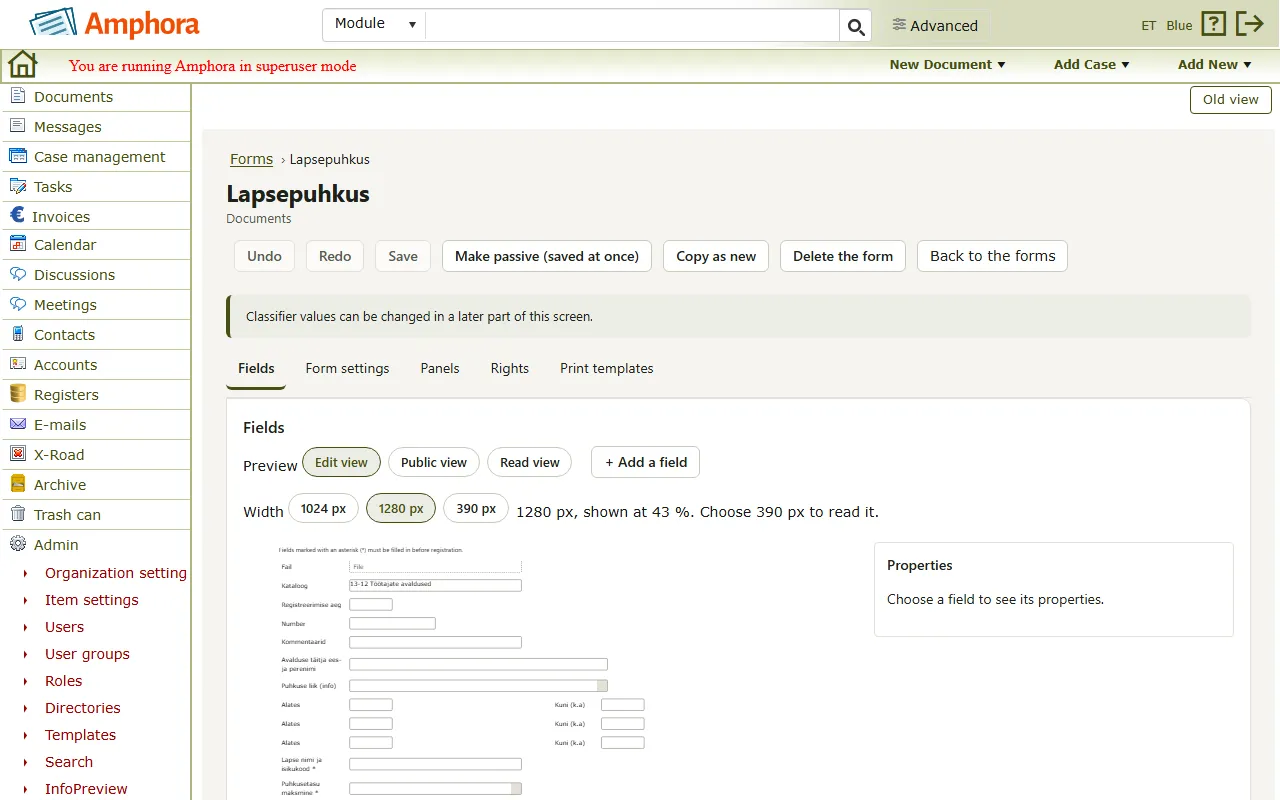
Above an open form's title is the view name Form configuration. The header shows the form's name, its module and these buttons:
- Back – returns to the forms list.
- Undo and Redo (arrow buttons; also Ctrl+Z and Ctrl+Shift+Z) – undo or redo the last change.
- Save – saves all changes at once. With no changes, the button is grey. While there are unsaved changes, the header shows Unsaved changes: and their number per tab, for example "Unsaved changes: 1 (Form settings 1)"; the link What changes? shows what saving will change.
- Make passive (saved at once) or Make active (saved at once).
- Copy as new.
- Copy to my organization – only on a form without an organization (see Copying to your organization).
- Delete the form.
The messages, invoices and archive forms have no Copy as new button; the invoices and archive forms have no Delete the form button either. Each module's form shows only the settings that module uses.
When other forms use the form as a sub-form, the line Changes also show in the forms: under the header links to them.
Copying
- Press Copy as new. A window opens.
- Choose the Loading method of the new form. It must differ from the original form's; if needed, add one with Add loading method.
- Press Create copy. The editor opens an unsaved copy with the heading “Copy of “…””. The loading method can still be changed with Change.
- Press Save. Only then is the copy saved; until then the original form stays as it is.
The copy gets the form's fields and settings, including their unsaved changes, and the loading method's counters, automatic workflows and the right to add documents. Print templates, the registration profile, field actions and the default values of list fields are not copied.
Unsaved changes to options, the form's name, panels and rights do not go into the copy; the window names those tabs. If the copy needs them, save the original form before copying.
A form with several fields on the same data field cannot be copied: fix the fields and save the form again.
Copying to your organization
A form without an organization can be copied as a form of your organization. The Copy to my organization button is only in the header of forms that have no organization.
- Press Copy to my organization. A window opens and shows your Organization.
- Check the copy's Name. It is prefilled as "form name - organization name".
- Choose the Default folder. Each folder shows how many counters it has.
- Press Copy. The copy is saved at once; the original form stays as it is.
The copy has no unit rights, so every unit of your organization can use it. Rights (form access), the registration profile, field actions, default values of list fields, reply forms and document templates are not copied.
Important
The copy uses the same data object as the original form: a new data field added to the copy also appears on the original form.
Active and passive
A passive form is not shown in the active forms list or in the lists where a form is chosen. Its documents stay as they are. Make passive (saved at once) asks for a confirmation and saves the change at once; Make active (saved at once) brings the form back. The change applies to this version only.
Before changing the state, save or undo your changes.
Deleting
Delete the form deletes the form with all its versions. This cannot be undone. When the form has its own loading method, that is deleted too.
A form that is in use cannot be deleted. The window then shows where it is used, for example Documents:, Forms that use it as a sub-form:, Field actions: or E-mail registration rules:, with their number. Instead of deleting a form in use, you can make it passive: then no new documents can be created with it.
Versions
The form's versions are on the Form settings tab, in the Versions line; the current version is marked (current). An older version can only be viewed. When you save the current version, the general data of the older versions is updated too; the header then says how many older versions got it. Open the current version on an older version leads back.
When someone else changed the form at the same time
When someone else saved the form after you opened it, your changes are not saved, and the The form was changed meanwhile window opens:
- Keep my changes – your changes stay on the screen, and you can copy what you need;
- Reload the form (my changes are lost) – you see the other user's change.
When you leave a form without saving, Amphora asks Leave without saving?: Leave without saving leaves and the changes are lost, Cancel keeps the form open with the changes.
3. Form settings
The Form settings tab holds the form's general settings in groups. Which groups show depends on the form's module: for example, the Registration, Self-service and Legal acts groups are only on document forms. The changes are saved with the form by Save.
General
- Module and Data object – where the form is used and which data object's fields the form shows.
- Loading method – the form's loading method. + Add loading method adds a new one; it is saved at once and stays even if you do not save the form. It is set for this form when the form is saved.
- Name – the form's name in the interface language. The name belongs to the loading method: every form with this loading method shows it. A name can be at most 500 characters long.
- Description – a longer explanation of what the form is for. People filling in the form and AmBot read it in their own language; each language has its own box, added with the + Add description button (for example “+ Add description: Estonian”). The All languages button opens the Name and description in every language window, which lists the form's name and description per language; Close closes it.
- Versions – the form's versions (see Versions).
- Background colour – the form's background colour. The colour code is written as #RRGGBB, for example #FFFFCC; No colour removes the colour.
Registration (on document forms)
- Default form for registering an annex and Default form for registering a reply – which form opens when an annex or a reply is registered to the document.
- Reply forms – the forms that can be chosen when a reply is registered.
Default form for registering a reply and Reply forms show only when your Amphora uses the reply settings. * Create a case automatically and Form of the new case – a case with the chosen form is created for the document. * Number replies with the folder or case counter, Count the annexes and Show the main object search.
Responsible person (on document and case forms)
- Default responsible person – the responsible person added to a new document or case.
- Create a task – a task is also created for the default responsible person.
Public view
- Visible in the public view – the documents of this form are in the public view.
- Place in the public view (tab) and Document type in the public view.
Self-service (on document forms)
- Offered in self-service – the form can be used in the self-service portal. Under it is the option Show the "Send unsigned" button (see Self-service portal).
- Persona and Persona document type (on loaded document forms only).
Legal acts (on document forms)
- Enable legal act management, Mode and Form for drawing up the legal act.
- Send the adopted legal act to Riigi Teataja and VOLIS.
Duplicate check
- Check for duplicate records – on save, Amphora checks whether a record with the same values already exists. Fields that make records the same sets which fields are compared.
- Show a message about a duplicate and Fields the message shows – the message shows the chosen fields of the record saved earlier.
Changing the duplicate check needs its own right; without it, the settings can only be viewed.
Translations
The group lists the fields without a title in the interface language, for example "English: fields without a title: 3". A field's name is a link that opens the field. When every field has a title, it says, for example, "English: every titled field has a title."
4. Fields
The Fields tab shows the form's fields as they are placed on the form. Invoice forms do not have this tab: they open on the Form settings tab, with the Basic data and Duplicate check groups. The form is on the left, the chosen field's settings (Properties) on the right. The form editor needs a window at least 1024 pixels wide. In the 1280 px and 1024 px previews the field titles are beside the boxes, in the 390 px preview above them, as on that device's screen.
The editor shows the texts of the form, its fields and options only in the interface language: Estonian, English or Russian, and Estonian for any other language. The texts in the other languages stay stored. The All languages link (in the form settings next to the name and description, in the field settings next to the title) shows these texts in all languages. To change the texts of another language, switch the interface language.
Views, size and device
Above the form, on the View: line, you can choose how it is shown:
- Edit view – the form as it looks when a document is edited. Fields can be added and moved only in this view.
- Public view – only the fields marked as shown in the public view.
- Read view – the document's read view. Message and archive forms have none here, because their read view is built from the stored fields.
The Zoom row sets the preview's width and zoom. The 390 px, 1024 px and 1280 px buttons show the form at the width of a phone, tablet or computer screen; the device name shows when the mouse is over the button. The − and + buttons zoom the preview out and in, and 1:1 (Actual size) sets it back to 100 %.
Adding a field
- Choose the field on the form that the new field goes next to.
- Press + Add a field.
- Choose the Position: Below the selected field, in a new row, Beside the selected field, in the same row, At the start of the form or At the end of the form.
- Type the type's name or a part of it in Search field types, for example "date", and choose the type in the list. The types are in the groups Text and number, Date and deadline, Choice, People and folders, File and address and Structure. Esc closes the window.
The chosen field's row also has + buttons that add a field straight below the row or into it (on a screen at least 1024 pixels wide).
Field types are, for example, Text box, Number, Date, Date and time, Deadline, Checkbox, Drop-down list, Editable drop-down list, Radio buttons, Checkbox list, List box, Multi-select drop-down list, Classifier (over 50), Classifier list (over 50), Person, Person list, User, In-ADS address, In-ADS cadastral unit, Web address, HTML editor, File, Folder, Sub-form and Caption. In a sub-form, the types Sub-form, File and Folder are not offered.
Field settings
A field's settings open when you press the field on the form. With the keyboard, the arrow keys move between fields.
Basic data
- Type – the field's type. Changing the type clears the settings the new type does not use; a message names them, and Undo brings them back. The type cannot be changed when documents of the form hold a value in the field that a field of the new type cannot use. The type of a sub-form field cannot be changed.
- Data field – the data object's field that stores the field's value. Each field needs its own data field; two fields cannot share one. The Caption type has no data field.
New data field. When no data field fits, choose New data field in the data field list, enter the Name (Latin letters, digits and _; starts with a letter), choose the Data type and press Add the data field. The data field is saved with the form.
Changing the data field. When you change the data field of a field that holds values in documents, Amphora asks Change the data field of “…”?: the values of this form's documents move to the new data field, and the values of other forms' documents stay on the old one.
Texts
- Title – the field's title in the interface language. A title may use a line break (
<br>) and bold, italic or underlined text (<b>,<i>,<u>); the editor and the preview show the title formatted. - + Description – adds a description of the field.
Missing translations are listed on the Form settings tab, in the Translations group.
Rules
- Required – the field must be filled before saving.
- Required at registration – the field must be filled before registering.
Some fields cannot be filled in through self-service; such a field cannot be made required. For a folder field, the ticks apply only to staff, because in self-service the application gets the form's default folder.
Template and public view
- Shown in the public view – the field shows in the public view.
- ID in templates – the name used for the field's value in a DOCX template.
Layout (opens when you press its heading; the heading shows the row, column and width)
- Place – the row and column of the field.
- Width, Title width (px) and Height (px or rows; for a multi-line field 0 = one line).
- Maximum length – how many characters can be written in the field; 0 = no limit.
For a person field, Organization restriction sets whether every organisation the user can see is offered, or only the persons of the chosen organisation.
Moving a field
The chosen field can be moved in three ways:
- with the buttons at the top of the field settings (Move the field): Move up, Move down, Move left and Move right;
- with Alt + arrow key;
- by dragging it with the mouse: a line shows where the field lands.
Fields can be moved only in the edit view.
Deleting a field
Choose the field and press Delete the field under its settings (or the Delete key). When documents of the form hold values in the field, the window shows how many: after the delete, those values are not shown on the form, in the read view or in DOCX templates, but they are not removed from the database. They come back if the field is added again on the same data field.
The field leaves the form when you press Save; until then, Undo brings it back.
A file field cannot be deleted while documents of the form use it. A folder field cannot be deleted, because the form uses it to file the document in a folder.
5. Options and classifiers
Fields with options (for example Drop-down list, Radio buttons, List box, Checkbox list, Editable drop-down list and the classifiers) have an Options part in their settings.
Important
Options belong to the data field, not to the form: every form that uses the data field shows them. A changed text changes on every data field that has the option.
Options of a new data field can be added after the form is saved.
Adding and changing options
- Add new – adds a new option at the end of the list. Enter the option's Text. The Estonian text is required: on an English or Russian interface, it has its own row, Estonian (required). For a "none" option, enter for example "Puudub" as its name.
- Mappings – texts that map to the option: the text entered in New mapping is added with Add mapping and removed with Remove.
- Delete – the option is removed from the data field when the form is saved; until then, Undo brings it back. An option that documents hold as a value cannot be deleted; it can be made passive.
A new option is added at the end of the list; the order of the options cannot be changed here. These changes are saved with the form by Save.
Actions saved at once
Two actions are saved at once, without saving the form; their button names say "(saved at once)":
- Add existing (saved at once) – adds an option that another data field already uses. Search the option by name and press Add. The window shows which data fields and forms already have the option: the option is shared, so a change to its name or state shows on all of those data fields.
- Make the option passive (saved at once) and Make the option active (saved at once) – a passive option cannot be chosen on new documents; values documents already hold stay. The change applies to every data field that has the option, and the window lists them before you confirm.
Multi-level options
Multi-select drop-down list, Classifier (over 50) and Classifier list (over 50) can have levels. Tick Multi-level choice and choose the Number of levels and the Kind of choice:
- Linked choice – each row is whole: a choice on one level chooses the same row on the other levels. The options are shown as rows; Add a row adds a row, and Move up and Move down change the order of the rows. A row is made passive or active with Make the row passive (saved at once) or Make the row active (saved at once).
- Sequential choice – the next level shows only the values under the value chosen on the level before. The options are shown as a tree; Add a value and Add a value under it add values.
Each level has its own caption (Level 1 caption and so on). Levels shown on the form sets which levels the form shows; a hidden level's caption and values stay stored.
The kind cannot be changed to linked choice while a value has more than one value under it. Multi-level choice can be turned off only when no value has values under it.
When the options were changed at the same time
When someone else changed the options after you opened them, nothing is saved, and the The options were changed meanwhile window opens: Read the options again reads the current options (your changes to those options are lost), Keep editing keeps your changes.
6. Default values, formulas and field actions
Default value
The Rules part of a field's settings holds the default value that a new document starts with in the field. Its form depends on the field type:
- a text or number field: Default value or Default value formula;
- a checkbox: Ticked by default;
- a date field: Default date (as dd.mm.yyyy) or a formula;
- a field with options: one of the options; None leaves the field empty;
- a person field: The logged-in user: on a new document, the field starts with the person who creates the document;
- a folder field: Default folder.
On a radio buttons or list box field, the default is put back every time the field is shown: when a saved document has the field empty, the default is shown and is saved on the document's next save.
A new document made by staff gets the default folder only when the staff member has the right to add documents to that folder; otherwise the field stays empty. In self-service, the application always gets the default folder.
When the default option is passive or removed, the settings show it with a mark, for example "(passive)".
Formulas
A formula starts with =, or on a date field with DATE. Under the formula box, a hint shows what the field type can use:
- Text box – the logged-in user's data: (fullname) full name, (firstname) first name, (lastname) last name, (code) personal code, (job) job title, (email) e-mail, (phone) phone, (organization) organisation, (department) department.
- Number – the sum of other number fields: =sum(Field1,Field2), recalculated on every save.
- Date – today: DATE. Offsets: DATE+1D (day), DATE-1D, DATE+1M (month), DATE+1Y (year); on a date-and-time field also DATE+2h (hours) and DATE+30m (minutes). The 15th of the next month, or in the second half of the month the 15th of the month after: =15THOFNEXTFULLMONTH.
- A field of the source document (the letter answered or the parent document): =SOURCE.FieldName.
Amphora checks the formula and says when something is wrong, for example when a number has no unit (D, M, Y, h or m), when =sum names fields that are not on the form, or when DATE is on a text field instead of a date field.
Field actions
A field action does something when the field's value meets a condition, for example fills other fields or sends a notification. The actions are in the Field actions part of the field's settings: its heading shows the number of actions, and the part opens when you press the heading.
Important
Actions are saved at once. The form's Save and Undo do not change them. Actions of a new field can be added after the form is saved.
Actions cannot be added to a sub-form field.
Adding an action
- Press Add action.
- Enter the Title.
- Choose the Action condition: No condition, A given value in the field (and the Value) or The value changes.
- Choose When the action runs, for example As soon as the condition is met or On save.
-
Choose the Action:
- Create a record – creates a record with the chosen module and form (Object to create). Mappings for filling the form set which field values are carried to the new record; Open the created object opens the created record. With the Tasks module, you can also choose the Task type.
- Fill in fields (on the open form) – fills a field of the open form (Field to change) with a fixed value, a value from the database or the value of another field of the open form (Type of value to fill). When the field to change is a Number field and it is filled with a fixed value, the value gives way to the Sum formula box: type the formula as =sum(Field1,Field2) with the data fields of this form's other Number fields, separated by commas (the list is under the box; the field to change cannot be in the formula). The formula can be up to 150 characters long. The sum is calculated only with the condition A given value in the field and the time As soon as the condition is met.
- Send a notification – sends a notification to the persons chosen in Field with the recipients; choose the Notification type too.
Earlier actions of the kinds Open the form for adding a record, Fill in fields (on the related form) and Change values stay in the list and can be changed, but no new action of these kinds can be added.
-
If needed, tick Ask for confirmation before the action. Filling replaces a value already in the field, so a confirmation is often useful.
- Press Save in the window. The action is added at once.
In the list of actions, an action can be changed (Edit), deleted (Delete; this cannot be undone), and the order changed with Move up and Move down. These changes are saved at once too.
7. Sub-forms
A Sub-form puts the fields of another form inside the form. When Repeating (several entries) is ticked in the sub-form field's settings, a document can have several entries of the sub-form, each with its own fields, for example several rows.
Adding a sub-form
- Add a field of the type Sub-form to the form (see Adding a field).
- In the field's settings, choose the Data field. The sub-forms are the forms of that data field's class. For a new data field, choose New data field (named after the sub-form, made on save).
- Choose the Sub-form. A form that contains this form itself cannot be chosen.
- When a document must be able to hold several entries of the sub-form, tick Repeating (several entries). The tick changes which data fields are offered. When the chosen data field does not fit the tick, Amphora swaps it for one that fits or makes a new one on save, and says so at the field.
- Click Save. A new data field is made on save.
When you change the data field later, the sub-form choice is removed, and a form of the new data field's class must be chosen. The type of a sub-form field cannot be changed.
When documents of this form already have entries in the sub-form field, neither the sub-form nor the Repeating (several entries) tick can be changed. Add a new sub-form field instead.
Entry labels and display
When Repeating (several entries) is ticked on a sub-form field, the field's settings choose how the entries look on a document:
- Entry labels – Headings (caption and number), Numbered list, Bulleted list or Unlabelled list;
- Entry display – As blocks or As a table.
Changing a sub-form
The field's settings have the link Open the sub-form “…”. It opens the sub-form in the same view: the header shows the sub-form's name, and Back returns to the main form. Changes to the sub-form are saved with the sub-form's Save.
Under the sub-form's header, the line Changes also show in the form: or Changes also show in the forms: lists the forms that use this sub-form.
When you leave a sub-form without saving, Amphora says whether the changes are lost only in the main form or in both the main form and the sub-form.
Required fields in a sub-form
The Required and Required at registration ticks of a sub-form field take effect only when the sub-form's loading method type is Sub-form category. A sub-form field is then required only when it is ticked both on the main form's sub-form field and on that field in the sub-form. With any other type, the sub-form's own ticks apply.
When Repeating (several entries) is ticked on the sub-form field, the Required tick does not stop staff from saving the document, even when the sub-form entry is empty. A new document always has one empty entry.
8. Panels
The Panels tab has a table of the panels shown under the form in the document or case view, for example Signatures, Versions, Relations, History, Workflow, Item files, Parties, Deliveries and Responsible person. Which panels are in the table depends on the form's module.
For each panel, you can tick:
- Visible – the panel is shown;
- In the public view – the panel is shown in the public view;
- Required on save – the panel must be filled before saving;
- Required at registration – the panel must be filled before registering.
In the Static fields part, in the Static fields of the module table, you can tick for each static field of the module whether it is In the public view. Greyed boxes do not apply to this module.
The changes are saved with the form by Save.
9. Rights
The Rights tab has two groups: Access and Roles.
Access
The Access table shows access to the form by unit and user group. Each row has a Status that can be changed; new rows cannot be added here. Changes to roles and access are saved with the form by Save.
The statuses:
- Allowed – the form is shown and usable for members of this unit or user group;
- Not set – the form is allowed unless the user has "Denied" in another unit or group;
- Denied – members of this unit or user group cannot use the form.
"Allowed" wins over "Denied": a user denied in one group and allowed in another still sees the form.
Search units and user groups searches the rows, and the status filter narrows them. A unit's row without a user group applies to the whole unit ((whole unit)).
Roles
The Roles table shows the roles the form is shown to, and those it is the default form for:
- Shown – the form is offered to users with this role;
- Default form – the form is the role's default form.
A role can have the form as its default form only while the form is shown to it. When you untick Shown, Default form goes too. Filter roles searches the roles.
10. Print templates and read view
The Print templates tab holds the form's print templates and read views.
Important
Print templates are saved at once. The form's Save and Undo do not change them.
The templates are grouped by language, for example “Estonian · 1 print template”; a group opens and closes when you press its heading. The table shows each template's Name, Format, Output location and File. A system read view is marked System.
Adding a print template
- Press Add print template.
- Choose the File (.xsl).
- Enter the Name and choose the Format, Language and Output location.
- Press Add (saved at once).
Each template's row has these buttons:
- Download – downloads the template's file;
- Replace – replaces the template's file (Replace (saved at once)). The template's settings stay as they are; the current file cannot be restored. The file of a system read view cannot be replaced;
- Delete – deletes the template at once; this cannot be undone. A deleted system read view is made again the next time the form is saved.
Read view. The system read view is built from the form's fields in every language and is updated when the form is saved. The read views of all active forms can be generated again from the forms list: More actions → Generate read views (see Forms list). A preview of the read view is on the Fields tab, with the Read view choice.
11. Check and save
All changes to the form are saved at once with Save. Until then, the header shows Unsaved changes: and their number. After saving, the forms list opens with a message, for example "The form “Application” has been saved."
Check
While you edit, Amphora checks the form and shows the Check box above it. The number of problems also shows on the Save button. The check finds, for example:
- a field without a data field, or whose data field another field already uses;
- a form without the folder field or file field it needs;
- a wrong formula or default value;
- a form name that is missing or longer than 500 characters.
A problem's line is a link that opens that field or setting. The line On save also: shows what happens on save, for example that deleting a field leaves documents with a value without that field's value, that values move to another data field, or that the field has no Estonian title and the form shows the data field's name.
When you open a form whose saved state has problems (for example, a passive default choice), the check shows them at once under In the saved form:.
When saving fails, the message above the form gives the reason and, if needed, a code that can be sent to support.
Undo and Redo
Undo (Ctrl+Z) undoes the last unsaved change, and Redo (Ctrl+Shift+Z) makes it again. They do not change the actions that are saved at once (for example field actions, print templates and the buttons whose name says "(saved at once)").
12. General metadata fields
General metadata fields are on no form, but every module's search profiles can use them. The view opens from the forms list: More actions → General metadata fields; the Back button returns to the forms list.
The table shows each field's Title, Data field, Field type and Widths.
Adding and changing a field
- Press Add field, or Edit on a row.
- Choose the Data field and the Field type. Each data field can have only one general metadata field.
- If needed, enter the Title width and Field width; an empty width uses the default width.
- Enter the Title in each language. An empty title leaves that language without a title.
- Press Save. The field is added or changed at once, in every module's search profiles.
The row's bin button (Delete) deletes the field: it disappears from search forms and can no longer be added to a search profile. In search profiles that have it, it stays in the field list under its data field name. This cannot be undone.
Last modified: 20 November 2026, 08:34:42