Legal Acts System
- Workplace Requirements
- Legal Acts Management
a. Draft Preparation
b. Draft Editing with akt-editor
c. Draft Editing with Amphora Client (VexPro, alternative)
d. Draft Editing with WebDav (VexPro, alternative)
e. Agenda Preparation
f. Creating Legal Act from Draft
g. Transfer of Unsent Outgoing Communications to Legal Act
h. HTML and PDF Generation
i. "Validate" Button on Legal Act Forms - Sending Drafts from Amphora to VOLIS
a. Usage Prerequisites
b. Sending Draft from Document Edit View
c. Sending Multiple Drafts at Once from Document Registry View - Validation for Sending to State Gazette
a. Usage Prerequisites
b. Policy Configuration
c. Legal Act Form Configuration
d. Legal Act Validation on Document Form
e. Sending Legal Act to State Gazette - Template Elements
a. New Template Elements
b. Response Document Template Elements
c. .akt Template Template Elements - Amphora VexPro Legal Acts System Quick Guides
a. Quick Guide for Draft Submitter
b. Quick Guide for Draft Handler
Workplace Requirements
The default tool for editing legal act content (.akt files) is akt-editor — a browser-based editor built into Amphora that requires no separate installation (see Draft Editing with akt-editor). akt-editor is enabled for an organization via Amphora customer support.
Alternatively, legal acts can be edited with the enhanced VexPro Editor, which requires installing Amphora Client and the enhanced VexPro Editor. The latest versions are downloadable from Amphora homepage or Amphora public view. Legal acts can also be edited through VexPro using WebDav software, but to add links to legal acts, Amphora Client is required and Internet Explorer web browser must be used.
Enhanced VexPro is a further development of the original VexPro, with added Amphora functionality (similar to MS Word program). Additionally, it is possible to add links (change marks) to Amphora-internal documents in VexPro legal acts.
An important enhancement has been made to Amphora Client, where a unique personalized token (code) can be used for user authentication. Token configuration is also a prerequisite for using enhanced VexPro.
Important
Enhanced VexPro can be recognized by its round icon.  ***
***
Legal Acts Management
There are four forms in Amphora for managing regulations: Regulation Draft (draft document form), Government Regulation (legal act form), Government Agenda Item (case form), and Government Session Agenda (case form).
Draft Preparation
The lifecycle of a regulation in Amphora begins with adding a draft using the Regulation Draft form. To do this, go to the Documents module, select Load New, and choose Regulation Draft as the form.
The Regulation Draft form opens, where a default .akt regulation draft template is configured in place of the main file. On the form, you can immediately start filling fields, which are immediately transferred to the template, so there's no need to save the document beforehand to see changes. The document is in draft status before saving (in the document registry view, the document is marked with a yellow background).

Draft Editing with akt-editor
akt-editor is a browser-based editor for legal act (.akt) files built into Amphora, and the default tool for editing draft and legal act content. Unlike VexPro, there is no need to install VexPro or Amphora Client — the editor opens directly in the web browser. akt-editor is enabled for an organization via Amphora customer support.
On a saved draft, a Muuda akt-editoris (Edit in akt-editor) link appears on the main-file row and opens the editor in a modal window over the document view (no new browser tab).
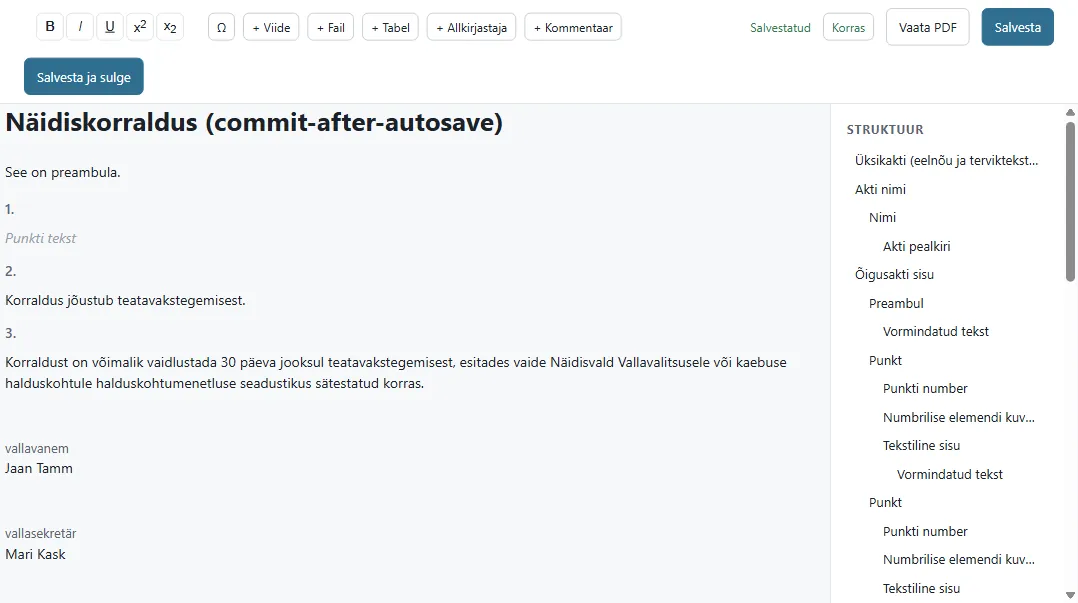
The full akt-editor guide — user interface, editing and adding elements, the structure tree, compliance validation, saving, automatic draft, PDF preview and generating the legal act — is on a dedicated page: Legal Acts Editor (akt-editor).
Important
Amphora form fields (e.g. the draft Title) are still edited in the Amphora document view, not in akt-editor.
Draft Editing with Amphora Client (VexPro, alternative)
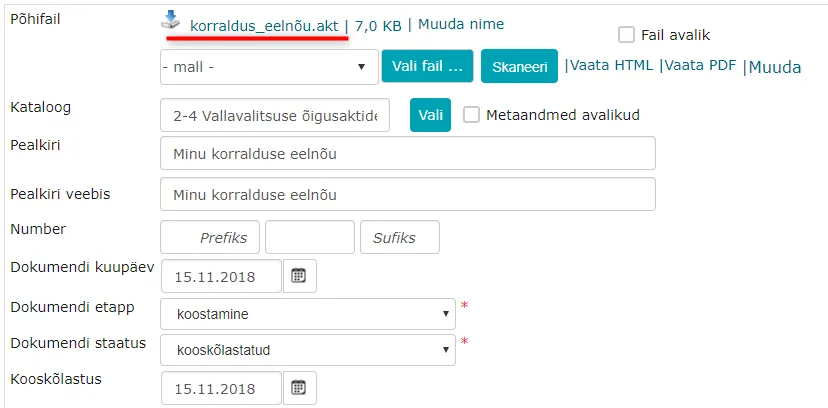
Important
Fields on the Amphora form (e.g., draft title) cannot be changed in VexPro. This should be done directly on the form.
Changes made can be viewed immediately by clicking on the .akt extension file name in the main file area. With Amphora Client, you can choose whether to open the file for Editing or Viewing. If you want to supplement the document, you should choose Edit. VexPro tool opens, showing the fields filled on the form.
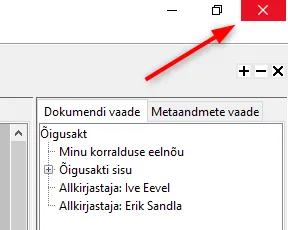
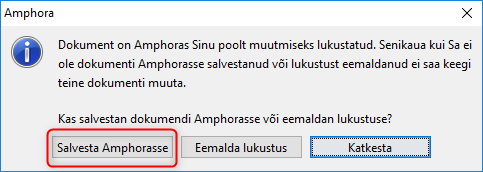
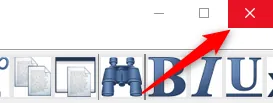
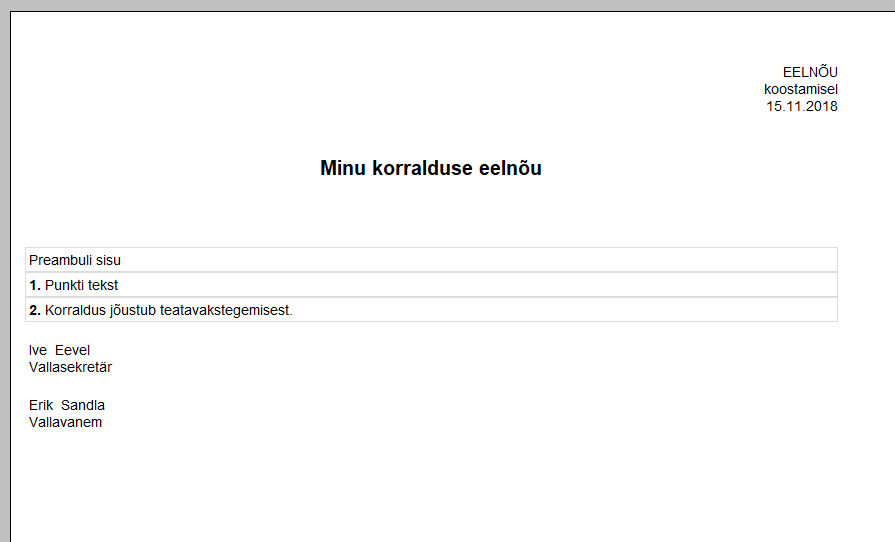 We add content text to the document (using VexPro tool) and save back to Amphora by clicking the red cross in the upper right corner of the VexPro window. In the opened dialog box, select Save to Amphora.
Draft Editing with WebDav (VexPro, alternative)
Important
Fields on the Amphora form (e.g., draft title) cannot be changed in VexPro. This should be done directly on the form.
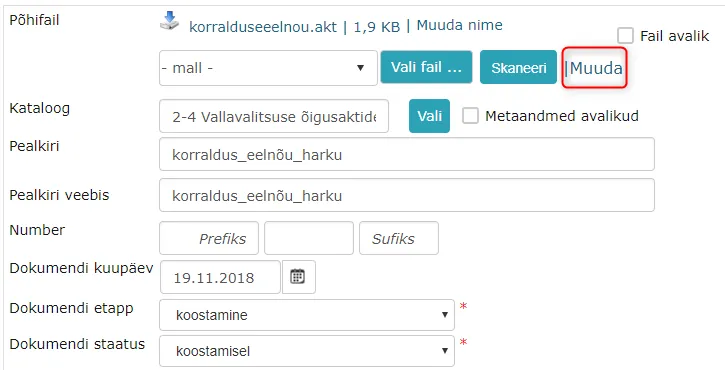
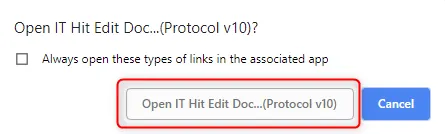
Changes made can be viewed immediately by clicking the Edit button next to the file. With WebDav, there's no choice between editing and viewing, but a confirmation window appears where you need to click the Open IT Hit Edit Doc… button. If you check Always open these types of links in the associated app, this confirmation window will no longer appear.
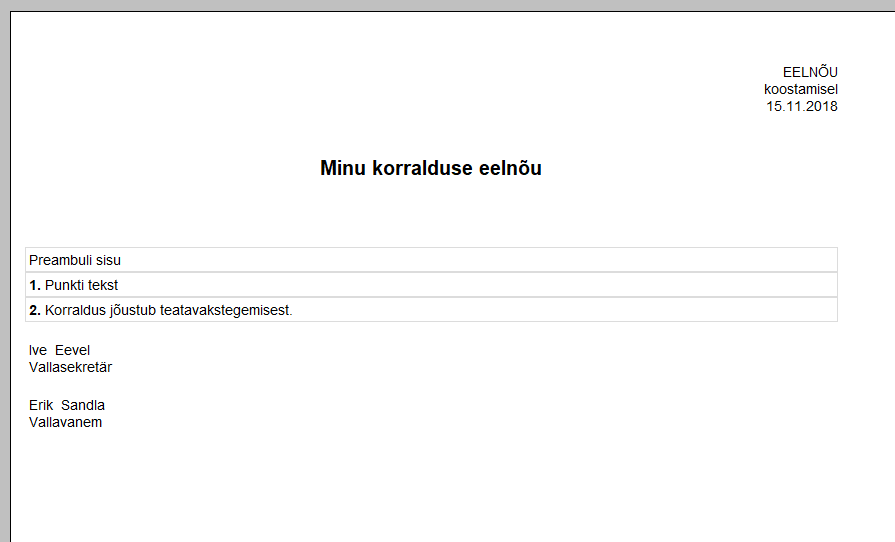 We add content text to the document (using VexPro tool) and save changes in VexPro. Saving is possible in 3 different ways:
- File -> Save.
 save icon.
- CTRL + S key combination.
When the file is saved, click the red cross in the upper right corner of the VexPro window. In the opened dialog box, select No.
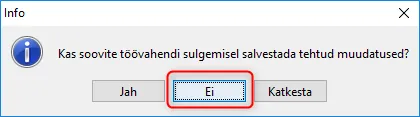 Next, you need to save changes in Amphora as well. After saving, the draft loses its draft status and a related agenda item (form Government Agenda Item) is automatically generated for the draft document in the same folder where the draft is located, and it's added to the composition of the created agenda item.
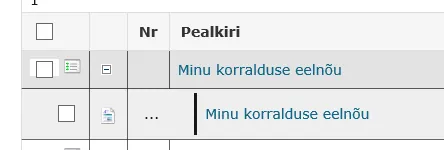 If you need to further supplement the document text or change data on the form, this can be done continuously. All changes made in VexPro must definitely be saved to Amphora.
Agenda Preparation
Next, you need to prepare the agenda, which is formed from the automatically generated agenda items from the previous step. For this, go to the case view, select agenda items with checkboxes that you want to add to the agenda, and click Create New Case.
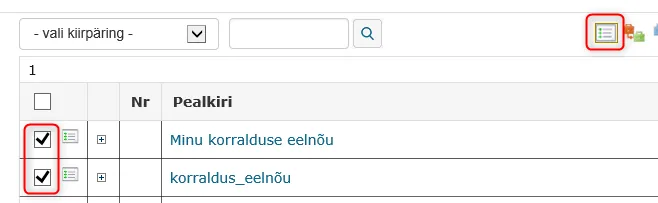 In the opened view, select Government Session Agenda as the form and fill all necessary fields. Save the form.
Creating Legal Act from Draft
Since the drafts were already prepared in .akt format, adopted drafts can be easily generated as legal acts. To do this, go to the Documents module, find the draft document, and open it.
Since the forms are pre-configured accordingly, the Regulation Draft form has a Generate Legal Act button.
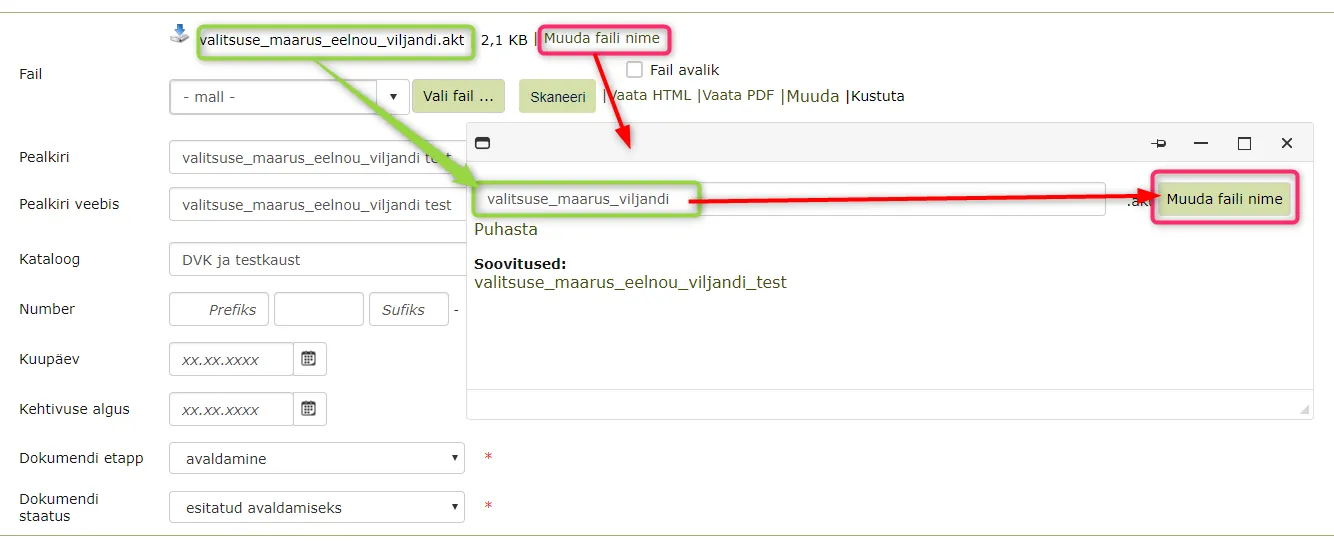
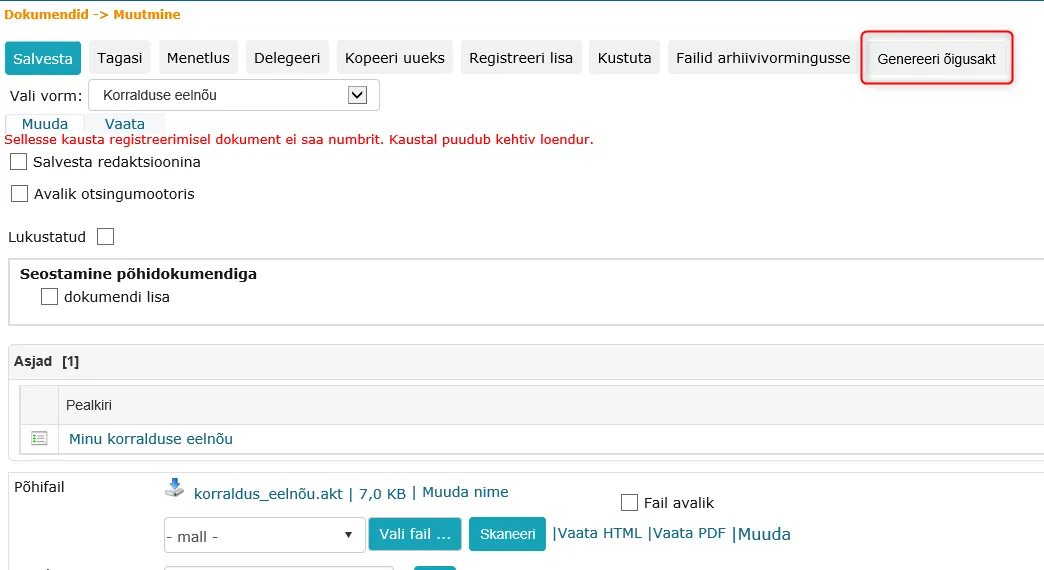 Clicking this button opens a new Government Regulation form, where all necessary fields are automatically transferred from the draft form. At this point, it would also be reasonable to change the file name. Just like with the draft, you can still make changes to the document before saving and review the act file content by clicking on the file name.
If the draft had one or more unsent outgoing communications, these are automatically added to the legal act, and when the legal act is saved, they are removed from the draft.
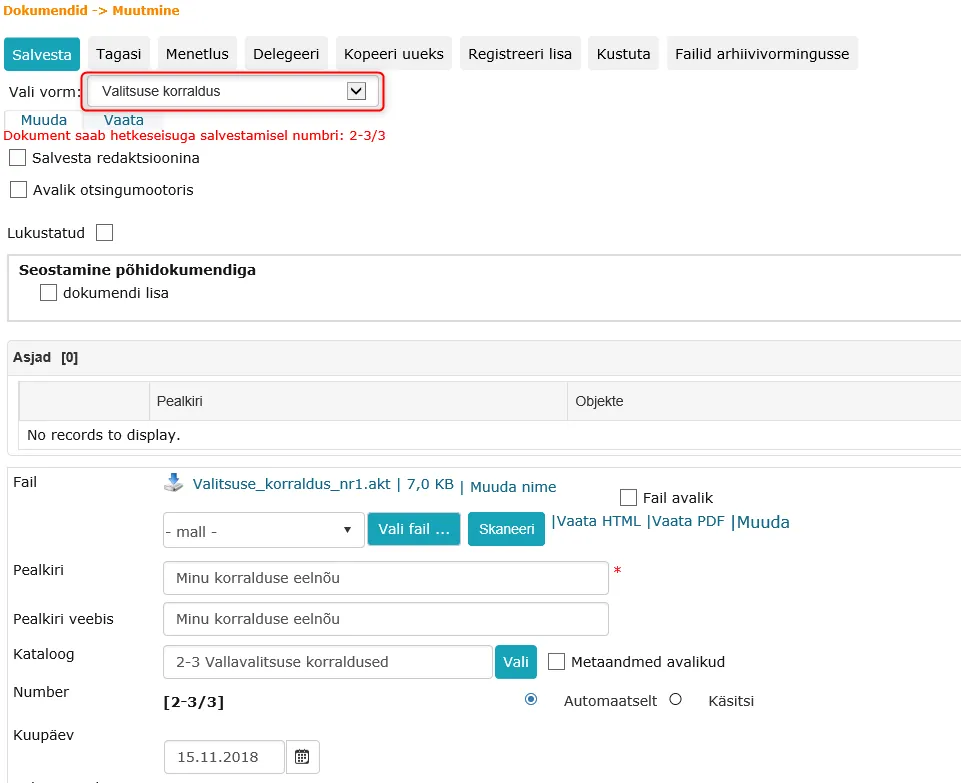 If everything seems correct, save the document. Later, it's still possible to change the document content if necessary.
Transfer of Unsent Outgoing Communications to Legal Act
If the draft has one or more outgoing communications that are unsent (not sent out), these communications are added to the legal act when generating it, and when the legal act is saved, the unsent communications are removed from the draft. Sent communications stay on the draft and are not added to the generated legal act.
HTML and PDF Generation
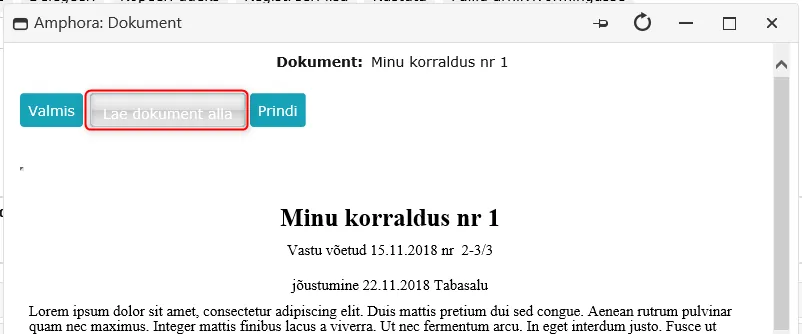
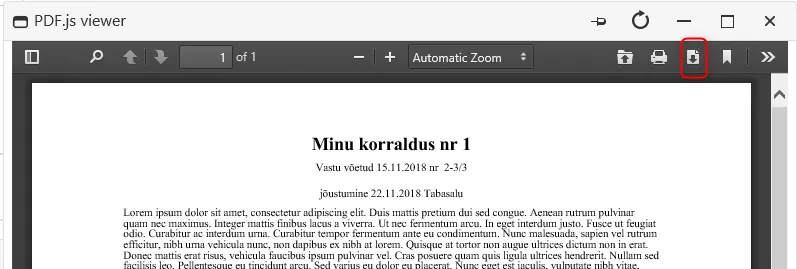
Both drafts and legal acts have HTML and PDF previews available. From these views, it's also possible to download the legal act in the previous file formats.
 HTML document preview window:
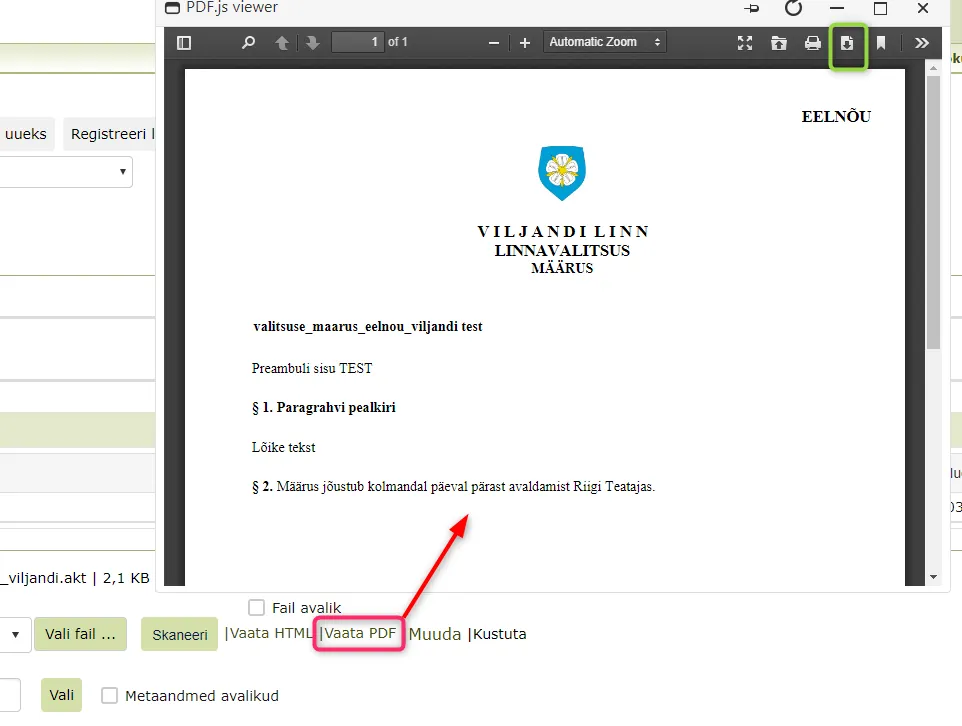
 PDF preview window (download button is marked in red):
"Validate" Button on Legal Act Forms
The Validate button is visible on all forms that have Allow legal acts management functionality enabled. This button checks that the .akt file above the main file is correct and suitable for sending to the State Gazette. The button has exactly the same functionality as VexPro traffic light's Check Schema Compliance button.

 If there's no .akt extension file in the main file area, Amphora displays a notification - Main file is missing or is not an .akt extension file!
If the .akt file is not correct, Amphora displays problems in red text when clicking the Validate button. The problem description is in English, so if the user doesn't understand the error description precisely, contact Amphora customer support.
 If the .akt file is correct, Amphora displays the following message:
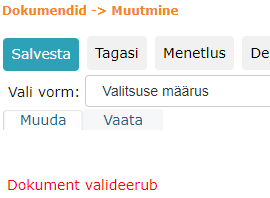 After this, it's possible to send the legal act to the State Gazette.
Sending Drafts from Amphora to VOLIS
Important
The VOLIS service closed on 1 July 2026 (www.volis.ee). Sending from Amphora to VOLIS no longer works. This chapter is kept only to explain earlier sendings.
The following describes a situation where legal act drafts are sent from Amphora document management system to the sessions system VOLIS.
Usage Prerequisites
This solution requires that the institution uses correspondence functionality in the documents module and Amphora VexPro legal acts system.
Additionally, the user who will send drafts to VOLIS must enable the policy Document Sending to VOLIS.
All draft forms should also have the VOLIS checkbox enabled so that documents can be sent to VOLIS with this form.
Sending documents to VOLIS requires that all sent drafts must be numbered. This stems from the fact that drafts are sent through DHX.
Sending Draft from Document Edit View
A draft can be sent to VOLIS directly from the document edit view. The corresponding button appears in the top button bar.
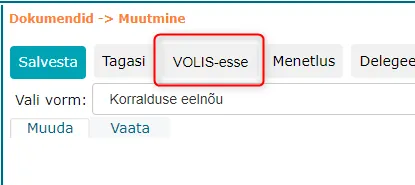 Before sending, you should verify once more that the draft HTML is visible, as the draft is transmitted to VOLIS in HTML format. HTML can be viewed by clicking the View HTML link.
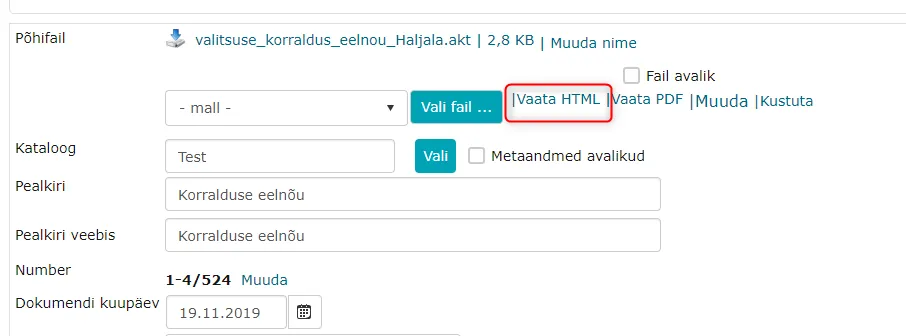 The document in HTML format should be as simple as possible, i.e., without coat of arms and other decorative elements.
If the HTML is correct, click the Send to VOLIS button. After clicking the button, sending starts and one communication appears in the Communications panel.
 If an error occurs during sending, fix the error and click the Send to VOLIS button again.
Sending Multiple Drafts at Once from Document Registry View
It's also possible to send multiple drafts at once. To do this, go to the document registry view, mark the drafts to be sent with checkboxes, and click the VOLIS icon.
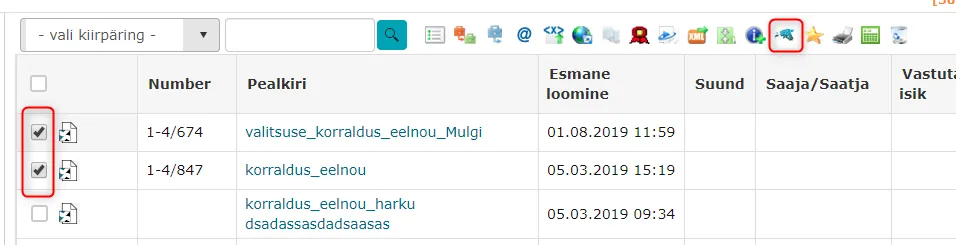 Then a new sending window opens. In this window, you can review the drafts to be sent once more. To send, click the Send to VOLIS button. After this, the desired drafts are sent to VOLIS.
Important
While the sending process is running, do not close the window!
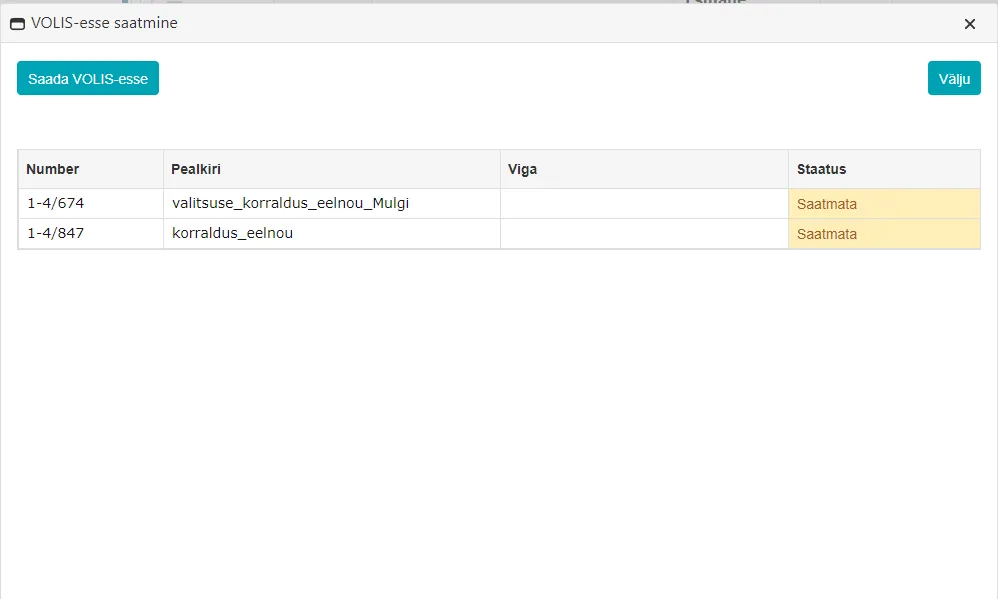 If everything went well, you see the following view:
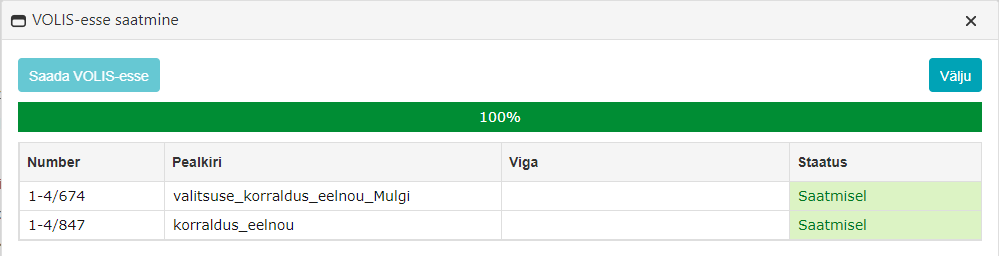 Sending status means that the document is being sent in the DHX module (similar to a document sent via DHX). Now you can close the window by clicking the Exit button.
To ensure that all drafts reached VOLIS, go to the DHX module and check the sending status.
 ***
***
Validation for Sending to State Gazette
The following describes functionality that simplifies legal act preparation for sending to the State Gazette. The functionality consists of continuous legal act validation and compliance checking with State Gazette requirements. The functionality is available from Amphora version 13.1.2.
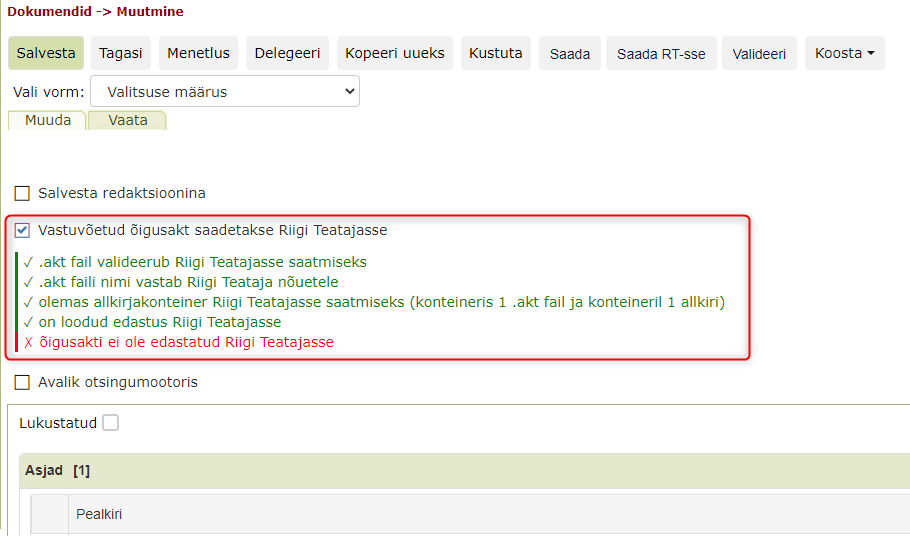
When this functionality is enabled, a list of steps that need to be taken for the legal act to comply with State Gazette sending requirements is displayed in the document header on the legal act form.
Usage Prerequisites
This solution requires that the institution uses Amphora VexPro legal acts system.
Additionally, the solution requires correctly configured .akt templates and Amphora enhanced VexPro usage (minimum version 1.3.0.5).
Policy Configuration
To simplify sending legal acts to the State Gazette, it's possible to display a Send to SG button on the document form. To display the button, the user group needs to enable the policy Document Sending to State Gazette.
Legal Act Form Configuration
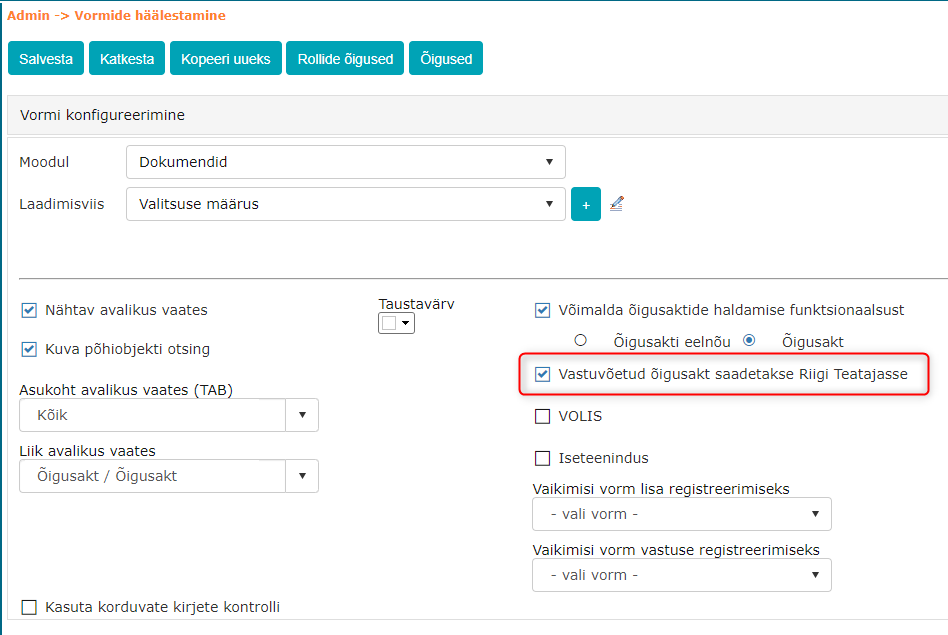
To use this functionality, it needs to be enabled on the legal act form. To do this, go to Admin -> Form Configuration and select the desired legal act form. Enabling this functionality on draft forms is not necessary.
In the form's basic settings, check Adopted legal act is sent to State Gazette with a checkbox. This option appears only if Allow legal acts management functionality is checked.
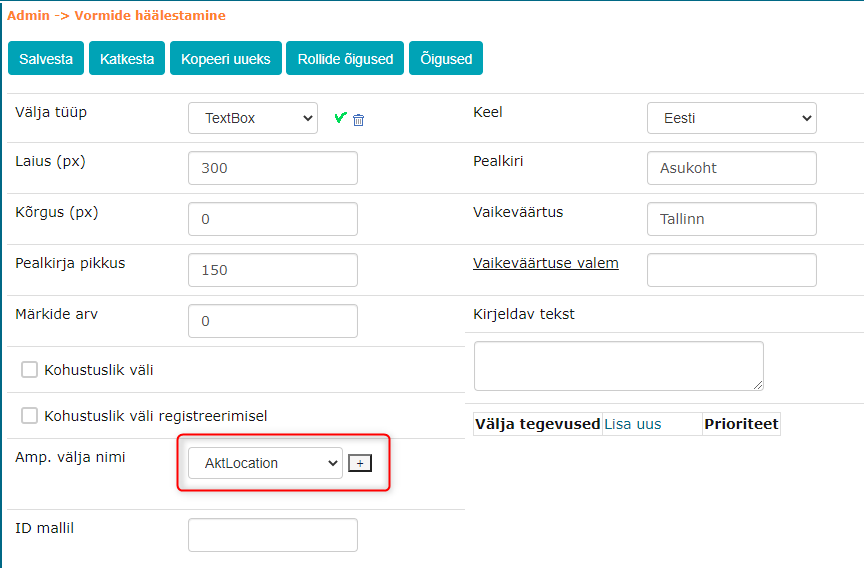
 In addition to the State Gazette sending option, the form must have a text field Location. The State Gazette format doesn't allow adding the legal act publication location inside the .akt file. Previously, a special element was used in the .akt template where the location was added. When using the new functionality, the location must be added to the form, which also allows changing the location directly on the form if necessary.
When adding a location field to the form in Amphora, use the special Amp. field name AktLocation.
 When implementing the legal acts system, Amphora customer support makes necessary configurations on forms and configures .akt templates and print templates that work with the new system. If the legal acts system is already in use, please contact Amphora user support to make necessary corrections to .akt templates and print templates to use the new State Gazette sending functionality.
Legal Act Validation on Document Form
When the Adopted legal act is sent to State Gazette option is enabled on the legal act form, a validation list is displayed in the Amphora legal act form header. In the list, correct actions are marked in green and deficiencies in red.
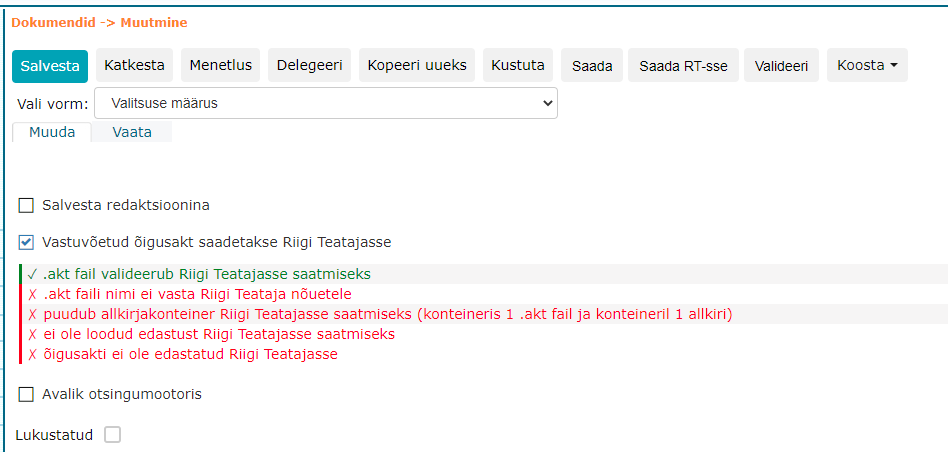 When generating a legal act from a draft, all points are initially red because the legal act doesn't have a number yet. After saving the legal act, the first point turns green if the .akt file validates. Next, you should change the .akt file name to comply with State Gazette requirements (the Change file name link offers suitable variants; after changing the file name, the second point turns green). Then you can send the pdf file to the senior manager for signing. Then you need to sign the .akt file for sending to the State Gazette (New signature file). Now the document has two signature containers and the third point is green. Then click the Send to SG button in the legal act form header. This creates a communication and asks whether to send immediately or later. When sending immediately, the signature container with the .akt file is transmitted via DHX to the State Gazette. When choosing Send later, sending doesn't occur and you need to click Send or Send to SG later in the legal act form header (both send).
Longer description of the stages of the list displayed in the legal act form header:
1) .akt file structure must comply with State Gazette requirements. This checks the .akt file XML structure compliance with the State Gazette schema. All validation errors are also displayed under this stage when clicking on the stage title. The errors are in English, but by reading carefully, you can see which XML element has the problem. If you can't understand the error precisely, you can always contact our customer support.
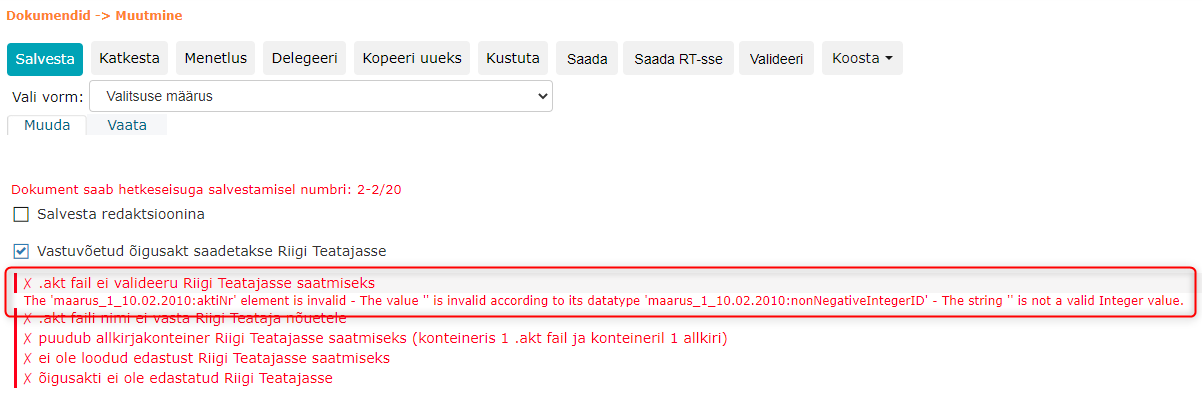 The first point is red before the legal act's first save because then the legal act doesn't have a number yet. If the legal act is saved (and received a number) and the first point is still red, click on the stage title to see what error is still preventing the .akt file from validating.
2) .akt file name must comply with State Gazette requirements. This checks the main file name. The name format requirements are specified in the regulation Procedure for submitting local government unit acts for publication in the State Gazette. To change the file name, click the Change file name link next to the main file. In the opened dialog box, change the name to comply with State Gazette requirements. Amphora generates suggestions compliant with SG requirements for what the file name could be. If one of the suggestions fits, click on it and the desired name is entered in the file name field. Then click the Change file name button.
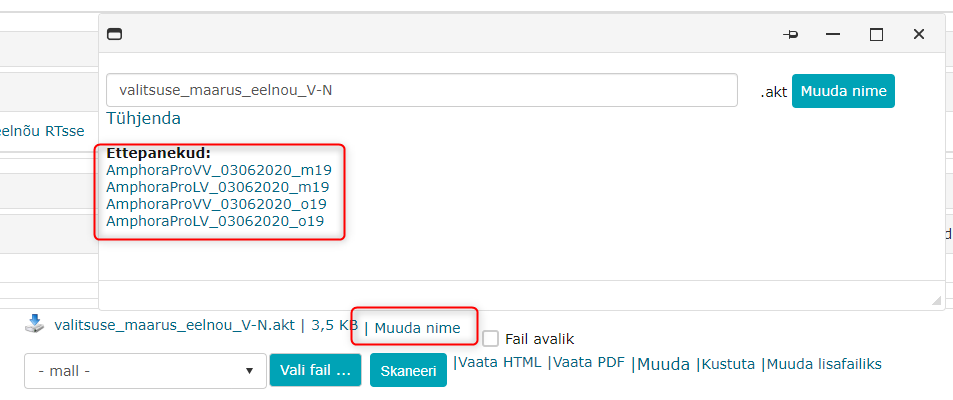 After changing the .akt file name with the Change file name link to comply with State Gazette requirements, you can send the pdf file to the senior manager for signing. Then you need to sign the .akt file for sending to the State Gazette (New signature file).
3) Signature container check. A signed .akt file must be sent to the State Gazette. The signature container must have only one signature and the container may contain only one .akt extension file. This stage also checks the file name once more.
After signing the correctly named .akt file, the legal act document should have two signature containers (pdf with senior manager's signature and container with akt file signed by State Gazette submitter) and the third stage should be green.
4) Communication existence. Amphora checks whether the document already has a communication to the State Gazette.
To automatically create a communication, click the Send to SG button in the legal act form header. This creates a communication and asks whether to send immediately or later. When sending immediately, the signature container with the .akt file is transmitted via DHX to the State Gazette. When choosing Send later, sending doesn't occur, the communication stage turns green, and the last stage remains red.
5) Legal act successfully sent to State Gazette. Turns green when the communication panel shows status Sent.
If Send later was chosen in the previous stage, then to send later, click Send or Send to SG later in the legal act form header (both initiate communication to the State Gazette).
Sending Legal Act to State Gazette
When the legal act .akt file is prepared and signed (first three stages are green), the signature container can be transmitted to the State Gazette in two ways:
1) Use the Send to SG button. After clicking the button, signature container validation occurs in the background, a communication to the State Gazette is automatically created, and a confirmation window opens asking whether to send immediately or later. Clicking Send immediately initiates sending to the State Gazette. Clicking Send later doesn't initiate sending. To send later, click Send or Send to SG later in the legal act form header (both initiate communication to the State Gazette).
2) Manually create a communication to the State Gazette and then click the Send button. This is the usual way to send letters also through the Letter form. When adding manually, you should definitely select the correct signature container for sending using the option Send only currently selected files, as by default the communication has the option Send all future added files and signature container enabled. So you need to be careful not to add multiple signature containers to the communication.
Upon successful sending, the communication panel displays status Sent and in the validation list, all stages are also correct, i.e., green. The status doesn't immediately change to Sent, but first shows Sending. Sending status means that the document is being sent in the DHX module (similar to a document sent via DHX).
To ensure that the legal act was sent to the State Gazette, go to the DHX module and check the sending status.
 ***
***
Template Elements
Starting from version 13.0.0, new template elements can be used in document form DOCX templates. New template elements can also be used in .akt templates. Additionally, it's possible to add data from an initiating document to a response document template. Previous document form DOCX template functionalities work the same way as before and can be used together with new template elements in the same template.
New Template Elements
New template elements must be manually added when creating templates in the format ::amphora field name::, i.e., the form field amphora field name between colons (two colons before and two colons after). These template elements only work with form fields, so logged-in user data, logged-in user position, etc., cannot be displayed with these template elements. The form field amphora field name can be found in Amphora's internal environment. To do this, go to Admin -> Form Configuration and select the form for which you need to create a template. Each form field has a  icon on the right side that you need to click. Form field settings appear at the top, where each form has an Amp. field name.
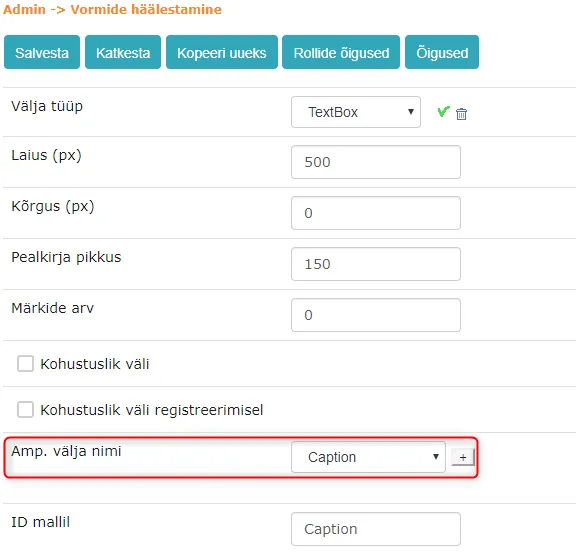 This field's template element is ::Caption::. Template elements are case-sensitive, so you must consider that if there are uppercase and lowercase letters in Amphora field name, then the template must have exactly the same letters.
Important
When adding template elements, you must definitely check that there are no extra colons and the Amphora field name is correct. If the Amphora field name is not correct, Amphora removes this template element and doesn't add anything to the template.
Response Document Template Elements
- A response document can be both a response letter and a draft/legal act created in the VexPro legal acts system.
Response document template elements are completely new functionality that hasn't existed in Amphora before. Now it's possible to add data from an initiating document to a response document template using new template elements.
New template elements look like this - ::source.amphora field name::. So if Amphora field name is Caption, then the template element should look like this - ::source.Caption::
Example:
A SPOKU application comes in and an official needs to prepare a response document. It's possible to add template elements to the response document template that automatically carry data from the Spoku application form to the response document template, without the official having to copy or write anything themselves.
In addition to the response letter template, it's possible to add, for example, the sent initiating letter's date (Your date).
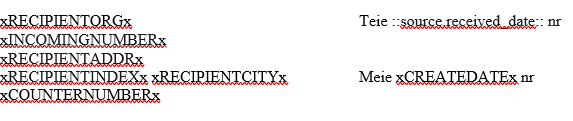
.akt Template Template Elements
Template elements can now be added to .akt templates. Here you can use both existing document template elements and response document template elements. Only these new template elements work in .akt templates (previous DOCX template elements don't work).
The .akt template file must be downloaded to your computer and opened with a text editor (we recommend using Notepad++). Between the HTML tag
 When the desired template elements are added, save the file and upload it back to Amphora (Admin -> Templates).
Amphora VexPro Legal Acts System Quick Guides
Quick Guide for Draft Submitter
-
Documents -> Load New -> document loading form opens (default Simple loading).
-
Select form: e.g., Government Regulation Draft -> .akt file appears above the main file (e.g., government_regulation_draft_viljandi.akt).
-
Select 2-4 Government Legal Act Drafts as catalog, .akt file name (e.g., government_regulation_draft_viljandi) is added to Title and Web Title.
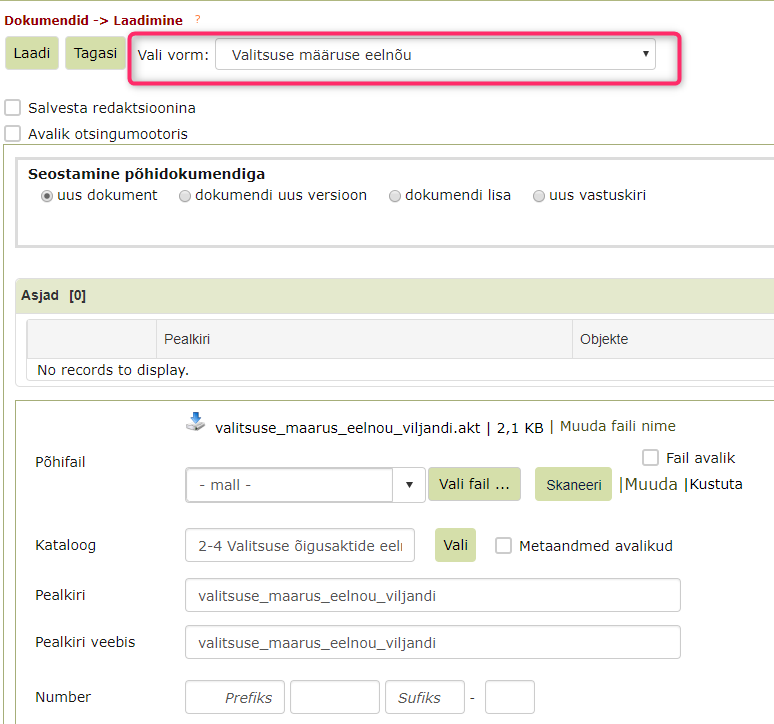 4. Don't touch the main file and catalog (but if you're still testing, select catalog DHX and test folder).
 -
Change draft Title and Web Title (e.g., Project Review Committee Regulation, and if you're still testing, then e.g., government_regulation_draft_viljandi test) and enter Presenter.
-
Only after changing Title and entering presenter click the Load button (because agenda item case is created with the same title and presenter(s)).
-
After clicking the Load button, the draft is saved and an agenda item case is automatically created "around" the draft in the same catalog (e.g., 2-4 Government Legal Act Drafts) with the same title and presenters (i.e., the loaded draft document is inside the created agenda item case).
-
You don't need to do anything more with the agenda item (but if you're still testing, change the agenda item case catalog to DHX and test folder as well).
-
The button bar now has Save instead of the Load button and many more buttons. A Generate Legal Act button appears at the end of the button bar. Don't touch this now.
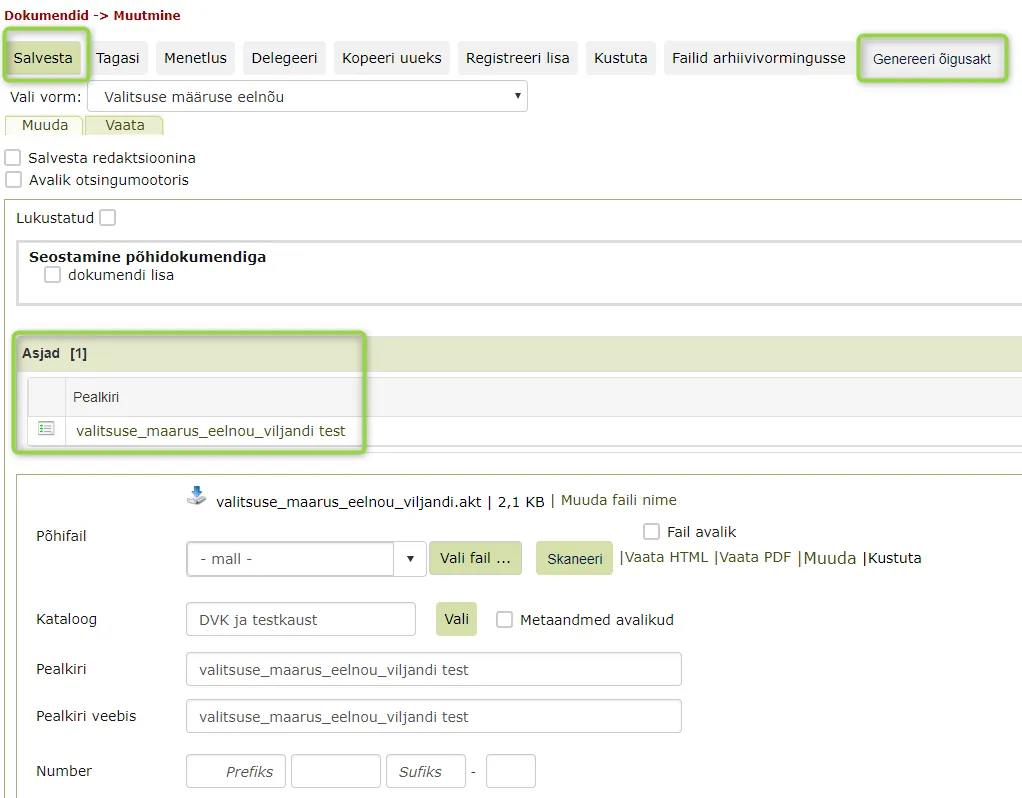 10. View HTML and View PDF options are added to the main file line next to Edit and Delete.
 -
Now you need to enter draft text in VexPro. To do this, click the Edit link on the main file line -> Clicking the Edit link opens the legal act template text in a VexPro window.
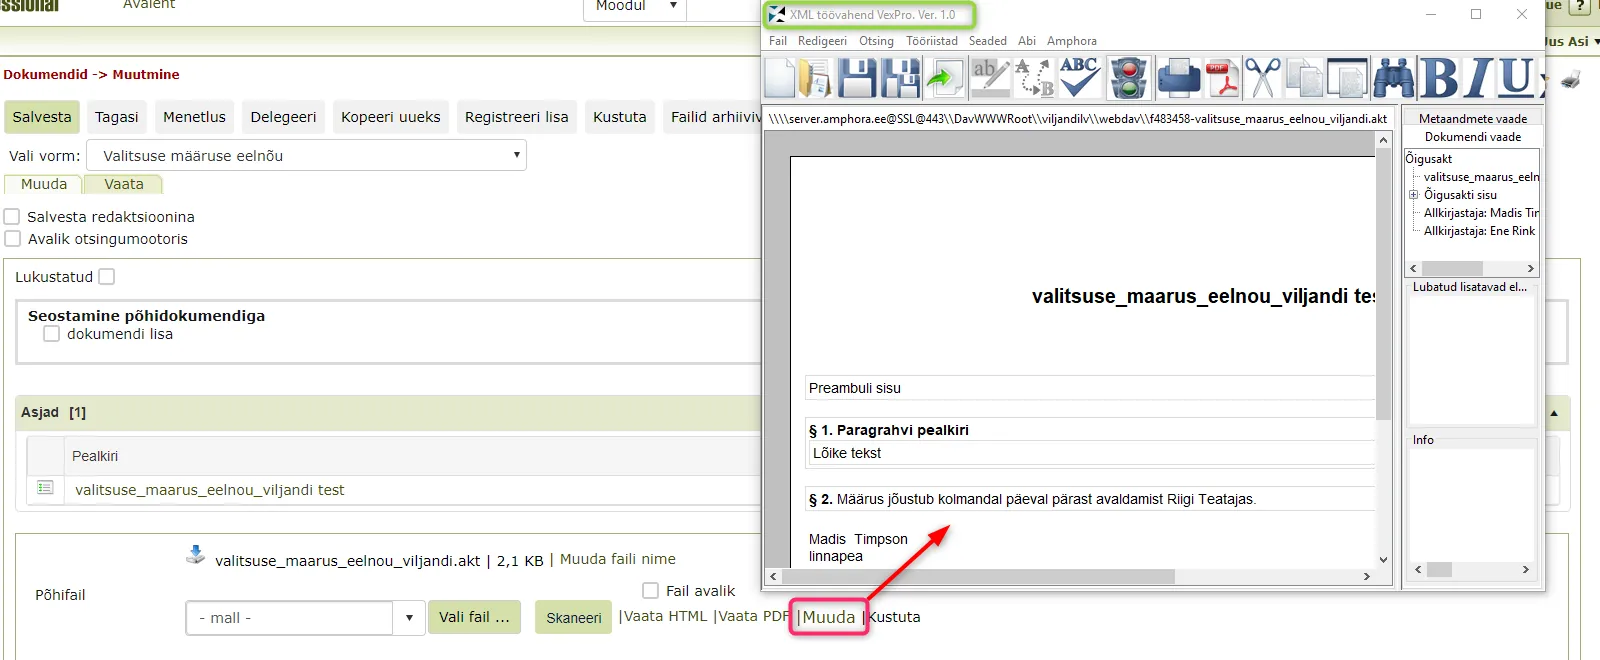 12. In VexPro XML tool, you need to enter draft text on the given template according to VexPro rules. VexPro user guide is available at this link.
 -
When draft text is entered, save changes made in VexPro and close VexPro.
-
After closing VexPro, definitely also click Save in Amphora document view.
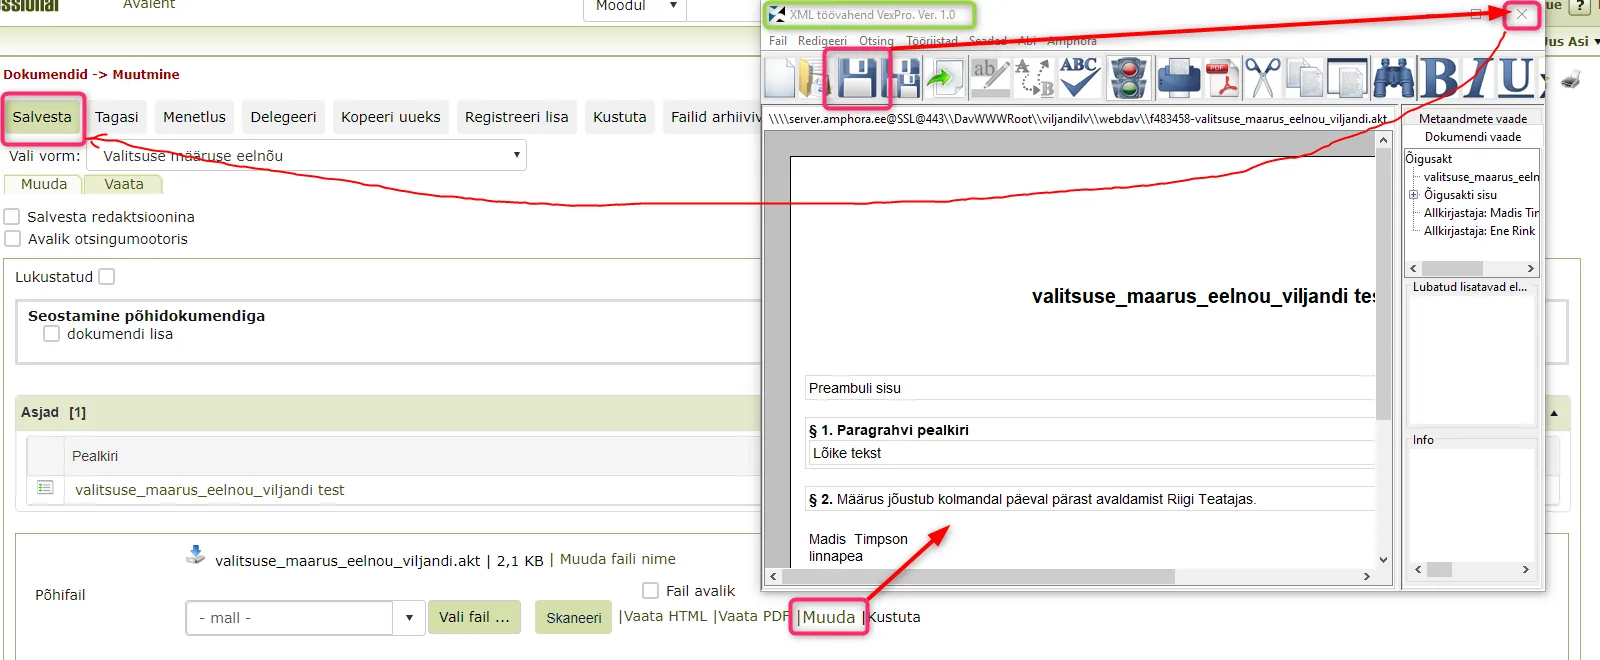 15. When draft text is entered/changed in VexPro and changes are saved in VexPro and Amphora, click View PDF link on the main file line to view the created draft text as a pdf file -> PDF.js viewer window opens. To save the PDF file for yourself, there's a download button at the top:
 16. If the PDF preview shows that something needs to be changed in the draft text, close the PDF preview window and click Edit on the main file line again in Amphora document edit view and make draft text changes in the VexPro window.
 -
If changing in VexPro window doesn't help, you might need to configure the draft print template (contact the main user or as main user contact Amphora customer support).
-
If the PDF preview is suitable, you can optionally download and save the PDF file for yourself (but it's not mandatory since it remains accessible in Amphora), close the PDF preview window, click Save once more in Amphora window just in case (but it's not mandatory if previously saved properly), and continue with other activities (or click Load New to load the next draft).
The current draft will be continued by the draft handler after the city government session with legal act generation.
Quick Guide for Draft Handler
-
Open draft document -> if necessary Edit draft text in VexPro and/or View PDF.
-
Button Generate Legal Act (-> only during testing change Catalog) -> if necessary Change file name and enter-change Number, Date and Effective from (during testing maybe also Title and Web Title).
-
Save legal act document.
-
If necessary Edit legal act text in VexPro -> Save both in VexPro and Amphora.
-
View PDF -> if necessary Edit legal act text in VexPro and/or download PDF.
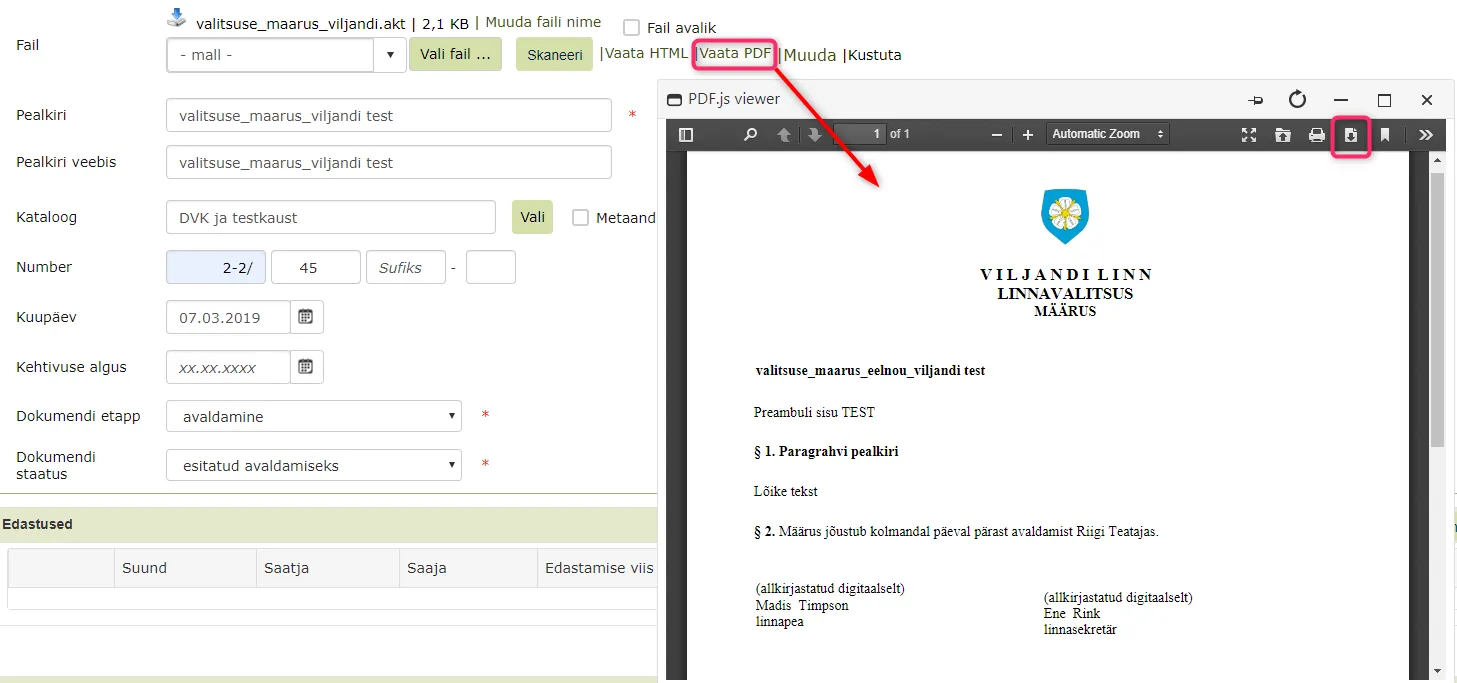 Same in more detail with pictures:
 -
Since drafts were already prepared in .akt format, adopted drafts can be easily generated as legal acts. To do this, find the draft in Amphora and open the draft edit view (e.g., Documents -> folder 2-4 Government Legal Act Drafts (but if you're still testing, then folder DHX and test folder) -> click on draft name -> draft document edit form opens).
-
If it was decided at the session to make changes to the draft text, then depending on internal work organization, changes to the draft VexPro text may have been made already at the session or you do them now or don't touch the draft text and make changes only to the generated legal act text. If necessary, you can now make changes to the draft VexPro text with the Edit link or view the draft text with View HTML and View PDF links.
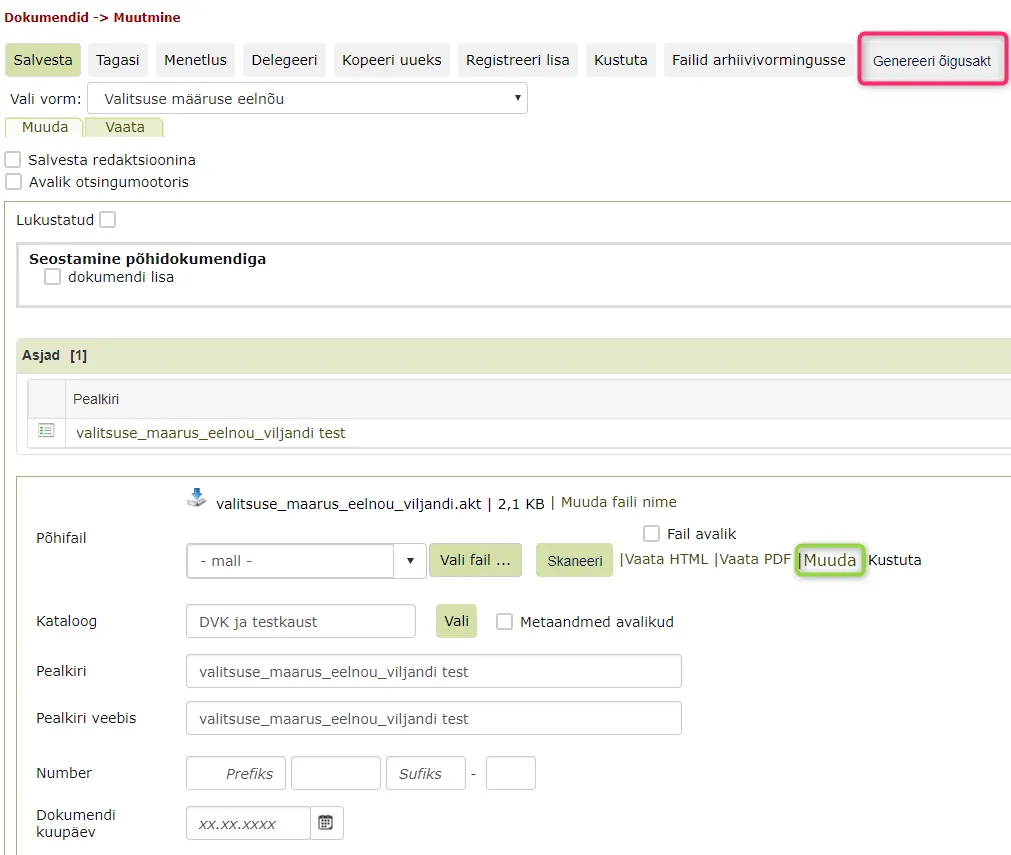 3. To create a legal act from the draft, click the last button Generate Legal Act in the top button bar -> Amphora automatically creates a new legal act document where necessary fields are automatically transferred from the draft form.
 -
A legal act form (e.g., Government Regulation) is automatically selected for the new legal act document.
-
The new legal act document is automatically placed inside the draft's agenda item case -> The Agenda item case now has two objects.
-
The new document's .akt file name and content are the same as the draft document had. If necessary, the file name can be changed with the Change file name link (for example, instead of government_regulation_draft_viljandi.akt to government_regulation_viljandi.akt).
 7. Title and Web Title are also automatically filled with draft data and can be changed.
 -
Catalog is automatically selected as legal act catalog (e.g., 2-2 Government Regulations) and don't touch it (but if you're still testing, select catalog DHX and test folder).
-
According to institution settings, legal act Number either appears automatically from counter or fill manually.
-
You also need to add legal act adoption Date and if necessary Effective from (but if date and effective from are already entered for the draft, they are also transferred to the legal act).
-
Document stage is automatically set to publication.
-
Document status is automatically set to submitted for publication.
-
When legal act metadata is reviewed and correct, click Save button.
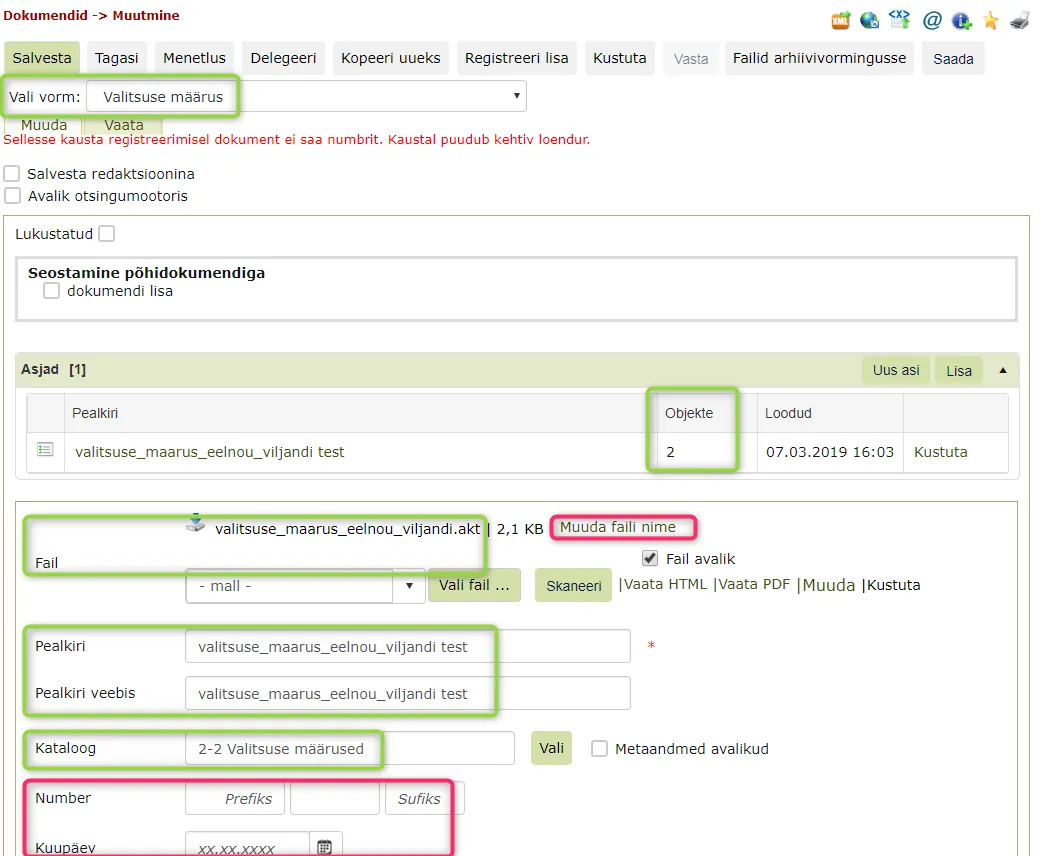 14. You can change legal act VexPro text both before and after saving with the Edit link.
 -
When changing legal act text in VexPro XML tool, VexPro user guide at this link may be helpful if needed.
-
After changing text in VexPro, save the made changes and close VexPro.
-
After closing VexPro, definitely also click Save in Amphora document view.
-
You can view and download legal act PDF file with the View PDF link -> PDF.js viewer window opens. To save the PDF file for yourself, there's a download button at the top.
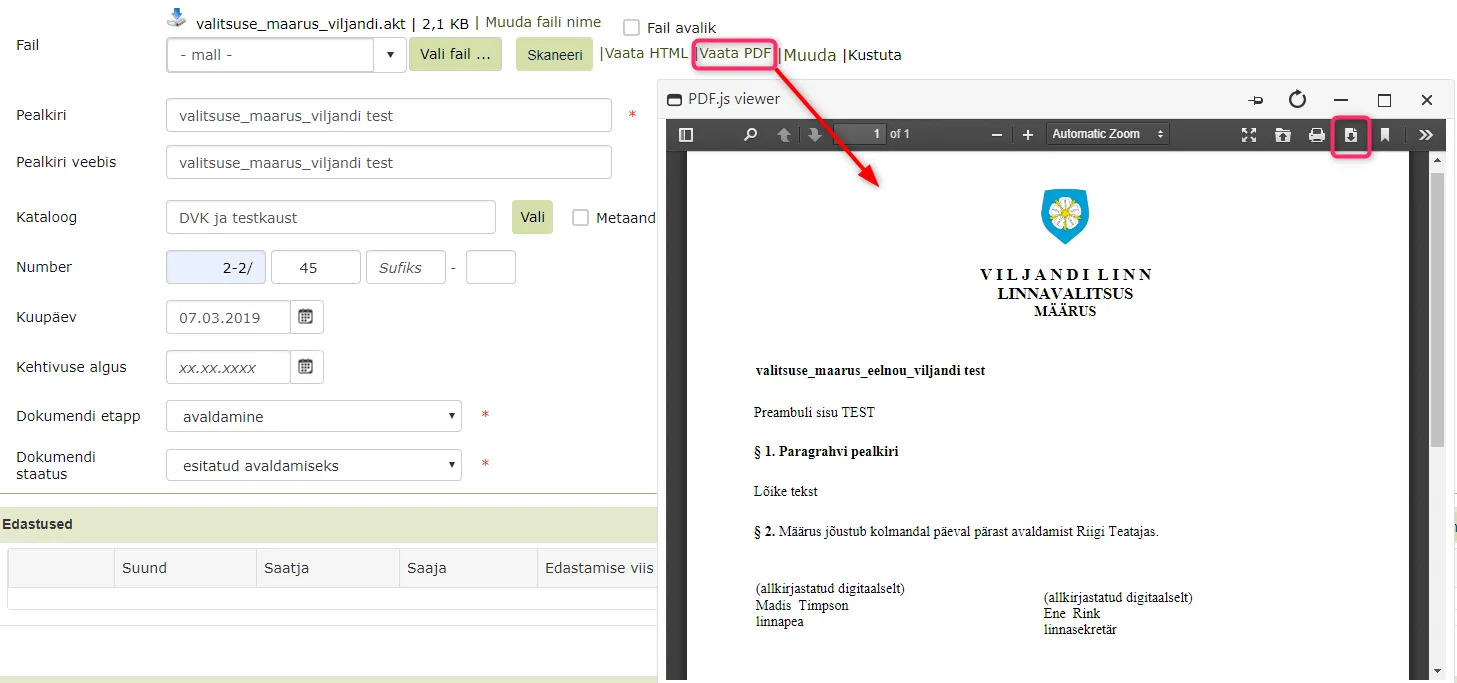 19. If the PDF preview shows that something needs to be changed in the legal act text, close the PDF preview window and click Edit on the main file line again in Amphora document edit view and make legal act text changes in the VexPro window.
 -
If changing in VexPro window doesn't help, you might need to configure the draft print template (contact the main user or as main user contact Amphora customer support).
-
If the PDF preview is suitable, you can optionally download and save the PDF file for yourself (but it's not mandatory since it remains accessible in Amphora), close the PDF preview window, click Save once more in Amphora window just in case (but it's not mandatory if previously saved properly), and continue with other activities (e.g., send legal act for signing).
Last modified: 24 October 2026, 11:09:12