Email Templates
- Introduction
- Remember!
- Example of Using Email Template
- Creating Email Template
- Using Form Fields in Template
- Loading Created XSLT File into Amphora
- Potential Problems and Solutions
- Template Examples
Introduction
Email template functionality allows you to configure default email content by form. This functionality is useful when similar content emails need to be sent frequently and the content creation uses fields from the form. Email templates can use all possible elements, such as tables, images, different fonts, etc., everything that the Amphora HTML text editor allows.
Multiple email templates can be configured for one form. Additionally, it is possible to configure separate attachment formatting.
Remember!
- Email templates work only when sending via the @ symbol
- It is not practical to use email templates with the "Letter" form
- If you cannot create the template yourself, you can contact Amphora customer support at help@amphora.ee
Example of Using Email Template
An organization constantly sends out contracts via email. To avoid having to fill in the email content continuously, the organization uses an email template on the "Contract Loading" form.
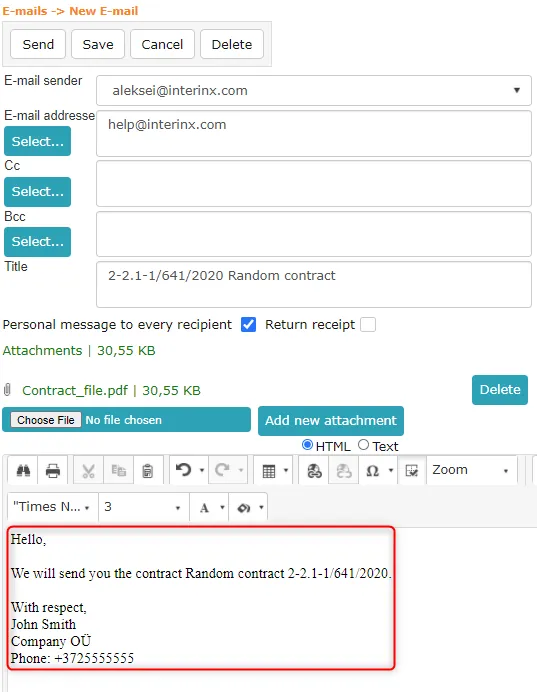
The email content is as follows:
Hello,

We are sending you the contract <contract_title> <contract_number>.

Best regards,
Tõnu Tõukeratas
Organization Ltd
Tel: +3725555555
Sending such an email in Amphora works as follows:
1) The user opens the document and verifies the correctness of the data. 2) The user clicks the @ symbol located at the top left in the document editing view.
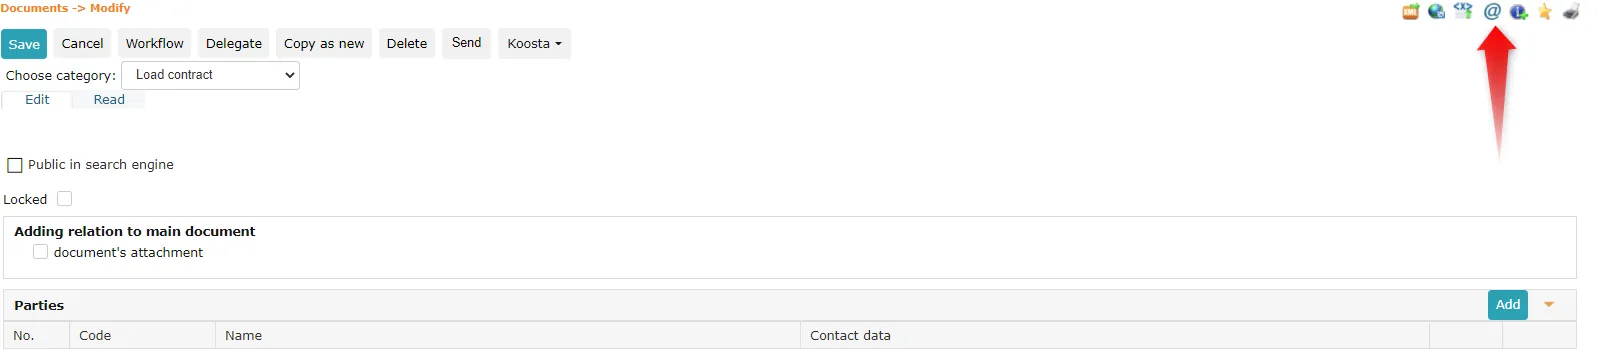 3) The email sending view opens, where the HTML text editor is automatically filled by the email template.
 ***
***
Creating Email Template
An email template is an XSLT stylesheet into which HTML code is written. This same HTML code is ultimately displayed as the email content. Creating a template requires at least basic knowledge of HTML. If skills are insufficient, you can contact Amphora customer support with a configuration request.
Template creation should start by downloading the template base from Amphora's public view. Then the file should be opened in a text editor. To make it easier to follow the activity, it is recommended to use a text editor that recognizes HTML elements, such as Notepad++.
Opening the template base reveals the following view:
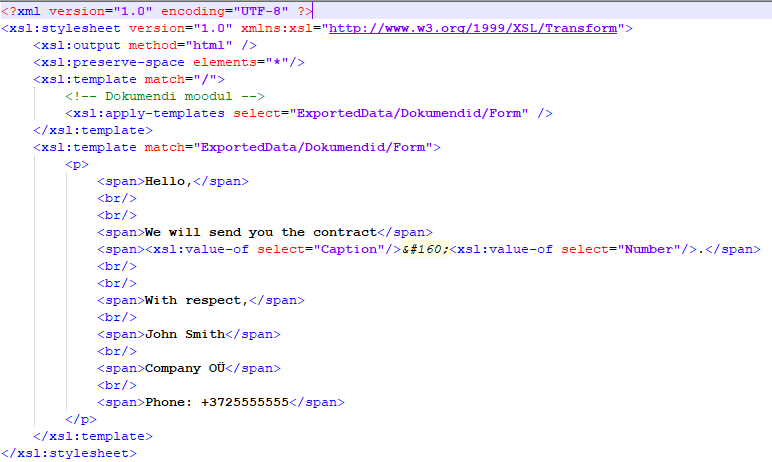 The letter content must be formatted within the area indicated by the red box. Nothing else should be changed. Within the area, HTML code can be used completely freely, for example, adding tables or changing font styles.
NB!
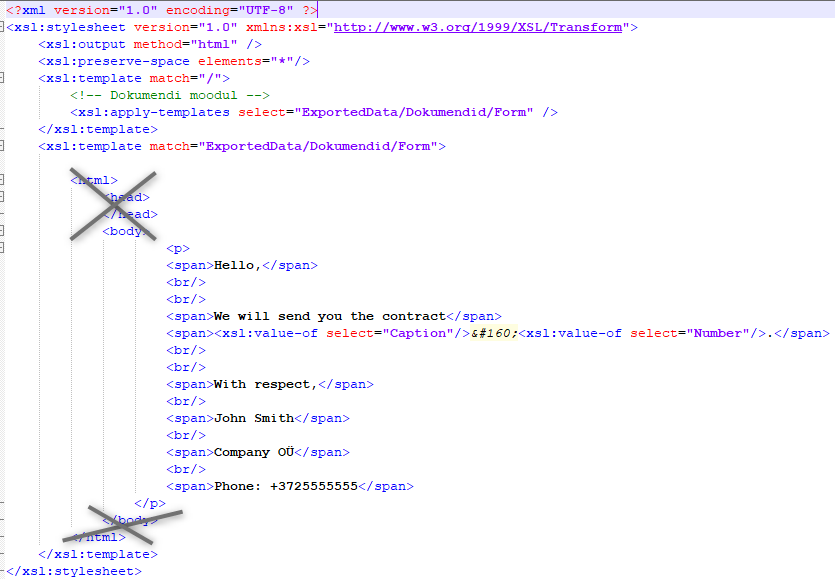
All code written to the indicated area automatically goes inside the
element, so you must not add your created code inside the element.Example of how not to do it:
 ***
***
Using Form Fields in Template
It is possible to use the content of the sent document's fields in the email content. For example, document title, number, etc. This can be added using the following code construction:
<xsl:value-of select="Caption"/>
Only the part marked in red needs to be changed. In this case, instead of "Caption", the desired Amphora form field name should be added. Predefined field names are as follows:
- Caption - document title
- PublicTitle – document title on the web
- Number – document number
- Document_date – document date
- RegisterTime – registration date
- Limitation/CommentDate - access restriction start
- Limitation/LimitDeadline - access restriction end
- Limitation/LimitCause - access restriction basis
Additionally, it is possible to use self-added form fields using the form field's Amp. field name, which can be found under Admin -> Form Settings. You need to open the desired form and click on the wrench next to the form element. A view appears at the top of the screen where you can see the Amp. field name of the given form element.
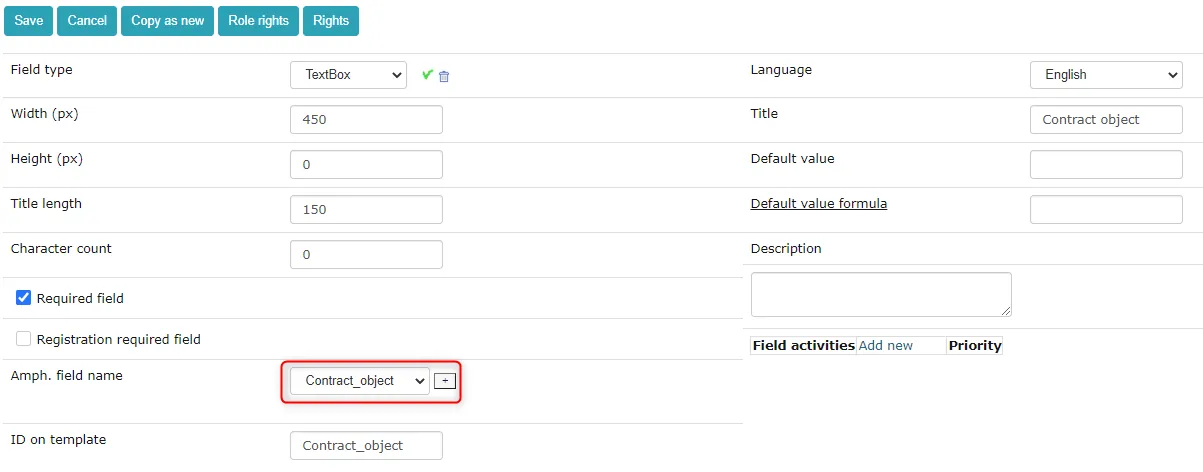 ***
***
Loading Created XSLT File into Amphora
When the template is created, the XSLT file needs to be loaded into Amphora. To do this, you need to go to Admin -> Form Settings and select the correct form. When opening the form, you need to click the "Print Forms" button (located at the top right).

 1. The created XSLT file should be loaded here.
2. The name can be written arbitrarily, but it's better to simply use "email".
3. Here you need to select HTML.
4. Here you need to select Email (content).
5. For language, we select Estonian.
1. The created XSLT file should be loaded here.
2. The name can be written arbitrarily, but it's better to simply use "email".
3. Here you need to select HTML.
4. Here you need to select Email (content).
5. For language, we select Estonian.
After that, press the OK button and save the form.
Potential Problems and Solutions
Problem: spaces disappear from the template.
Solution: If it turns out that some space is not transferred to the template, then instead of the space, the combination should be used (see example above).
Template Examples
<?xml version="1.0" encoding="UTF-8" ?>
<xsl:stylesheet version="1.0" xmlns:xsl="http://www.w3.org/1999/XSL/Transform">
<xsl:output method="html" />
<xsl:preserve-space elements="*"/>
<xsl:template match="/">
<!-- Document module -->
<xsl:apply-templates select="ExportedData/Dokumendid/Form" />
</xsl:template>
<xsl:template match="ExportedData/Dokumendid/Form">
<p>
<span>Hello,</span>
<br/>
<br/>
<span>We are sending you the contract </span>
<span><xsl:value-of select="Caption"/> <xsl:value-of select="Number"/>.</span>
<br/>
<br/>
<br/>
<span>Best regards,</span>
<br/>
<span>Tõnu Tõukeratas</span>
<br/>
<span>Organization Ltd</span>
<br/>
<span>Tel: +3725555555</span>
</p>
</xsl:template>
</xsl:stylesheet>
NB!
The XSLT template file example can be downloaded HERE.
Last modified: 17 October 2026, 09:18:57