Directories
- Catalogs Overview
- Creating a New Unit
- Adding a New Catalog a. Modules b. Default Restrictions c. Info Presentation d. Retention Schedule e. Rights f. Catalog Filters g. Notifications
- Operations with Catalogs a. Catalog Search b. Moving Catalog in Catalog Tree c. Catalog Deletion d. Catalog Data Modification e. Making Catalog Public f. Making Catalog Inactive
- Counters a. Adding Counter to Catalog b. Counter Assignment Reminder c. Setting Up New Administrative Period or Resetting Counters d. Setting Up Response Letter Counter e. Counter Deletion f. Counter Rollback g. Possible Problems with Counters
In the Directories view you can create catalogs (functions and series) and assign registries, i.e., counters to them. You can also modify existing catalog information, restructure existing catalogs, and move documents from one catalog to another.
Catalogs Overview
The Admin -> Directories overview consists of two parts. When you select a catalog from the catalog tree (1), information about that catalog is displayed on the right (2). All catalog properties on the right side (2) can be modified by clicking the Edit button.
A new catalog can be created by clicking the Create folder button. The Create folder button is active when a unit or another catalog is selected in the catalog tree.
The Create division button creates a new unit for the organization (in the illustration, the unit AmphoraPro is shown with a house icon). Delete deletes the catalog. All counters displays all catalogs in the environment where counters have been configured. Import allows importing catalogs into the Amphora environment. See also the export guide.
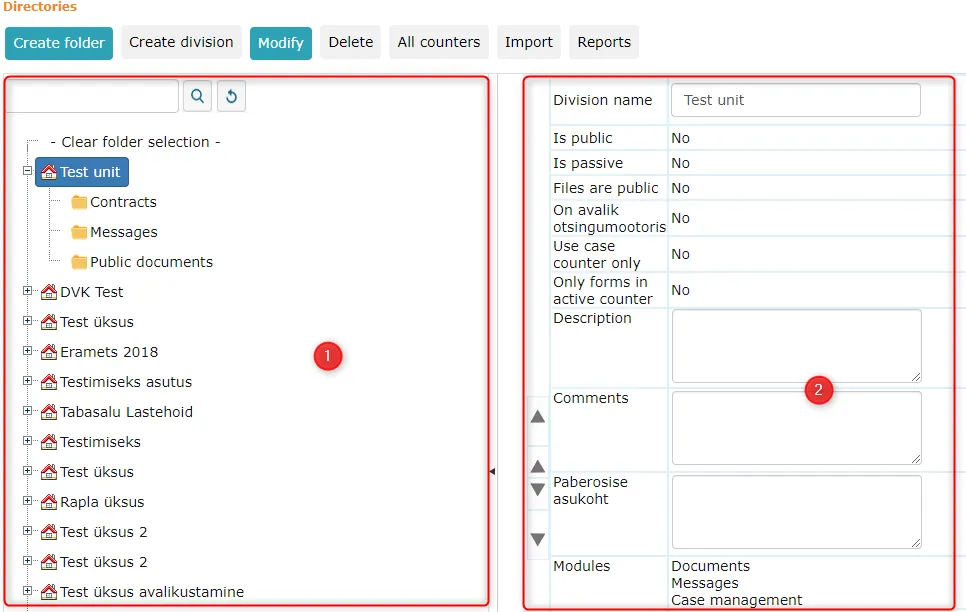
Counter-related data is also displayed in the catalog preview. The counter preview shows the full number (including the year if it is part of the counter).
NB!
When modifying a catalog or unit (Admin -> Directories), Amphora adds system logs. These logs are visible under Admin -> General Settings -> Logs (viewing other users' logs requires the user group policy "View other users' logs" to be enabled).
In the Admin module, only those units and catalogs where the user has Administration rights are visible. Units and catalogs with weaker rights (e.g., Read or Modify) are not visible in the Admin module. This applies to the Unit Settings, Users, User Groups, Catalogs views. In other modules (e.g., Documents, Case View), rights continue to work as before.
Creating a New Unit
The unit icon in the classification scheme is a house with a red roof  . All users and user groups that belong to the unit can be assigned to it; rights are also defined here.
To create a unit, open the Directories form from the Admin module submenu. Click the Create division button. Since creating a unit works similarly to creating a catalog, refer to the next topic: adding a new catalog. The only difference compared to creating a catalog is that the Create division button is active when no other unit or catalog is selected in the catalog tree.
It is very important to fill in the Email field (the organization's general email address where information requests will be received) and the Associated Organization field (the organization for which the unit is being created). This organization may not exist yet, so you should read the organization addition guide. Both fields are mandatory when adding a new unit and when modifying an existing one.
Public Catalog is needed for the organization to be visible in the public view.
To save the new unit, click the Save button. The Cancel button cancels the action.
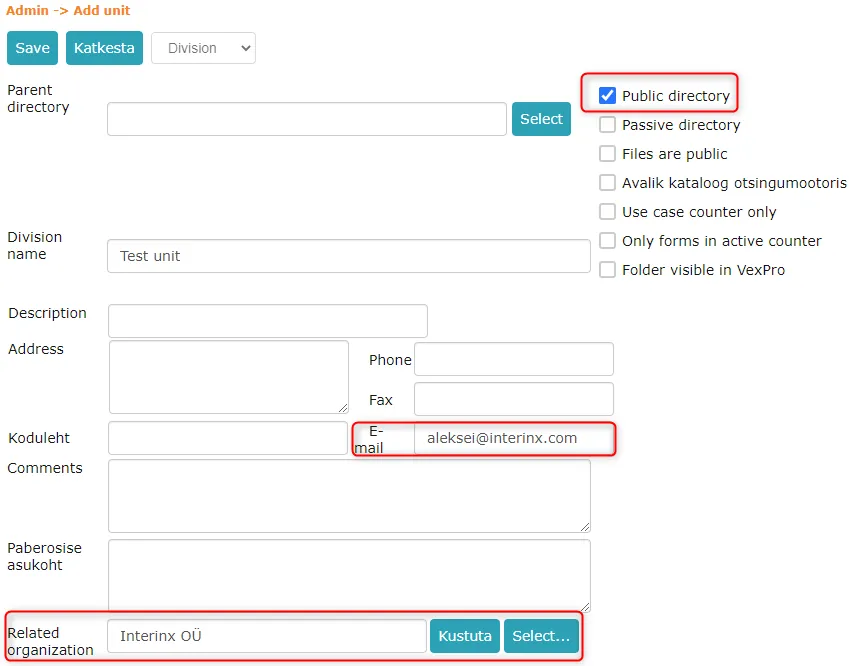
Important
It is not recommended to add units under other units.
Adding a New Catalog
To create a new catalog, open the Directories form from the Admin module submenu. Then click the Create folder button. The Add Catalog form opens.
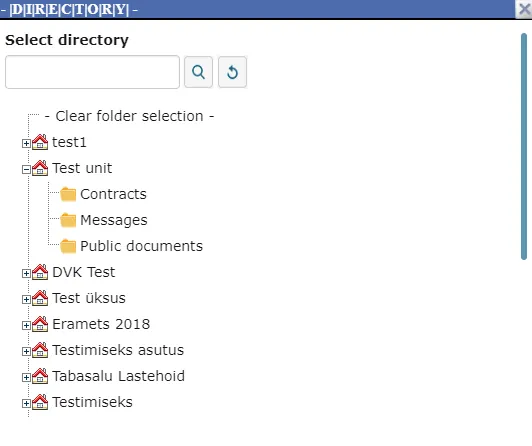
Select the parent catalog under which the new catalog should be placed by clicking the Select button after the Parent Catalog field (1). A window opens |C|A|T|A|L|O|G|. Select a catalog from the catalog tree by clicking on the catalog name.
 Enter the series designation and name (in the Directory name field) (2) and, if desired, comments about the catalog being created (in the Comments field) (3).
Important
By default, you can select the parent catalog by clicking on the desired catalog name in the Directories view (the name turns blue), and then clicking the Create folder button.
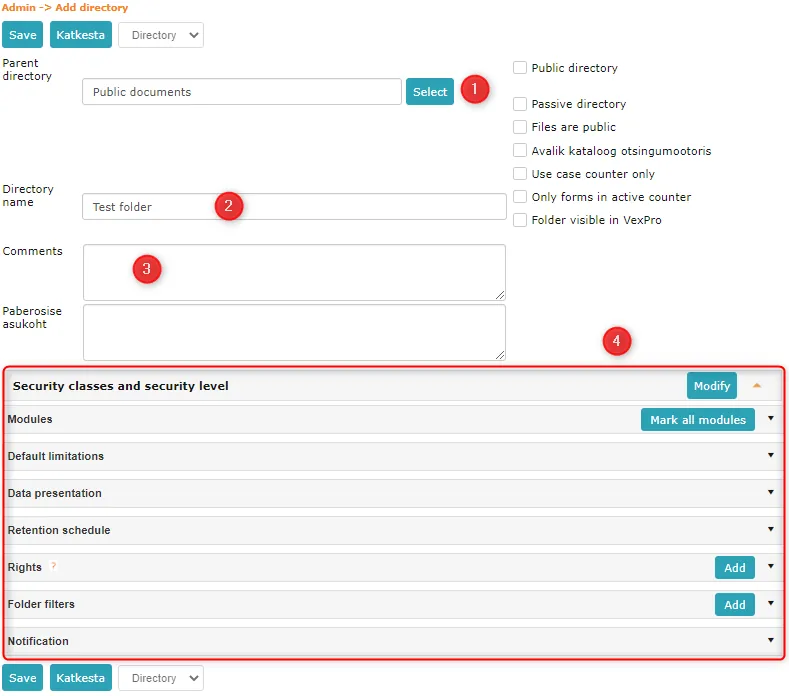 The following settings can be configured for the new catalog (4):
- Set security class and security level (panel Security Classes and Security Level)
- Choose which modules the catalog should be visible in (panel Modules)
- Configure default restrictions (panel Default Restrictions)
- Configure document or message presentation (panel Info Presentation)
- Configure retention schedule (panel Retention Schedule)
- Assign rights to the catalog (panel Rights)
- Add catalog filters (panel Catalog Filters)
- Subscribe to notifications about changes in the catalog (panel Notifications)
To save the new catalog, click the Save button. The Cancel button cancels the action.
Important
A counter can be added to a catalog only after saving; it is not possible to assign a counter immediately on first view.
Security Classes and Security Level
Important
The security class is assigned to the unit and by default applies to all sub-units. The setting can be changed individually for each series!
On the Security Classes and Security Level panel, click Edit. In the opened view, make the appropriate selection and click Save.
Modules
In the Modules panel, you can select the modules where the catalog is displayed. To configure the Modules panel, open the Directories form from the Admin module submenu.
Find the catalog for which you want to configure modules and click the Edit button.
Go to the Modules panel. Select the modules where the catalog should be visible by checking the checkbox in front of the corresponding module.
To select all modules, click the Mark All Modules button. Click the Save button. The Cancel button cancels the action.
Default Restrictions
To add default restrictions to a catalog, open Admin -> Directories, select the catalog, and click Edit.
In the opened view, enable the default restriction for the appropriate modules (on the Default Restrictions panel) and select the access restriction basis and restriction validity period from the dropdown.
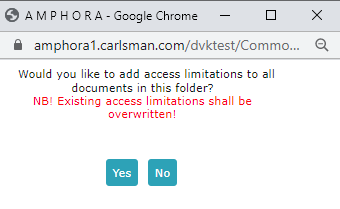
At the moment of saving, a pop-up window appears asking whether to add the selected restriction to all documents or letters in the catalog.
Important
If the pop-up window does not open, you need to enable pop-up windows in your web browser!
If you answer yes, old restrictions are overwritten; if you answer no, the default restriction is added only to new objects.
 ***
***
Info Presentation
Open the Directories form from the Admin module submenu. Select the catalog to configure and click on the catalog name. Then click the Edit button. The Edit Catalog Info form opens.
Go to the Info Presentation panel. To configure info presentation, check the Use Info Presentation box. If the checkbox is removed, the default fields are shown (number, title, status, date).
Select the module whose info presentation you want to configure from the dropdown.
Important
Currently, info presentation should only be used for the Correspondence module! For document and case catalogs, use the info presentation located in the Admin module.
To select forms that the system should show for the selected module, click the Select button after the Select Forms field. The Select Forms form opens.
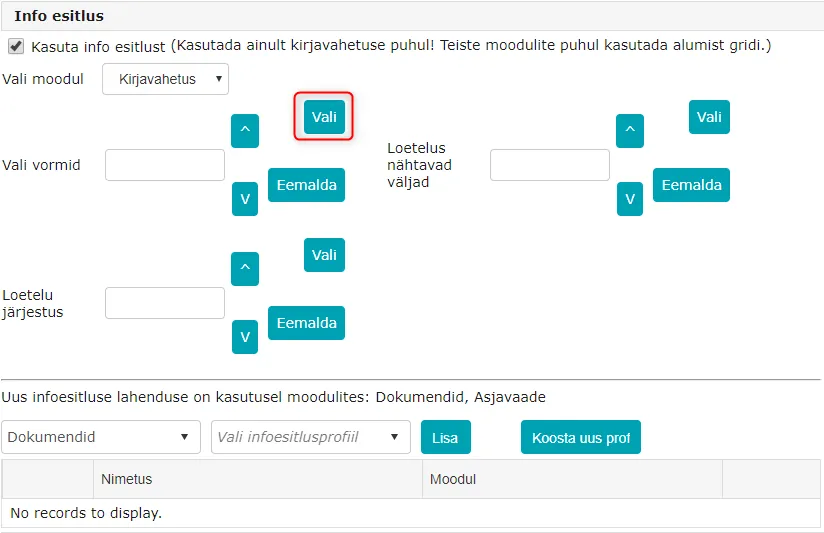 Select the necessary actions by clicking on the action and then the > button. When actions are selected, click the Save button.
Similarly to the form selection, select the fields visible in the list and the list order (e.g., select document number, choose ascending or descending order, and click the Save button).
The system sorts documents in the catalog by document number in ascending or descending order.
To remove selected actions, click on the action to be removed and then the Remove button. To save changes, click the Save button.
Retention Schedule
Document retention periods are set in the classification unit (usually series) data. The retention period and archival value set in the series data apply by default to open cases in that series.
The retention period and archival value can be further specified in the case data if needed.
To set the retention period, open the Directories view from the Admin module. Then select the appropriate classification unit by clicking on its name and then clicking the Edit button.
In the opened view, open the Retention Schedule panel. Here you can set the desired criteria.
You can also copy the Retention Schedule settings from an existing catalog by clicking the <- Copy settings from folder button.
When the desired settings are made, click the Save button.
If a retention schedule has been set for series, it extends by default to cases as well. Changes can be made in the case view.
Rights
Open the Directories form from the Admin module submenu. Select the catalog to which you want to assign rights and click the Edit button.
Go to the Rights panel. Click the Add button there. A form opens where you can select users/user groups to assign rights to for this catalog.
Select a user/user group by clicking on the selected name and then the > button.
To remove a selected user/user group, click on the name of the user/user group to be removed in the Selected box and then the < button.
When the selection is made, click the Save button.
In the Add Catalog view, the units/persons who have been assigned rights are now visible. Read more about rights definitions.
If a user belongs to two groups and both groups are assigned rights for the given catalog, the strongest right applies when rights differ (the strongest is the forbidden right with strength level 6).
To delete a user or user group from the list, click the orange cross at the end of the rights row. To save changes, click the Save button. The Cancel button cancels the action.
NB!
When creating a new catalog/unit, the creator has administration rights for only 24 hours. After that, this right is automatically removed and rights must be added manually.
Catalog Filters
See catalog filters under Personal Settings.
Notifications
Open the Directories form from the Admin module submenu. Select the catalog for which you want to send information to desired user(s) and click the Edit button.
Go to the Notifications panel. Click the Select button after the Persons who subscribed to info field. The Select Persons form opens.
Select the desired users by clicking on the user name and then the > button.
To remove a selected user, go to the Selected box, click on the name of the user to be removed, and then the < button.
To save, click the Save button. The Cancel button cancels the action.
Operations with Catalogs
Catalog Search
Open the Directories form from the Admin module submenu.
If you know the name of the catalog you're looking for, there are two ways to find it:
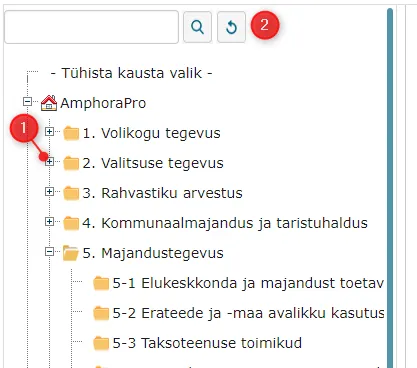
- Search for the catalog in the catalog tree by clicking the + sign in front of parent catalogs to open subcatalogs. When the searched catalog is found, click on the catalog name with the mouse to perform necessary actions;
- Search for the catalog using the search field above the catalog tree. Enter the name of the catalog you're looking for in the search field and then click the first button to the right of the field (filter button). The system displays all catalogs whose names contain the word entered in the search field. Select the catalog you were looking for by clicking on the catalog name.
 ***
***
Moving Catalog in Catalog Tree
Open the Directories form from the Admin module submenu.
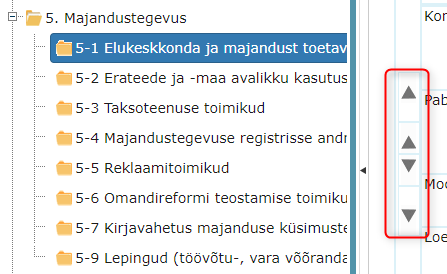
Find the catalog you want to move in the catalog tree and click on the catalog name with the mouse. On the right side of the catalog tree, where catalog data is also displayed, there are arrows in the first column.
By clicking on these arrows, you can move the catalog to first, one position up, one position down, or last in the parent catalog.
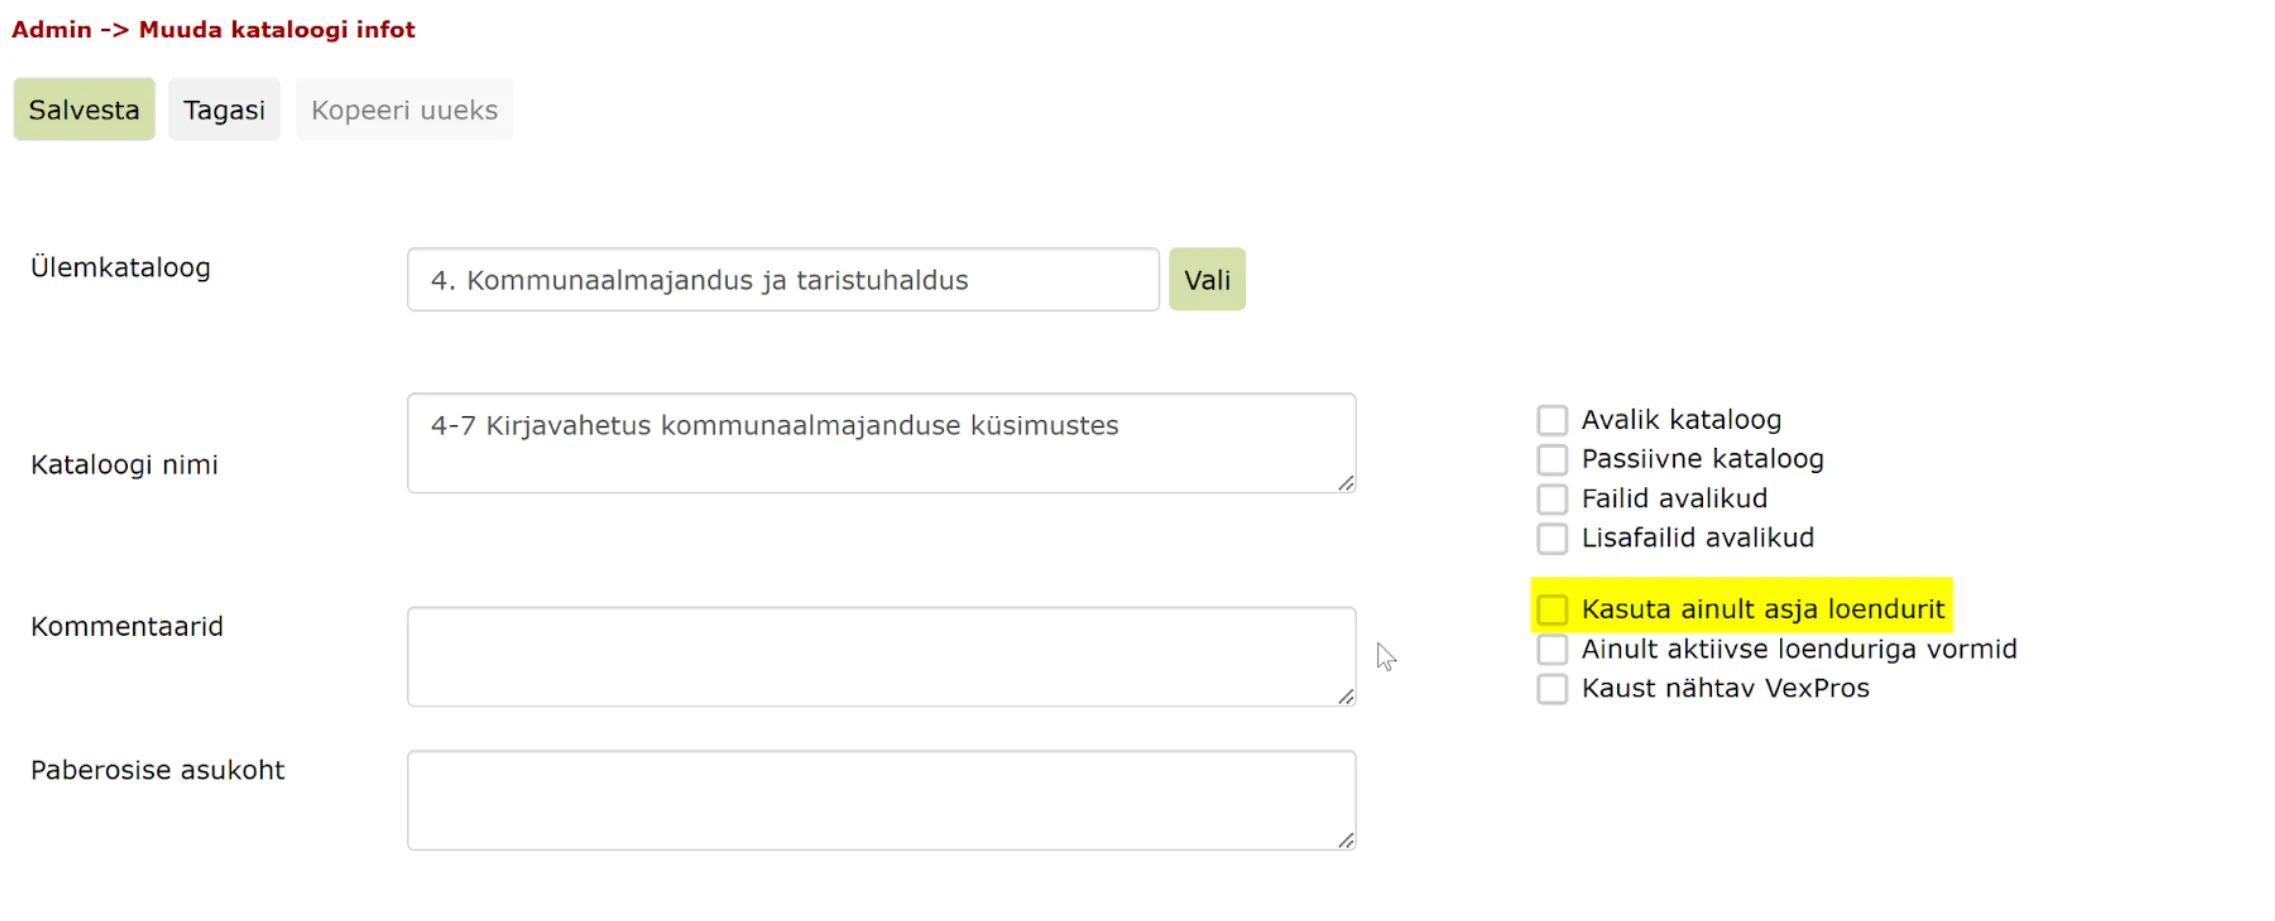
Moving under another parent catalog. A catalog can also be moved under another parent: select the catalog, press Muuda (Edit), choose the new parent in the Ülemkataloog (Parent catalog) field with Vali (Choose) and press Salvesta (Save).
NB!
A catalog cannot be placed under itself or under one of its own subcatalogs. The page then shows "Kataloog ei saa olla ise enda ülemkataloogiks" or "Kausta ei saa panna tema enda ega tema alamkausta alla!" and the change is not saved. In the older version (2026.09), moving a catalog under its own subcatalog shows no message: Amphora keeps the old parent catalog and saves the other changes. If the catalog is still in its old place after saving, it was not moved.
Catalog Deletion
Open Directories from the Admin module submenu. Then find the catalog you want to delete and click on the catalog name. To delete the catalog, click the Delete button.
Important
Before clicking the delete button, make sure you have selected the correct catalog.
If the catalog contains objects (documents, files, letters), the system will not allow you to delete this catalog. If the catalog is empty but you still get the message "Catalog contains objects. Delete objects first, then the catalog!", there may be objects related to this catalog in the trash, correspondence, or case modules.
If modules are hidden, you must first reactivate them from the catalog settings. After activating modules, delete objects related to the catalog from the respective module (trash, correspondence, or cases) and then try to delete the catalog again.
A case moved to the trash still blocks the catalog deletion. The catalog can be deleted only after the case has also been deleted from the trash.
Catalog Data Modification
Open the Directories form from the Admin module submenu.
Find the catalog whose data you want to modify and click on the catalog name.
To modify data, click the Edit button. The system displays the Edit Catalog Info form.
Make necessary changes and save by clicking the Save button. The Cancel button cancels the action.
Making Catalog Public
Open the Directories form from the Admin module submenu.
Find the catalog you want to make public and click on the catalog name. Then click the Edit button to open the catalog detail info view.
To make metadata in the catalog public, check the Public Catalog box. To make documents (files) in the catalog public, check the Files Public box. Additionally, you can make additional files public by default - for this, add the Additional Files Public checkbox.
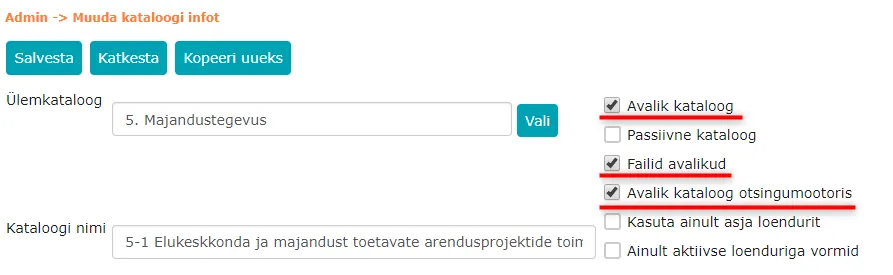 To save changes, click the Save button.
If you make catalog info public when the system has been used and objects have been previously saved to the selected catalog, the system asks at the moment of saving Whether to publicize all documents/messages in the catalog.
Clicking Yes makes all previously entered objects visible in the public view. Clicking No doesn't make previously entered documents public, but only documents entered in the future will be public.
Making Catalog Inactive
An inactive catalog is visible in the list view but you cannot add new objects to it. Additionally, an inactive catalog is not visible in the Public view (catalog selection in Public view).
Open the Directories form from the Admin module submenu.
Find the catalog you want to make inactive and click on the catalog name. Then click the Edit button to open the Edit Catalog Info form.
To make the catalog inactive, check the Inactive Catalog box. To save changes, click the Save button.
Counters
A counter is a tool that assigns automatic sequential numbers to documents. It ensures that each new document gets a unique registration number according to specified settings. The counter can be configured at the catalog level and by document forms.
Amphora uses 4 types of counters: document counter, case counter, correspondence counter, correspondence general counter. You can read more about their configuration below.
Using a counter helps keep document numbers organized and avoid duplicates.
The catalog counter is configured so that numbers are given only to documents whose form is selected in the counter composition.
Counters are easy to update when the administrative year changes. The guide for this is located here.
Adding Counter to Catalog
Open Directories from the Admin module submenu.
Find the catalog to which you want to add a counter and click on the catalog name. Then click the Edit button. The Edit Catalog Info form opens.
Go to the Counters panel. Click the Add button on the panel. If you want to modify an existing counter, click Edit on the row of the counter with active dates.
From the dropdown on the left, you can select which module forms to display: documents, letters (deprecated module), or case view.
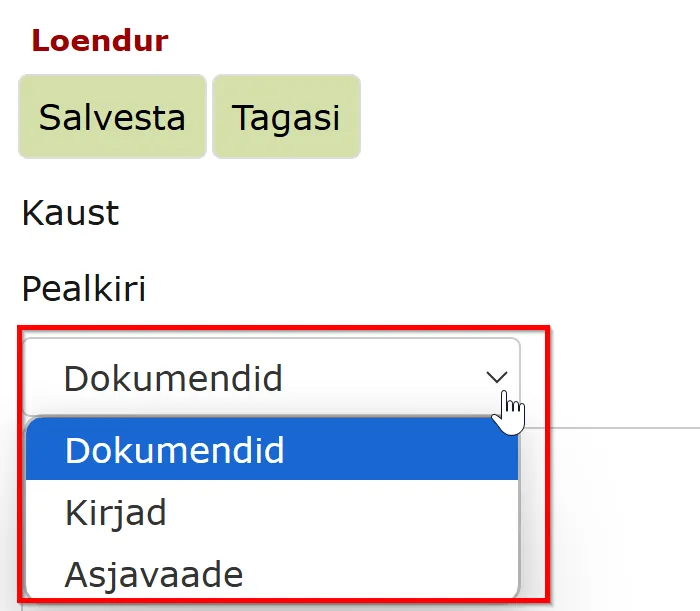
Select forms with which you plan to register documents in this catalog. Click on the form name in the left box and move it to the right box by clicking the > button. The right box shows which forms the counter will give numbers to.
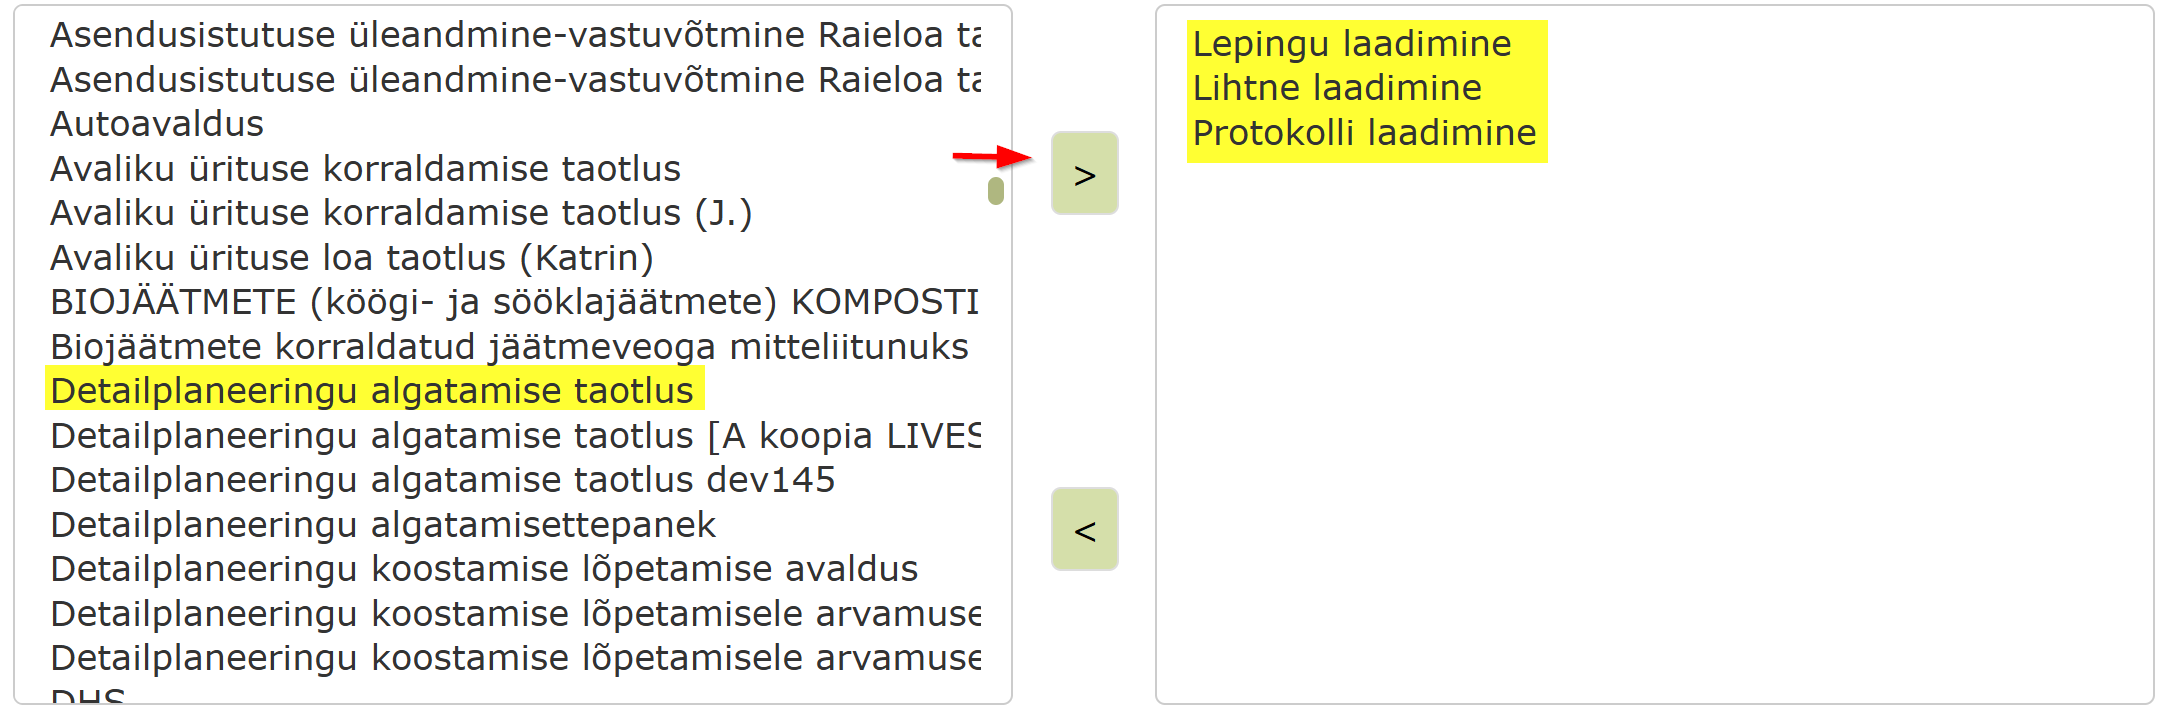 You can remove forms by clicking on the form you want to remove in the right Selected box and then clicking the < button.
You can fill in the following fields according to the counter type:
1)prefix - series designation with slash, optionally you can also add the year (e.g., 3-1/2025, the year updates automatically when copying counters for a new period).
2)value - this displays the last registered document number and the next document gets +1 added to this. When creating a new counter, add 0 as the value. Optionally, you can also add a suffix (e.g., year).
3)Validity period - date range when catalog entries are counted (fields Active from and Active until).
 Suffix – number suffix, combination of letters/numbers. Can be left empty or marked with year. In this case, the document gets the number in registry view: 3-1.4/1/2025. The year added to the suffix updates automatically when copying counters for a new period.
If you check the Consider parent prefixes box, the prefix of the parent catalog is also added to this catalog's prefix.
By checking the Drafts allowed box, in addition to the Save button, a Register button also appears when writing/uploading a document. Counting starts when the Register button is clicked.
Click the Save button. The Back button cancels the action.
Document Counter Configuration
Document counter should be configured as follows:
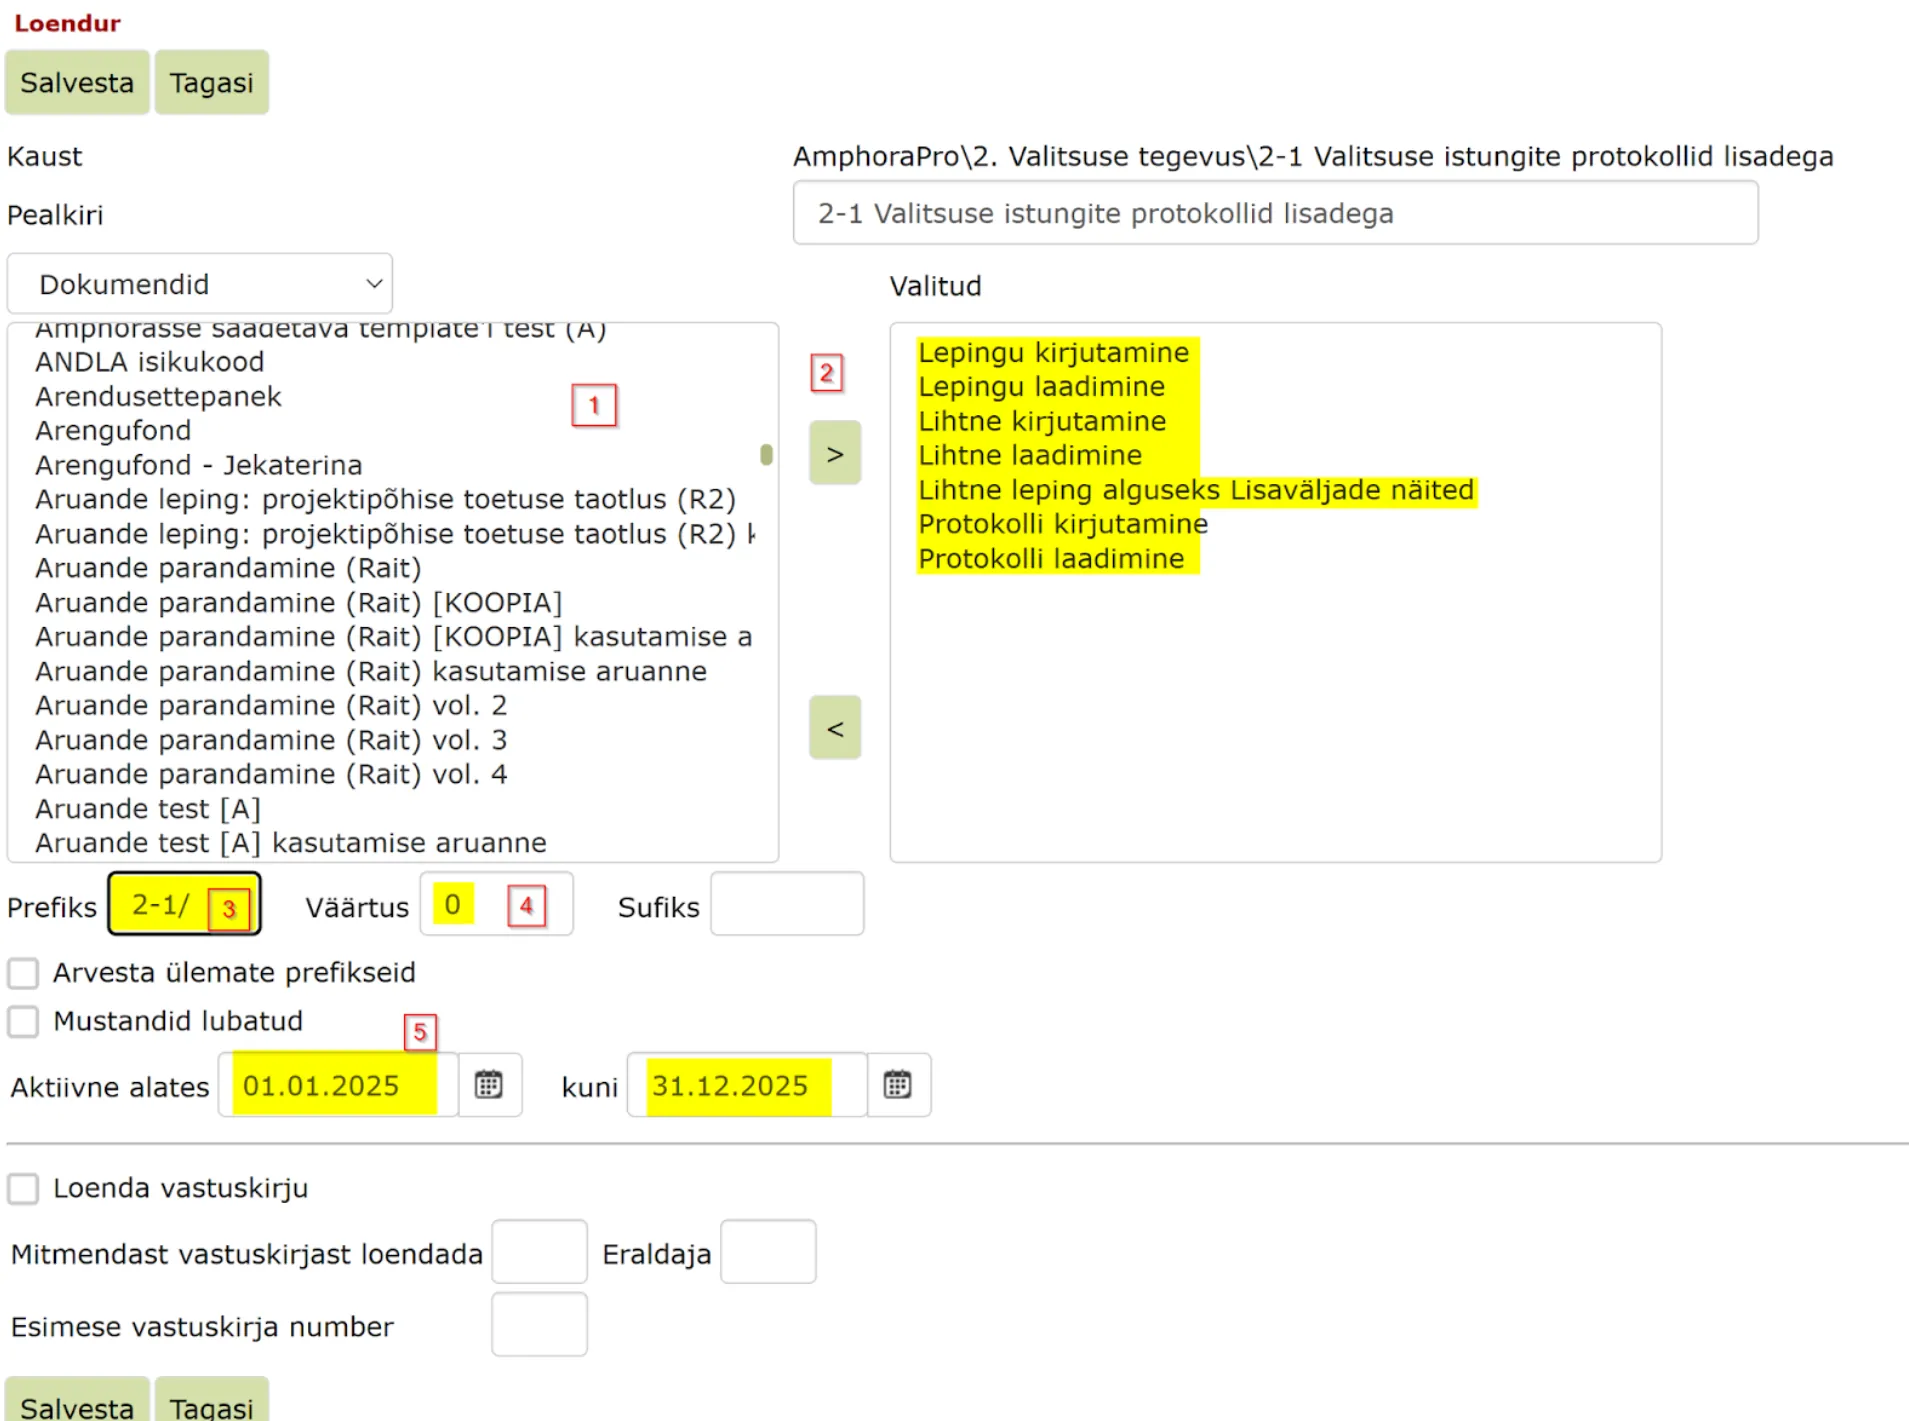 Form Selection – Select Documents from the dropdown. Select forms (1) that should get a number from the counter when registering documents in the catalog (don't add the "Letter" form here). Move selected forms to the right "Selected" box using the > button (2).
Prefix and Designation – Add prefix (series designation) and slash / to the counter (3). Optionally, you can add the year to the end of the prefix or to the suffix.
Value - 0 when creating a new counter (4).
Active Period – Set dates when the counter is used (5). Usually corresponds to the administrative period (e.g., 01.01.2025–31.12.2025, in schools and kindergartens it may be 01.09.2024–31.08.2025). For contract catalogs, dates can be left undefined, then the counter gives numbers to documents in the catalog indefinitely.
Case Counter Configuration
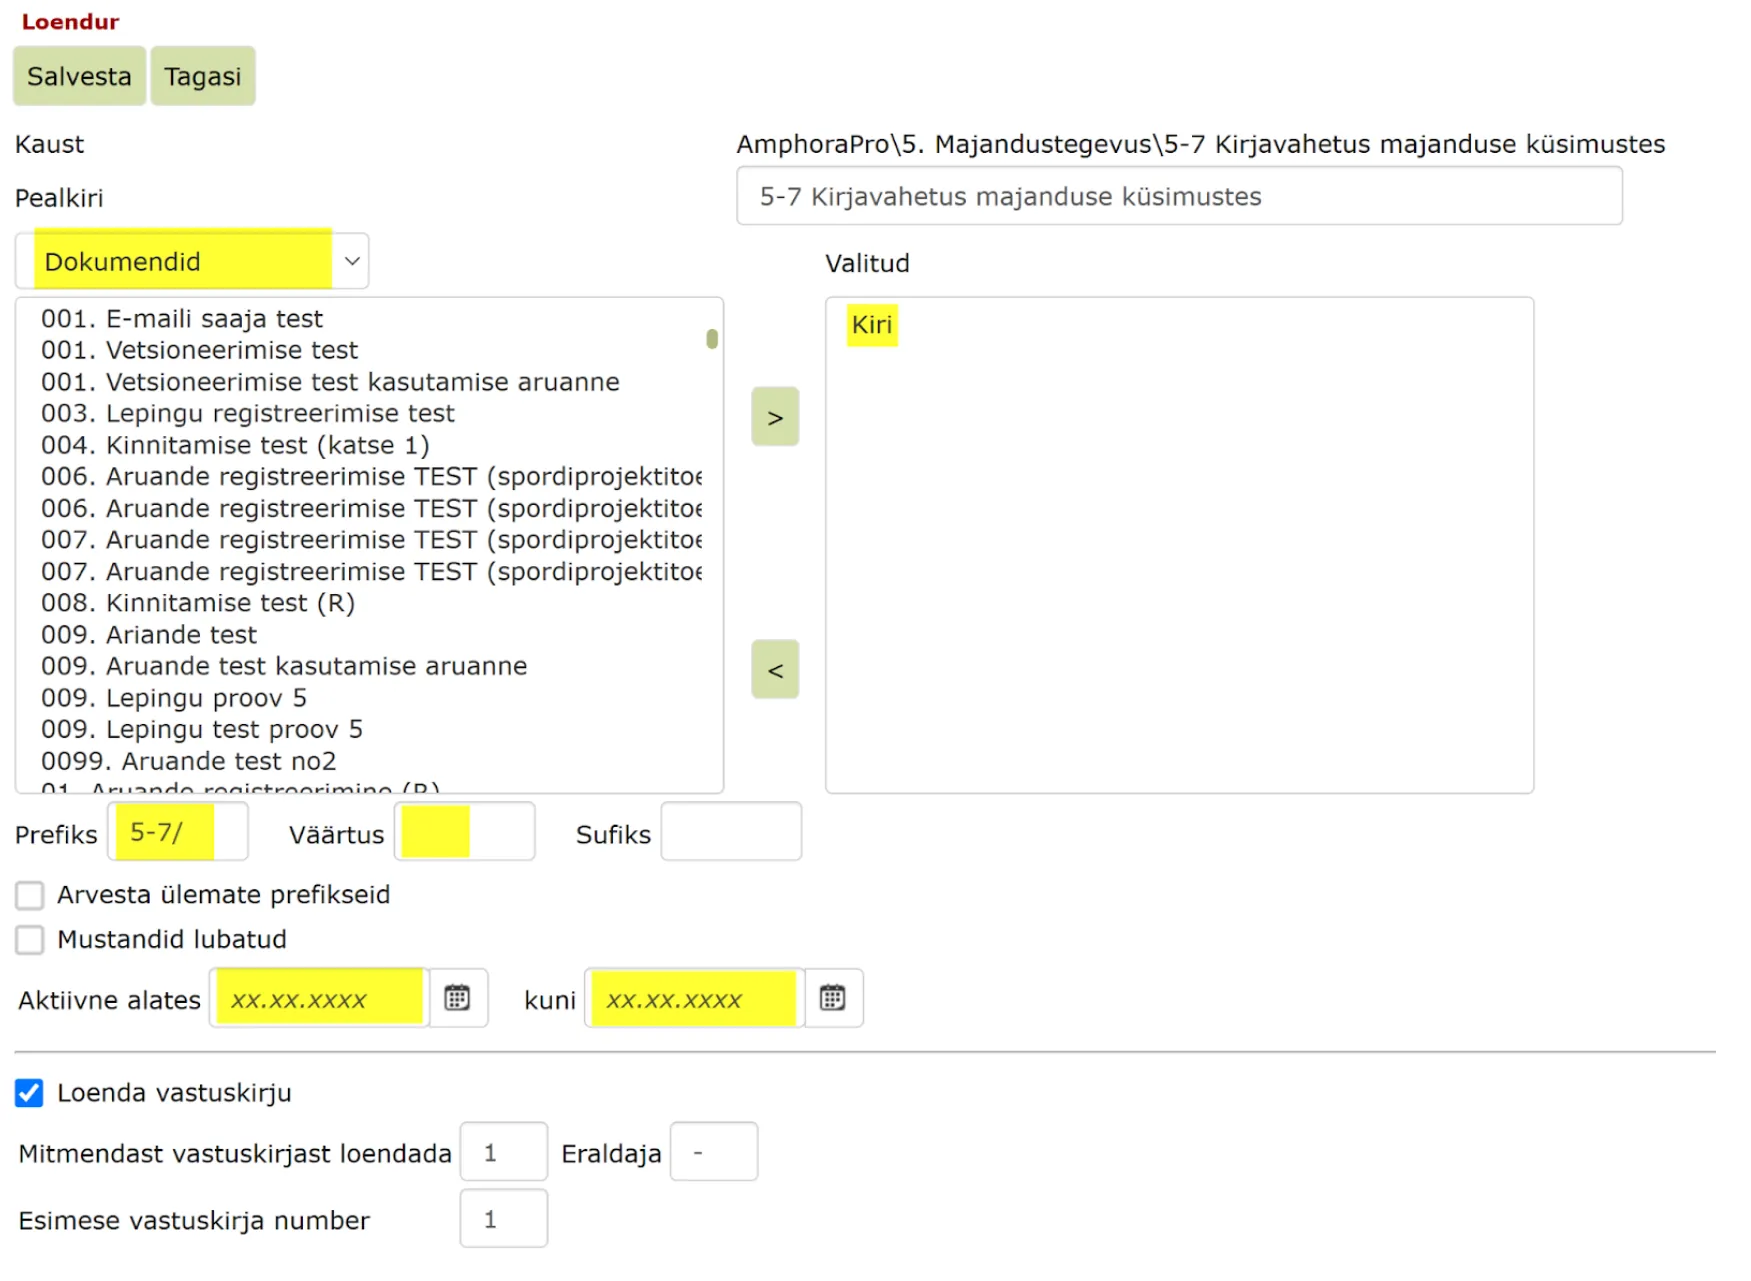
Case counter (for cases/files) should be configured the same way as document counter. The only difference is that in the catalog modification view, you should check the option "Use only case counter" and in form selection, select Case View from the dropdown and select "Case" as the form.
For municipalities, you can also add other case forms to the counter for draft or legal act catalogs, for example Draft (government, council, agenda item, etc.).
 Case counter gives numbers only to cases/files, and documents get numbers according to the case/file in the format case number-case sequential number (e.g., 5-1/1-1).
Correspondence Counter Configuration
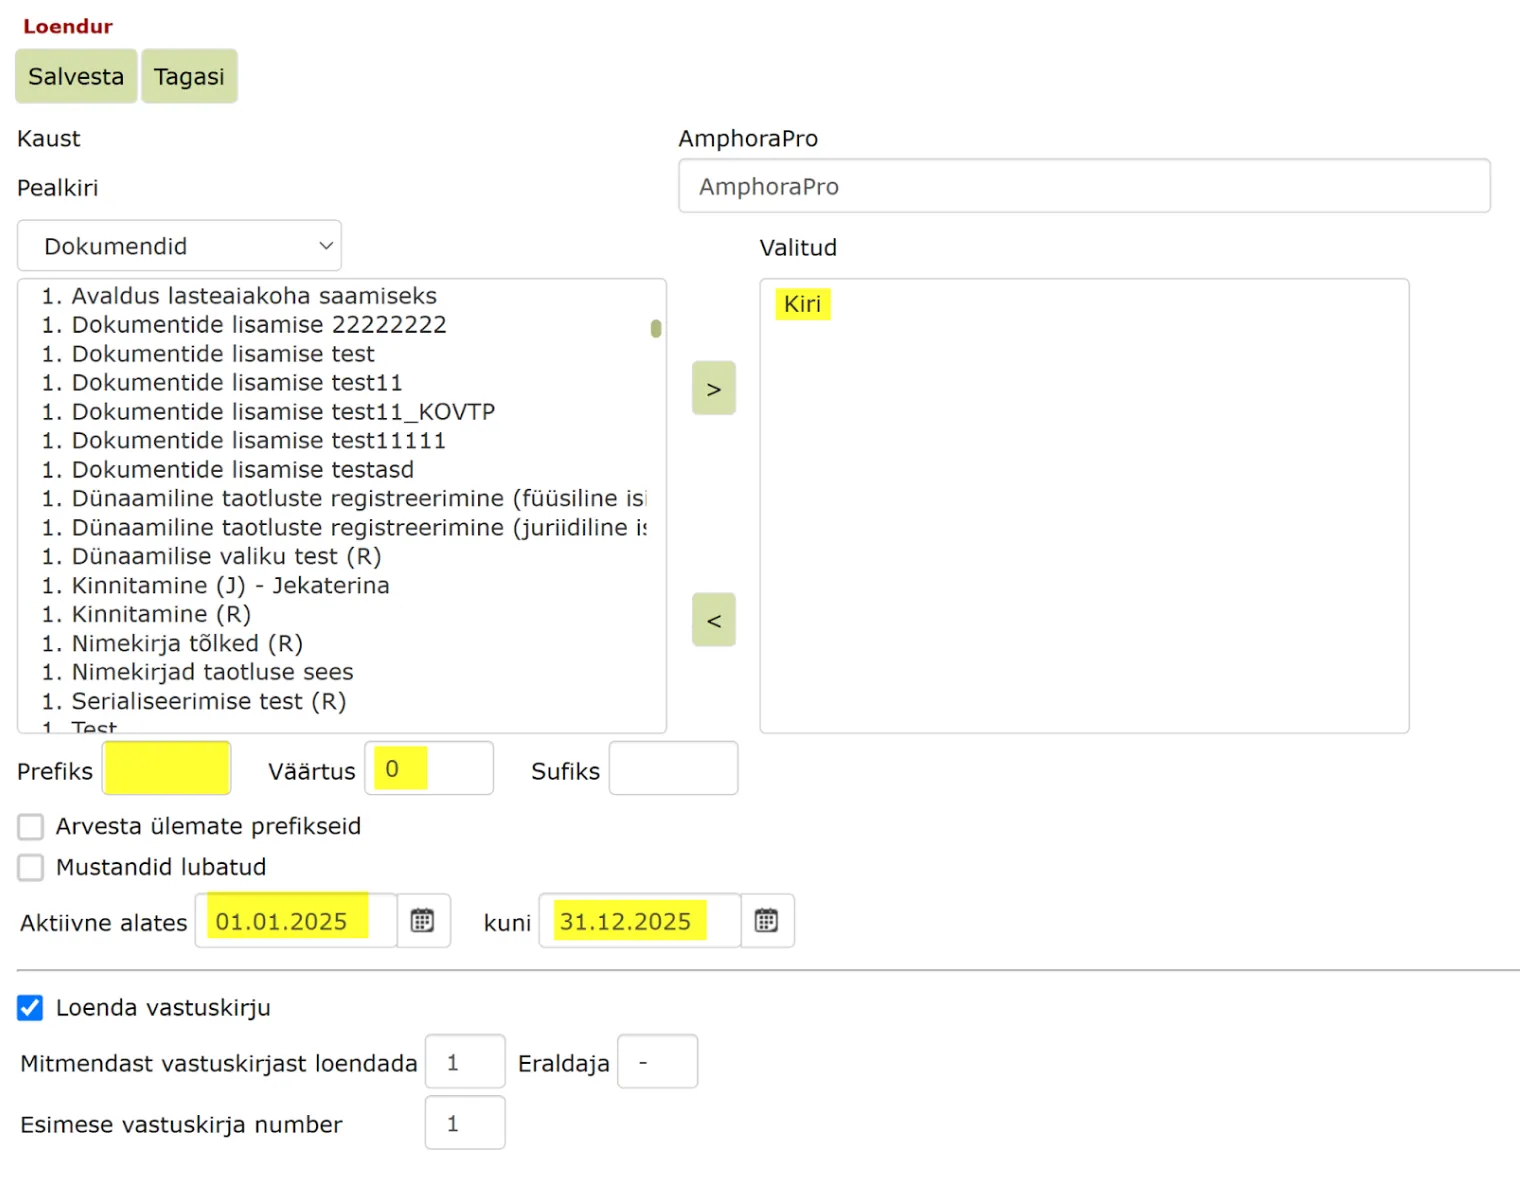
In correspondence catalogs, letters get numbers from the correspondence general counter, ensuring continuous and sequential numbering for letters registered in different series. At the catalog level, the counter is configured as follows:
 Selected form - Letter
Prefix - According to series designation
Value - Must remain empty. When creating a counter, Amphora sets the correspondence counter value to 0 by default. The counter must be saved and then the value 0 must be removed and resaved.
Dates - Active from and Active until fields should be empty.
Correspondence General Counter Configuration
The counter is added under the unit  and configured similarly to the document counter, but the selected form is the Letter form, and the prefix field remains empty:
 ***
***
Counter Assignment Reminder
- Title distinguishes the counter from other counters; you can also add the year here.
- From the dropdown, you must select the module whose objects (letters/documents) are counted.
- In the forms list, you must move all desired forms from left to right box (select with mouse to blue and click arrow >).
- Prefix – series designation or prefix that appears before the number (e.g., 3-1.4/). You can also add year to the prefix in the form 3-1.4/2025/ or 3-1.4/25/. When you copy counters for a new administrative period, Amphora automatically updates the year as well.
- Value - number through which the entered document gets a value one higher. If you mark 0, then the first letter/document you enter in Amphora gets value 1.
- Suffix – number suffix, combination of letters/numbers, can be left empty or marked with year. In this case, the document gets the number in registry view: 3-1.4/1/2025. The year added to the suffix also updates automatically when copying counters for a new period.
- Drafts allowed – allows later registration of the document (when saving the document, no number is given to the document, but only when the Register button is clicked)
- Active from .... until – allows setting a time period when numbers are assigned to documents/letters. Mark period 01.01.2025 until 31.12.2025. In this case, the counter starts being valid from January 1st. If you want it to start later (previous year's letters/documents not entered), then set a later date as the start.
- Loenda vastuskirju – creates the possibility to respond to documents registered with this counter (a Reply button appears on the document modification form). You need to check the checkbox, but not for Document module counters.
- Start counting from which reply – a numerical value is set for which response letter gets a specially marked number (registration number suffix).
- Separator – character combination that separates the registry number and response letter number.
- Counter of first reply – what number the first specially marked document gets.
- For correspondence counters, generally one numbering applies across series (letter numbers run consecutively regardless of which series they were assigned to).
- Therefore, when creating a counter, the Value field should be filled only for the parent series (the topmost catalog, which in normal practice is the organization name with house icon).
- For all other catalogs, the Value field remains empty for message counters (i.e., nothing should be marked there).
- For documents, it's generally a matter of separate numbering for series (i.e., no continuous number) and for documents, the Value field must be filled when adding each counter.
Setting Up New Administrative Period or Resetting Counters
Open Admin -> Directories, click the All counters button.
In the opened form, select the desired administrative period (e.g., 2025) and unit from the dropdown. The system displays all counters where the Active until field contains the past (previous) administrative period.
 When a new administrative year is selected (Active from and Active until), the Copy for new period button becomes active.
Mark and copy counters one page at a time (check, click Copy for new period, open e.g., 2025, open next page, check, copy, etc.).
The system copies counters and adds 1 year to all years and resets counter values (i.e., 01.01.2025 becomes 01.01.2026).
Important
For correspondence counters, dates should only be on 1 counter – the parent counter that gives values to sub-counters (where the value box is empty).
Correspondence sub-counters don't need to be copied - therefore they don't need to fill in Active from and Active until dates either (exception is a counter where the suffix field has a year).
If dates are missing, they can be added by modifying the counter:
- Open Admin -> Directories.
- Select catalog, click Edit button. In the opened view, find the Counters panel and click the Edit link, which opens the counter modification view.
- Enter dates Active from – Active until (for new administrative period, e.g., 01.01.2025 – 31.12.2025) and click Save in the counter view. Then click the Save button.
Setting Up Response Letter Counter
Open the Directories form from the Admin module submenu.
Find the catalog that has a counter assigned and to which you want to add a counter for response letters (the counter counts e.g., sent letters and also letters responded to those letters).
Click the Edit button. The Edit Catalog Info form opens. Go to the Counters panel.
Select the counter you want to modify and click the Edit link. The counter form opens where you can make necessary changes. Check the Loenda vastuskirju box.
Then fill in the necessary fields (separators can be symbols like '-', '/' etc.) and click the Save button.
Counter Deletion
Open the Directories form from the Admin module submenu.
Find the catalog whose counter you want to delete and click on the catalog name. Then click the Edit button. The Edit Catalog Info form opens.
Go to the Counters panel. Select the counter you want to delete and click the Delete link. To save the changes made, click the Save button.
Counter Rollback
In Amphora, a situation may arise where the document counter gives a document too high a number. This happens when documents have been saved to the catalog but deleted in the meantime. The counter doesn't update automatically, so the catalog counter should be 'rolled back' according to the number of deleted documents. Make sure that the document is really deleted and no new documents or letters have been registered in the meantime, to avoid a situation where two documents get the same number.
Important
You must be very careful if the document was registered with letter form. Letters get numbers from the general counter and letters are saved to different series, so you must check if any other correspondence catalog letters have been registered in the meantime.
To modify the counter, go to Admin -> Directories -> Select the catalog whose counter you want to roll back -> Edit.
Then go to the Counters panel in the opened catalog modification view. Select the active counter (by date). Click the Edit button.

Important
For letters, you should check the correspondence general counter - the counter under the unit with house icon. If the general counter number is higher than the deleted letter number, it means that new letters have been registered in the meantime. In this case, it's recommended to either add the missing letter manually or simply skip that number to maintain continuity in numbering.
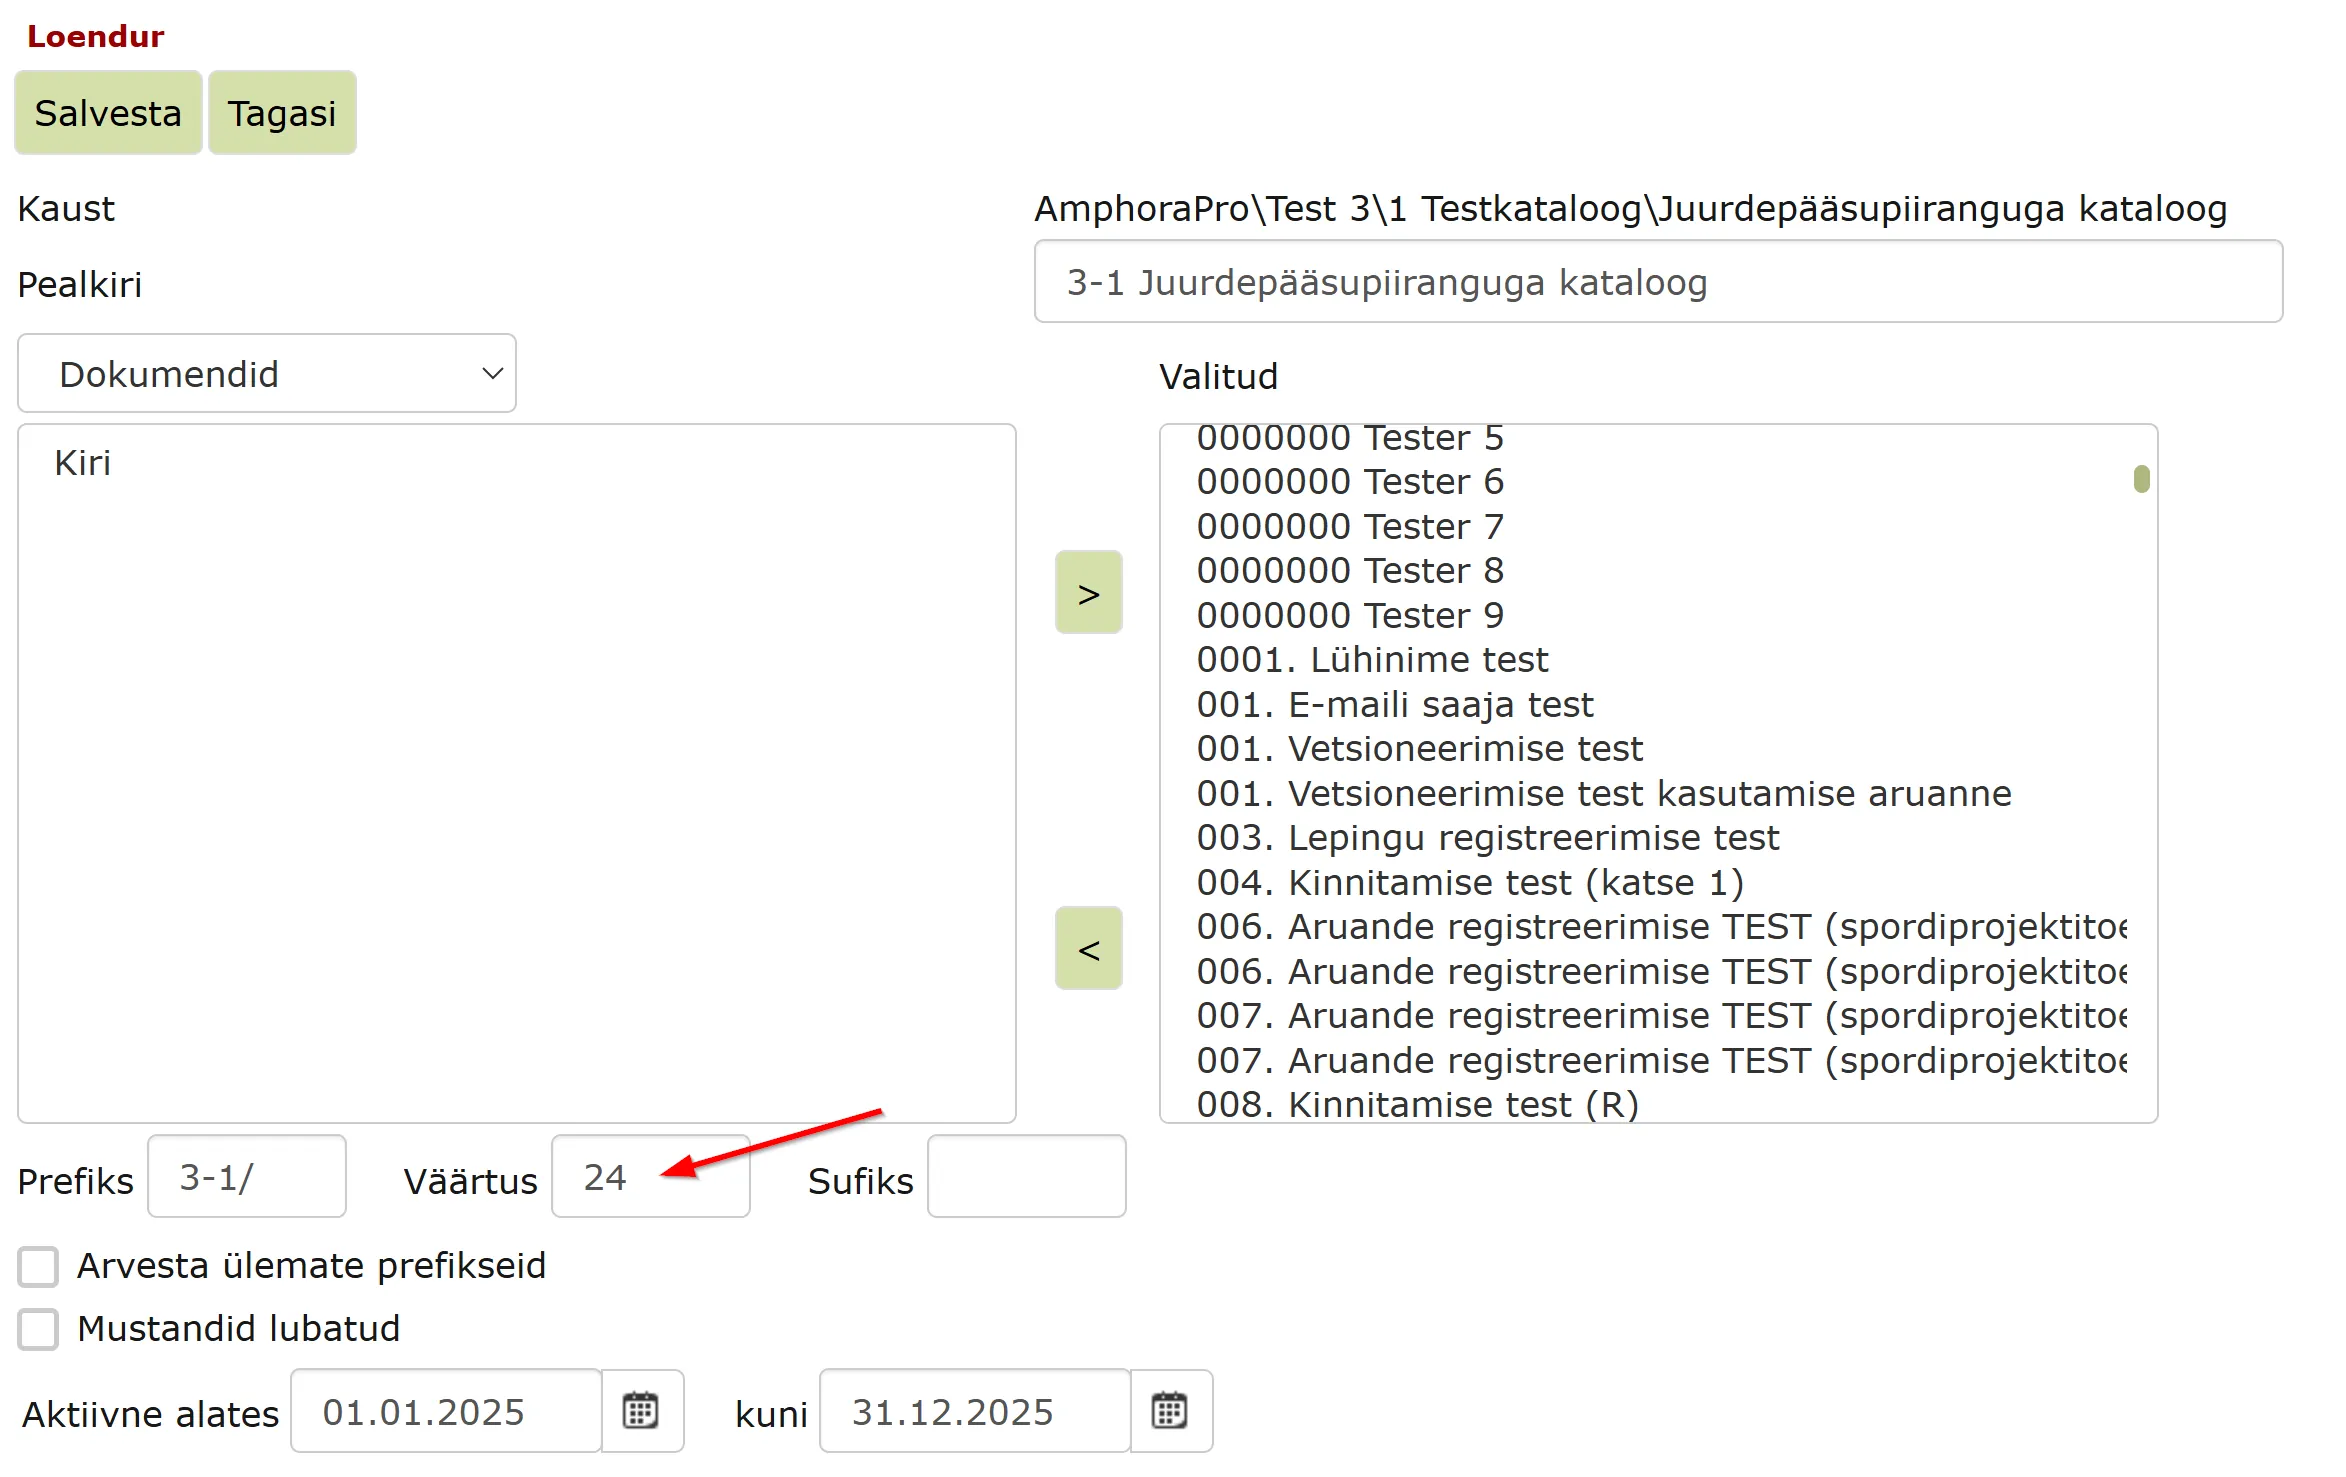
If you're sure that no new documents have been registered in the meantime and you want to roll back the counter, you can do this by changing the counter's "Value" field. You should write the number of the last registered document in the catalog here. For example, if you want the next document to get value 25, then you should set the number to 24 here.
 ***
***
Possible Problems with Counters
If Amphora doesn't let you modify the counter and you get the message "Selected category(ies) are already associated with an existing counter (counter name)!", then there's already an active counter with such form selection in the catalog. The redundant counter should be deleted. Before deleting the counter, make sure that the remaining counter is correctly configured (selected forms, prefix, value, dates, etc.).
Last modified: 17 October 2026, 11:05:57