Archive
Table of Contents
- Introduction
- Setting archive value and retention period for documents a. "Add document automatically to archive file" setting
- Creating archive files and describing metadata
a. Automatic generation of archive files
b. Manual creation of archive files by user - Adding documents to files
- Viewing list of archive files
- Viewing archive file data
- Converting files to archival format
- File archiving
a. Restoring a file from the archive - Searching archived documents
- Viewing archived documents
- Viewing control reports
- File destruction a. Generating destruction act
- Sending to National Archives (ASTRA)
Introduction
The Archive module enables managing document retention in an organization, from setting retention periods to document archiving and destruction.
This guide describes how to create and organize archive files, assign archive value to documents, perform archiving, and manage the destruction process in accordance with document retention periods.
Setting archive value and retention period for documents
Setting the retention period for documents is mainly done at the classification unit level (usually series). When you set the retention period and archive value in the series data, they automatically apply to all open files in that series. If necessary, you can specify or change these values at the specific file level.
To set the retention period, open Admin -> Directories. Then select the appropriate classification unit (catalog) by clicking on its name and then click the "Edit" button.
In the opened view, open the "Retention schedule" panel. Here you can set the desired criteria:
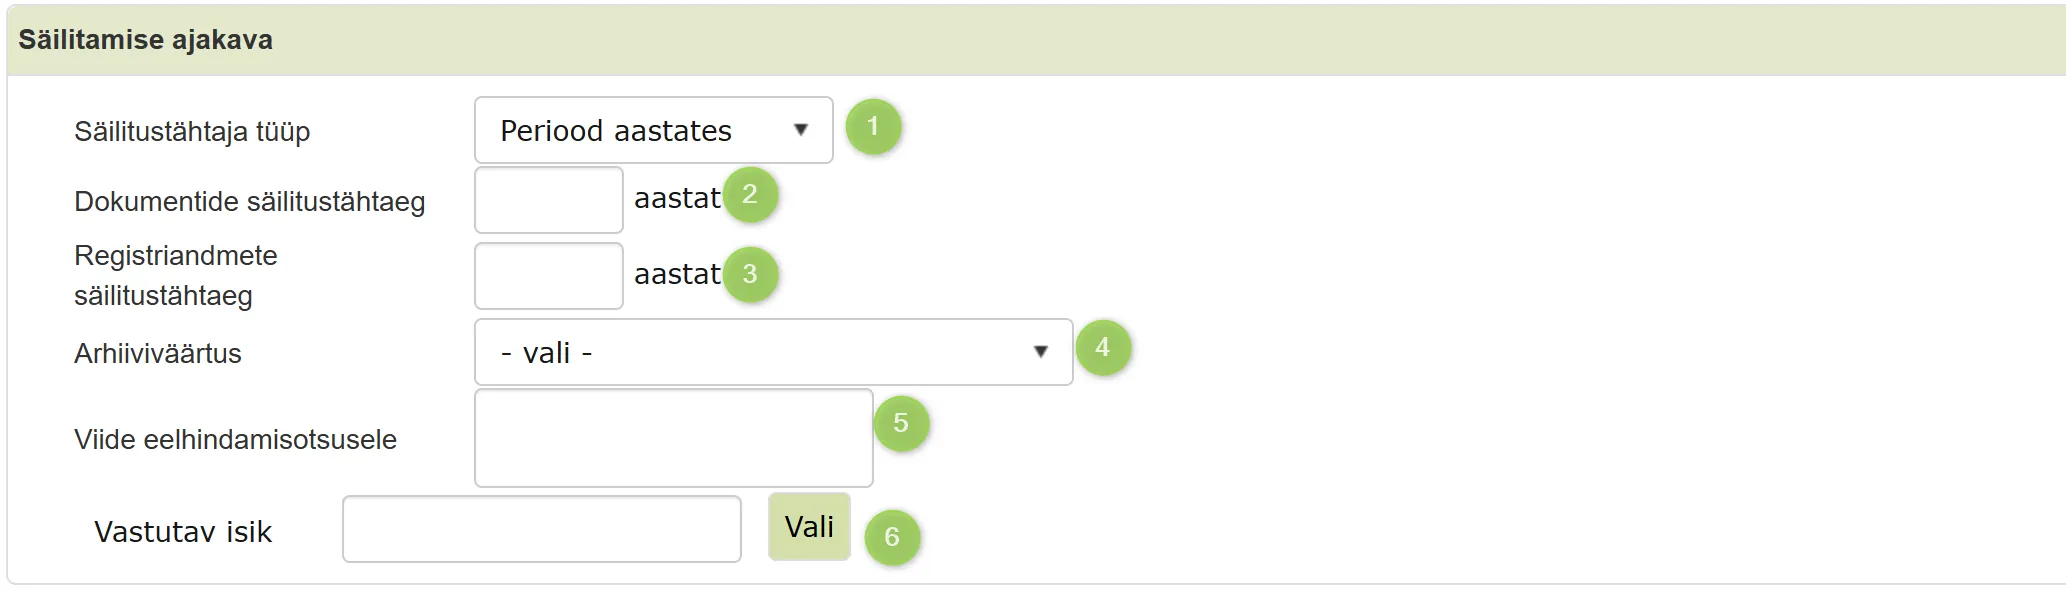 1. Retention period type – period in years, permanent or event. Depending on the selection, the period definition also changes: for an event, enter the event name and the deadline dates.
2. Document retention period – mark the time period (deadline in years).
3. Registry data retention period – mark the time period (deadline in years).
4. Archive value:
- Archive valuable – when the retention period has passed, it will be transferred to the archive. Not subject to destruction.
- Destroyable in simplified procedure – based on the pre-assessment decision, it is possible to destroy without asking for additional permission.
5. Reference to pre-assessment decision – you can mark the pre-assessment act data (number, date, act issuer) based on which the retention period and archive value of the given series have been determined.
1. Retention period type – period in years, permanent or event. Depending on the selection, the period definition also changes: for an event, enter the event name and the deadline dates.
2. Document retention period – mark the time period (deadline in years).
3. Registry data retention period – mark the time period (deadline in years).
4. Archive value:
- Archive valuable – when the retention period has passed, it will be transferred to the archive. Not subject to destruction.
- Destroyable in simplified procedure – based on the pre-assessment decision, it is possible to destroy without asking for additional permission.
5. Reference to pre-assessment decision – you can mark the pre-assessment act data (number, date, act issuer) based on which the retention period and archive value of the given series have been determined.
Assessment decisions can be found on National Archives website.
6. Responsible person – choose from Amphora users the person responsible for the registered documents of the given series.
When the desired settings are made, click the "Save" button.
If the retention schedule is set at a higher level (for example, on a function), a lower level (series) can take it over: open the series for editing, click "Copy settings from folder" in the "Retention schedule" panel and save. The settings are copied from the parent catalog to this one catalog. If you want different settings for some series, set them directly at the series level.
The retention schedule set for series applies automatically to all files in that series. If necessary, you can change these settings in the file view. The file view has the same "Copy settings from folder" button: it brings the series' retention schedule into the file.
"Add document automatically to archive file" setting
Under Admin -> Organization settings -> General settings there is a setting "Add document automatically to archive file", which allows automatically adding a document to the archive file composition when registering/modifying an existing document if Amphora finds a suitable archive file (the archive file is in the same catalog and the document's registered/modified dates fall within the archive file's boundary dates). To turn on this setting, you need to check the given option and then save the changes.
By default, this checkbox is turned off in all environments.
Archive module
In the Archive module, all units are visible to the user for which the user has rights (Admin rights). If you want to see only a specific organization, you can make the corresponding choice from the dropdown menu and then only the classification scheme related to that organization will be displayed.
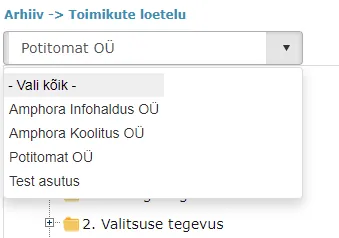 NB! The selection shows organizations related to units, not units.
Creating archive files and describing metadata
File formation in Amphora is possible in two ways:
- Automatically generated files by the system - the system automatically assigns mandatory metadata to created files. The user can later manually supplement the file metadata (for example, add keywords, etc.).
- Manually created files by the user - the user can create an archive file in the Archive module. At the time of file creation, there don't need to be previously registered documents that should belong to this file. This allows ongoing preparation of files in the system to simplify later data organization and archiving.
Automatic generation of archive files
It is inconvenient to create archive files one by one for each series at the end of the business year. To simplify the work, missing archive files can be generated automatically.
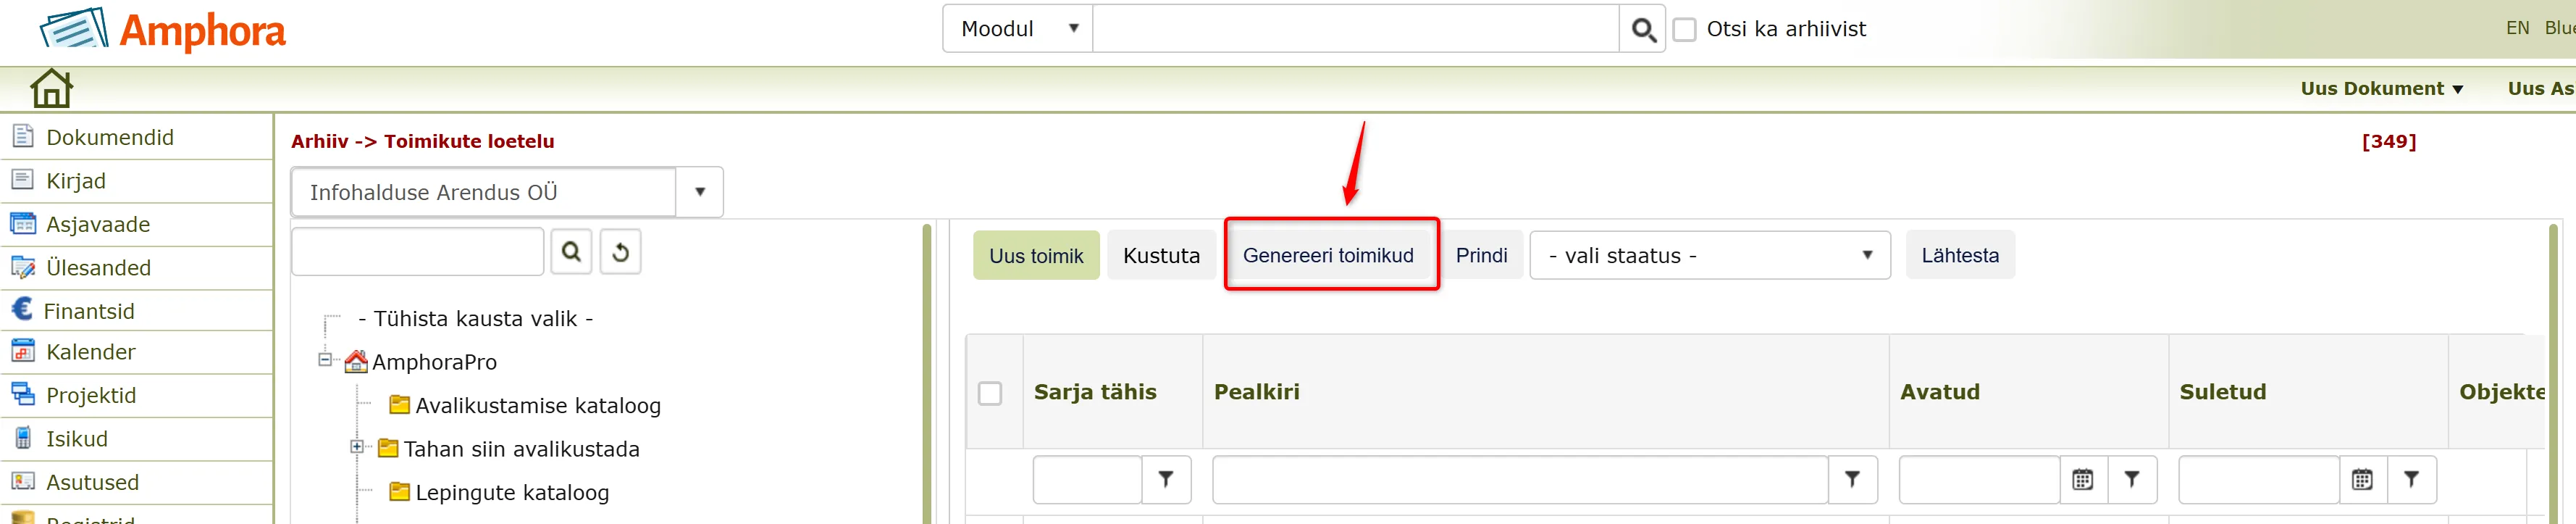 To automatically generate archive files, open the Archive module and click the "Generate files" button in the archive files view.
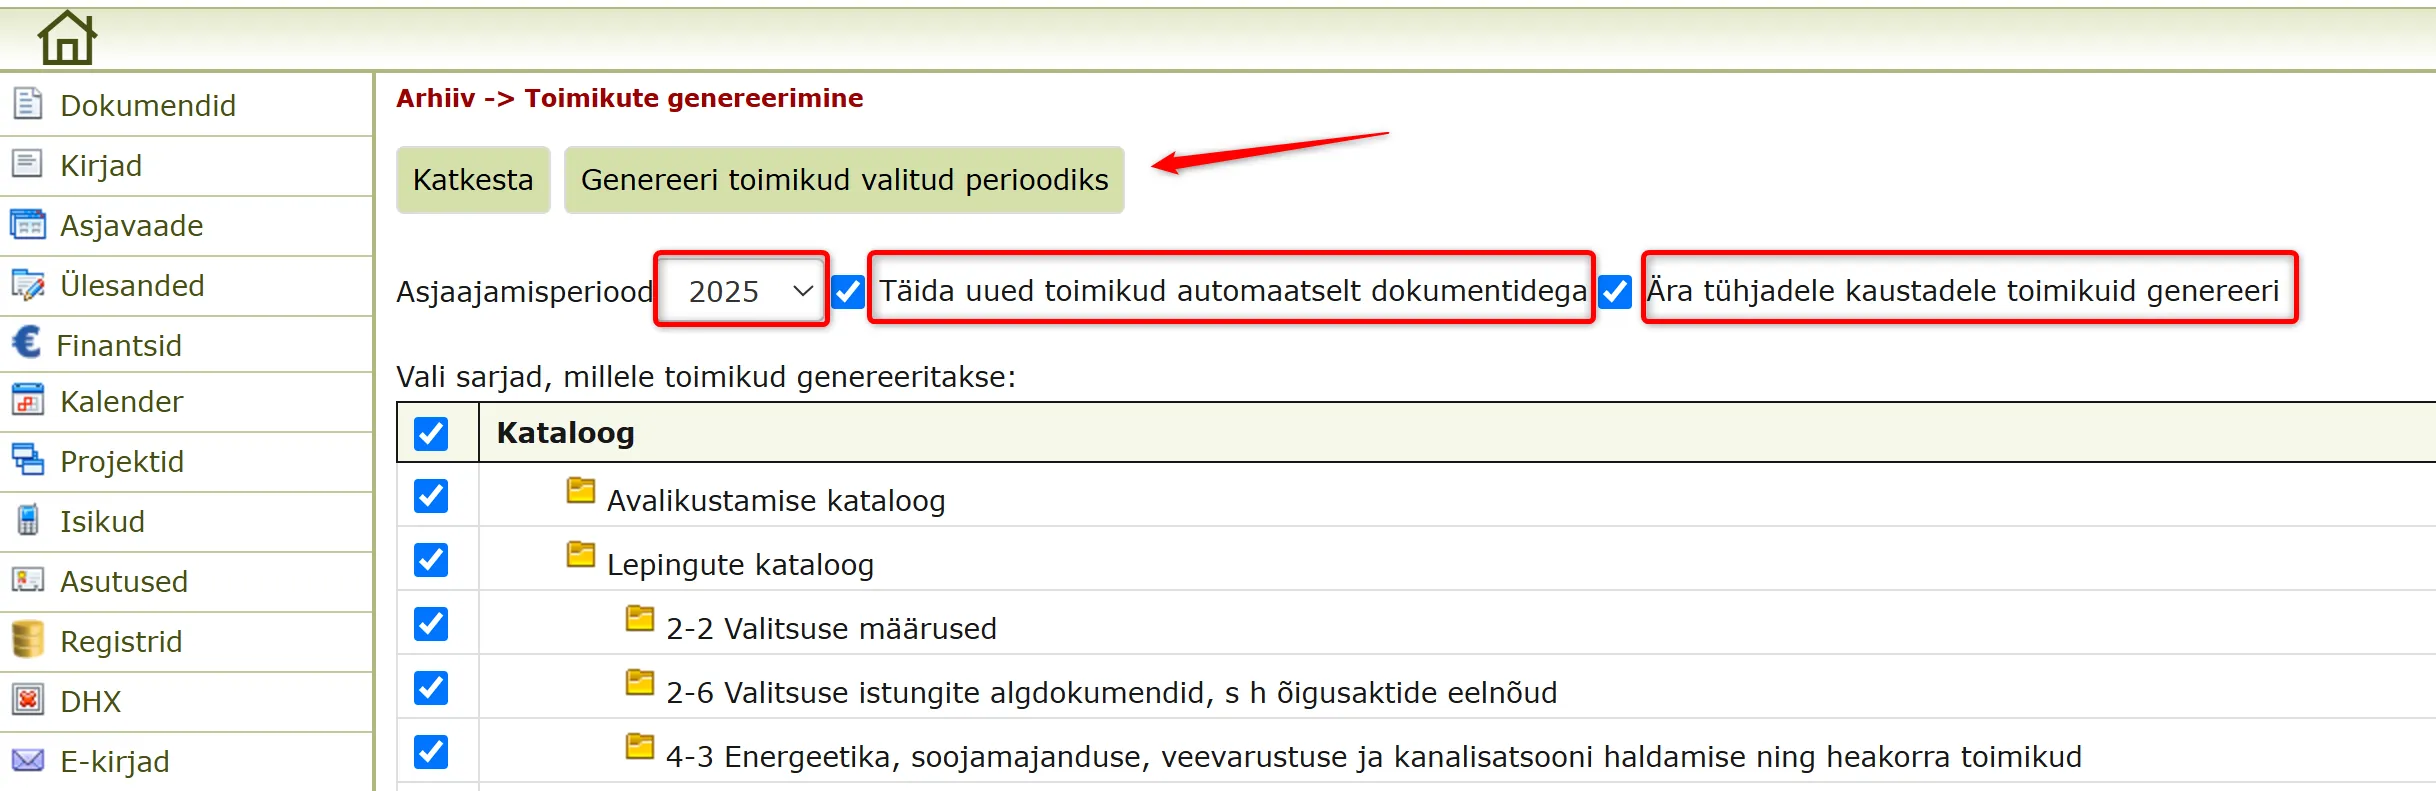 * When automatically creating files, select the desired business period (year) from the dropdown menu. Then a list of catalogs opens, from which you can mark with checkboxes those catalogs whose files you want to create.
* Don't generate files for empty folders - definitely select this if you are generating files for some previous year's business period. In this case, files will only be generated for series that actually have objects inside.
* Fill new files automatically with documents – with this selection, Amphora creates the file and also automatically adds the documents from that series to the file. If the checkbox is not made, then Amphora does not automatically add documents to the file and the user can add documents to the file manually.
* When catalogs are selected, click the "Generate files for selected period" button.
* When automatically creating files, select the desired business period (year) from the dropdown menu. Then a list of catalogs opens, from which you can mark with checkboxes those catalogs whose files you want to create.
* Don't generate files for empty folders - definitely select this if you are generating files for some previous year's business period. In this case, files will only be generated for series that actually have objects inside.
* Fill new files automatically with documents – with this selection, Amphora creates the file and also automatically adds the documents from that series to the file. If the checkbox is not made, then Amphora does not automatically add documents to the file and the user can add documents to the file manually.
* When catalogs are selected, click the "Generate files for selected period" button.
When generating files, you cannot select series that already have a file and you cannot select functions (Amphora does not offer a checkbox for input).
During automatic generation, the following metadata is filled by the system by default:
- Catalog – series name
- File type – by default business file
- Title – the series name without its number, followed by the year in brackets and the unit name (e.g. "Contracts (2027) Municipality Government")
- Medium - format, selects digital copy by default
- Opened and closed – series business period
- Series designation - catalog number
- Content language – Estonian
- Retention schedule – information from classification unit (series) data, if data has been added to the specific series
Manual creation of archive file by user
To create a new file in Amphora, you need to open Archive -> Files and then "New File".
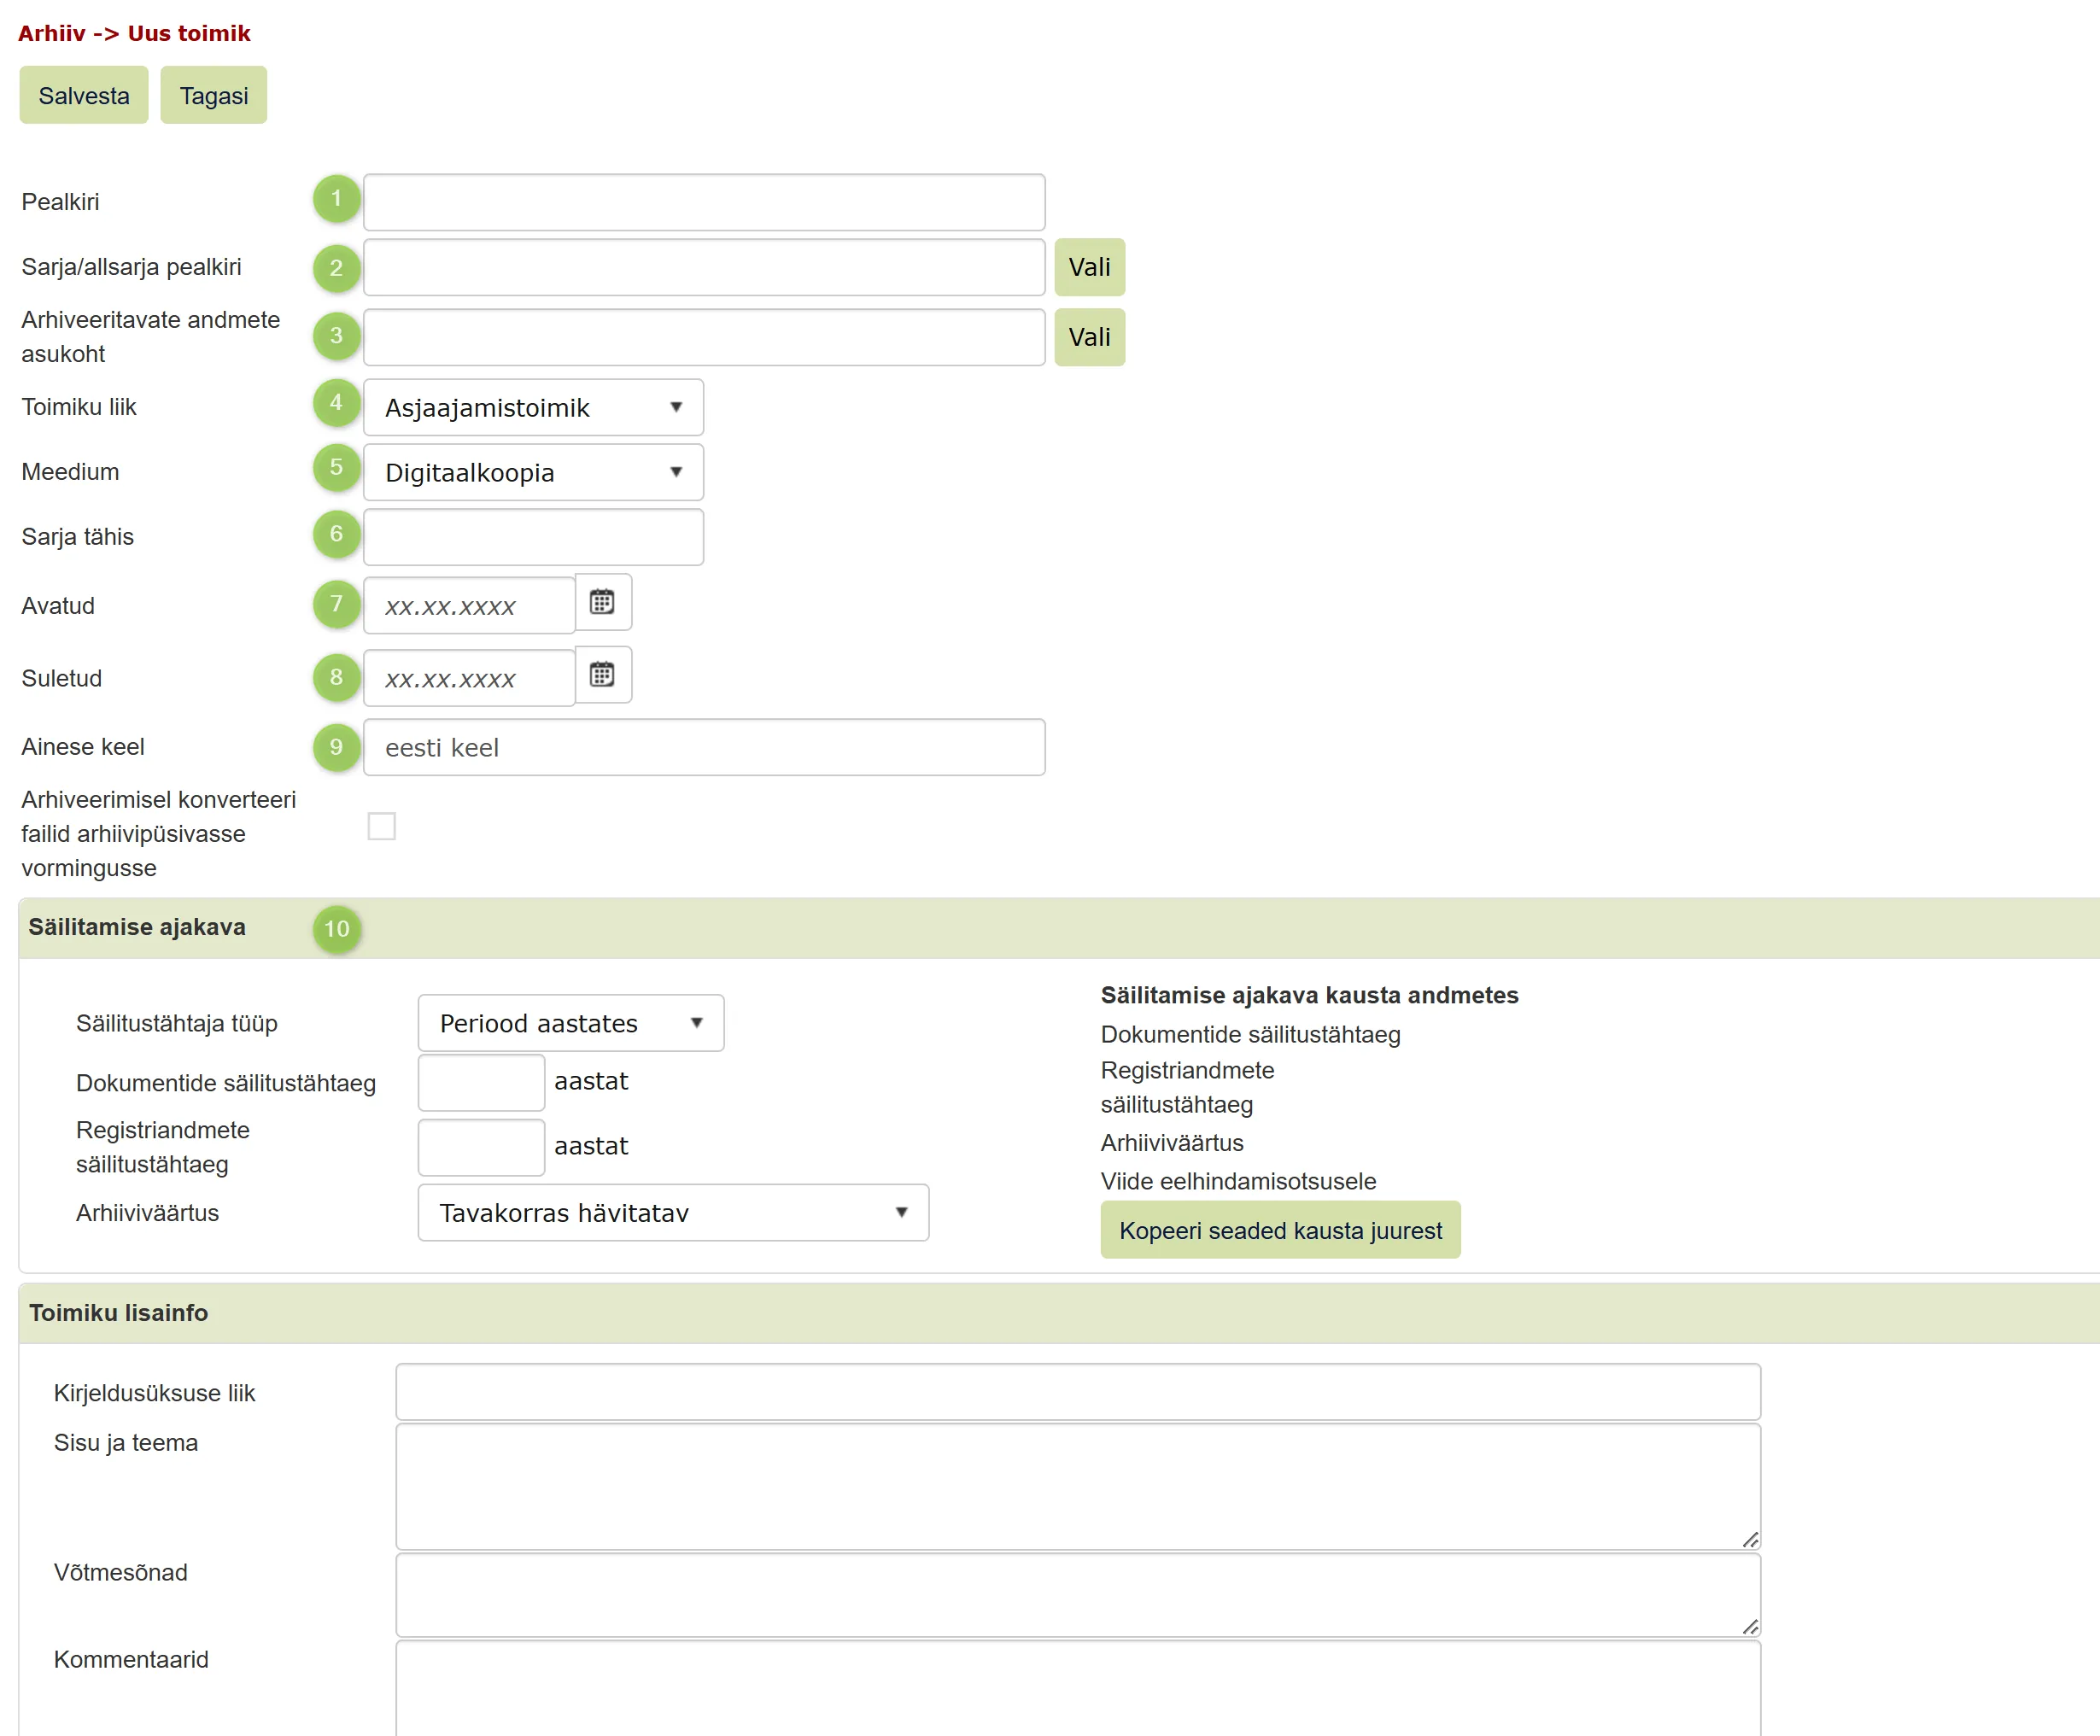
Based on the metadata added to the file, Amphora displays a list of documents to be selected for archiving. At minimum, the following fields should be filled:
- Title - Archive file title
- Series/subseries title - series where the archive file is registered
- Location of data to be archived - useful if some objects are in other catalogs (can be left empty if all data to be archived is in the series specified in the previous box)
- File folder type:
- Business file – the system only offers objects from a specific (one) series for that period. Generally in use and this selection is also selected by default when creating a file.
- Object file – it is possible to combine objects from different series regardless of dates
- Medium - digital copy (selected by default), digital original or paper
- Series designation - archive file series designation, entered by user. Allows archive files to be found more easily.
- Opened - registration time of the oldest document to be added to the file (e.g., business period start date 01.01.2020).
- Closed - registration time of the newest document to be added to the file (e.g., business period end date 31.12.2020).
- Content language
- Retention schedule - retention period and archive value that come from series data. The panel is pre-filled by the system if the corresponding information is available at the series level (can be added in Admin - Directories)
Panels:
- File additional info - can fill information about the description unit type, file content and topic, add keywords or comments.
- Copyright - can add copyright owner, deadline and add selection, reproduction prohibited.
- Documents in file - overview of documents selected for the file.
- File folder location - the file's location history: the location and the date from which the file is there. The list of locations is empty until an administrator has set the locations up in Optional field content (module Archive, field for the file location).
Adding documents to files
When metadata has been added to the file, documents (related objects) can be added to the file. When organizing files, it is possible to add and remove related documents at any time.
Documents in file panel
Important
If files have been automatically generated with the option "Fill new files automatically with documents", then documents have already been added to the file.
 Number - document number
Title
Registered - document registration date
Validity deadline Amphora primarily displays date field values. For contracts, the system primarily displays the "Valid until" (Not_valid_after) date here. If this is missing, the next available date is used in a specific order: first Document date (Document_date), then Registration time (RegisterTime) and lastly Document creation date (Create_time). The system automatically moves to the next date type if a higher priority date is not set.
Number - document number
Title
Registered - document registration date
Validity deadline Amphora primarily displays date field values. For contracts, the system primarily displays the "Valid until" (Not_valid_after) date here. If this is missing, the next available date is used in a specific order: first Document date (Document_date), then Registration time (RegisterTime) and lastly Document creation date (Create_time). The system automatically moves to the next date type if a higher priority date is not set.
Not_valid_after (Valid until) > Document_date (Document date) > RegisterTime (Registration time) > Create_time (Document creation date). Series - document catalog Series closed - date when the series (catalog) was marked as passive or closed status. Also visible in Admin -> Directories view, catalog closing date. For an active catalog, this field remains empty.
In this panel, main file icons (also signature container icons) are visible and certain file types (PDF, HTML) can be opened in preview similar to the Documents module. All other file types can be downloaded by simply clicking on the file icon.
By clicking the Add document button (in the "Documents in file" panel), a view opens where you can select objects (documents) from a specific series. Make checkboxes in front of the choices and then click the "Save" button.
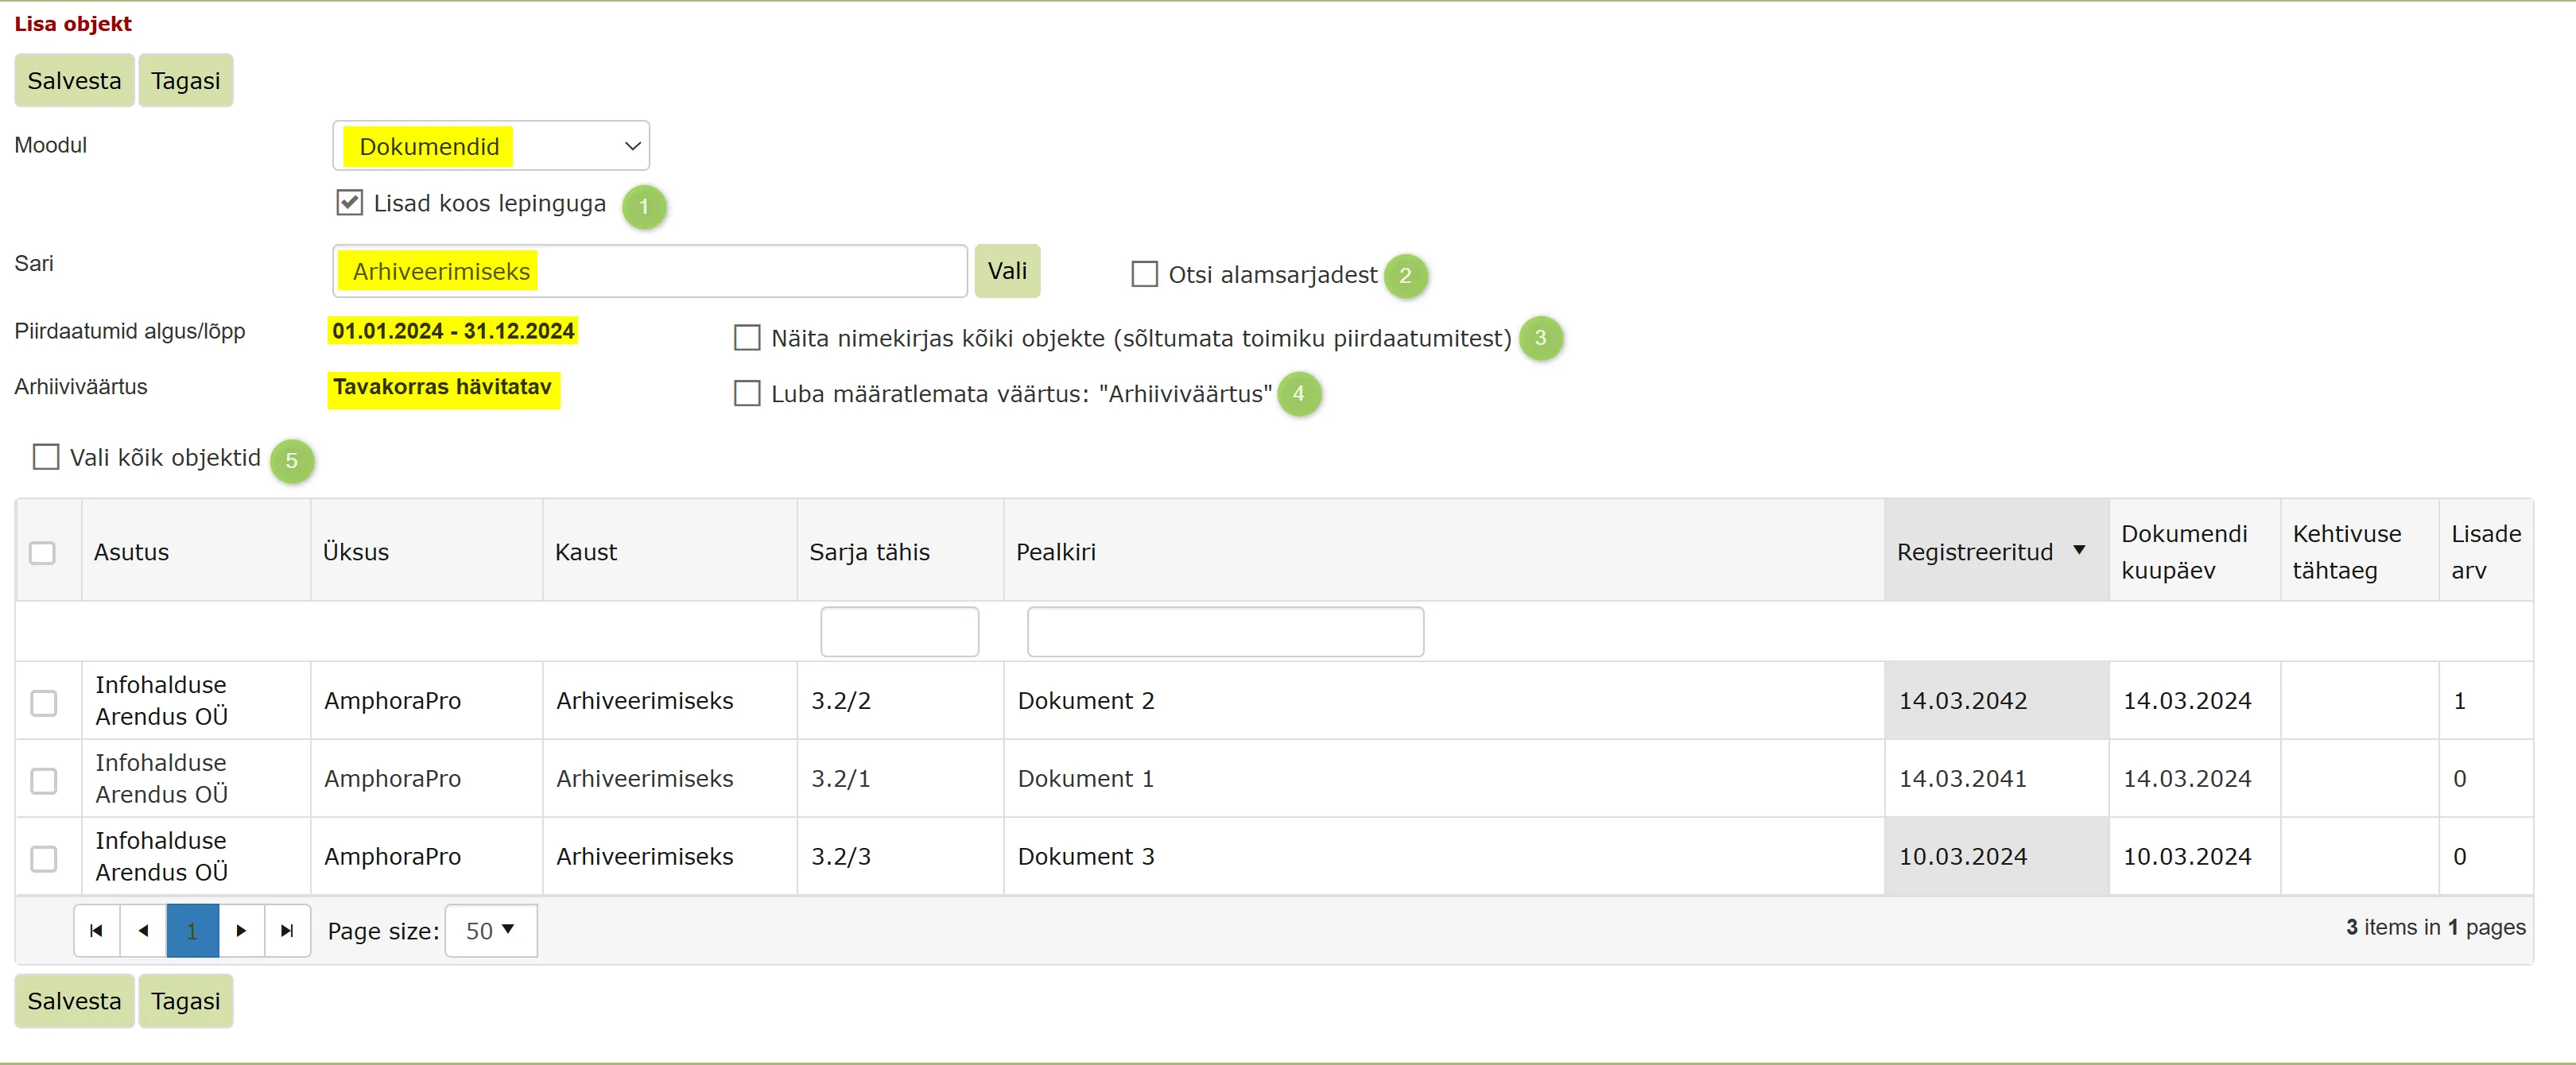 Module - from which module objects are displayed.
Series - which series objects are displayed.
Boundary dates start/end - with the Opened and Closed dates specified in the file metadata. The document selection displays those documents where "Document date" falls within the specified range.
Archive value
- Appendices with contract - document appendices are not displayed as separate documents. A column "Number of appendices" is added to the table, which shows the number of appendices belonging to the document. After archiving, documents registered as appendices are only visible under the main document in the "Relations" panel and are not displayed separately in the file document list.
- Search from subseries - allows selecting documents from subseries to the archive file. Also displays documents from subseries of subseries.
- Show all objects in list (regardless of file boundary dates) - also shows series documents where the document date does not fall within the boundary date range.
- Allow undefined value: "Archive value" - if the archive value in the catalog is undefined, then after checking this option, the series documents become visible and can be selected for the file composition.
- Select all objects - makes checkboxes for all documents at once (can select all objects, not just by page).
When archivable documents are selected (checkboxes made), click the "Save" button.
Adding a document to a file from the document card
A document can also be added to a file from its document card: in the File folders panel click Add, choose the file in the window that opens and click Ready. The panel is on the document card only on forms where it is switched on (Admin - Form configuration, the form's Panels, see Forms).
If some document did not appear in the selection?
Check the following:
- Documents are in the corresponding series (specified in metadata when creating the file).
- In document metadata, Document date falls within the boundary date range (specified when creating the file with metadata Opened and Closed), i.e., documents in the file must be related to that file's business period.
- The same archive value is set for the file and series - by default, it is possible to select only objects with the same archive value for the archive file composition. For example, if the archive file's archive value is "Destroyable in standard procedure", then by default Amphora only allows selecting those objects that are in a catalog that also has the archive value "Destroyable in standard procedure".
- "Valid until" control - applies to those documents (especially contracts) where the form has a "Valid until" (Amp. field name not_valid_after) field. Only those documents that are no longer valid come into selection. Amphora determines document validity as follows:
- The system first checks for the existence of the "Valid until" date.
- If the "Valid until" date exists and falls within the archive file period (between the archive file's opened and closed dates), then the document is displayed in the selection.
- If the document lacks both "Valid until" and "Entry into force" dates, but the registration date falls within the archive file period, then the document is also displayed in the selection.
- If the "Entry into force" date exists but the "Valid until" date is missing, then the document is not displayed in the selection because it is considered still valid.
Archiving cases/files
In the archive file object (document, case, invoice) selection view, there is "Case view" available in the module dropdown selection.
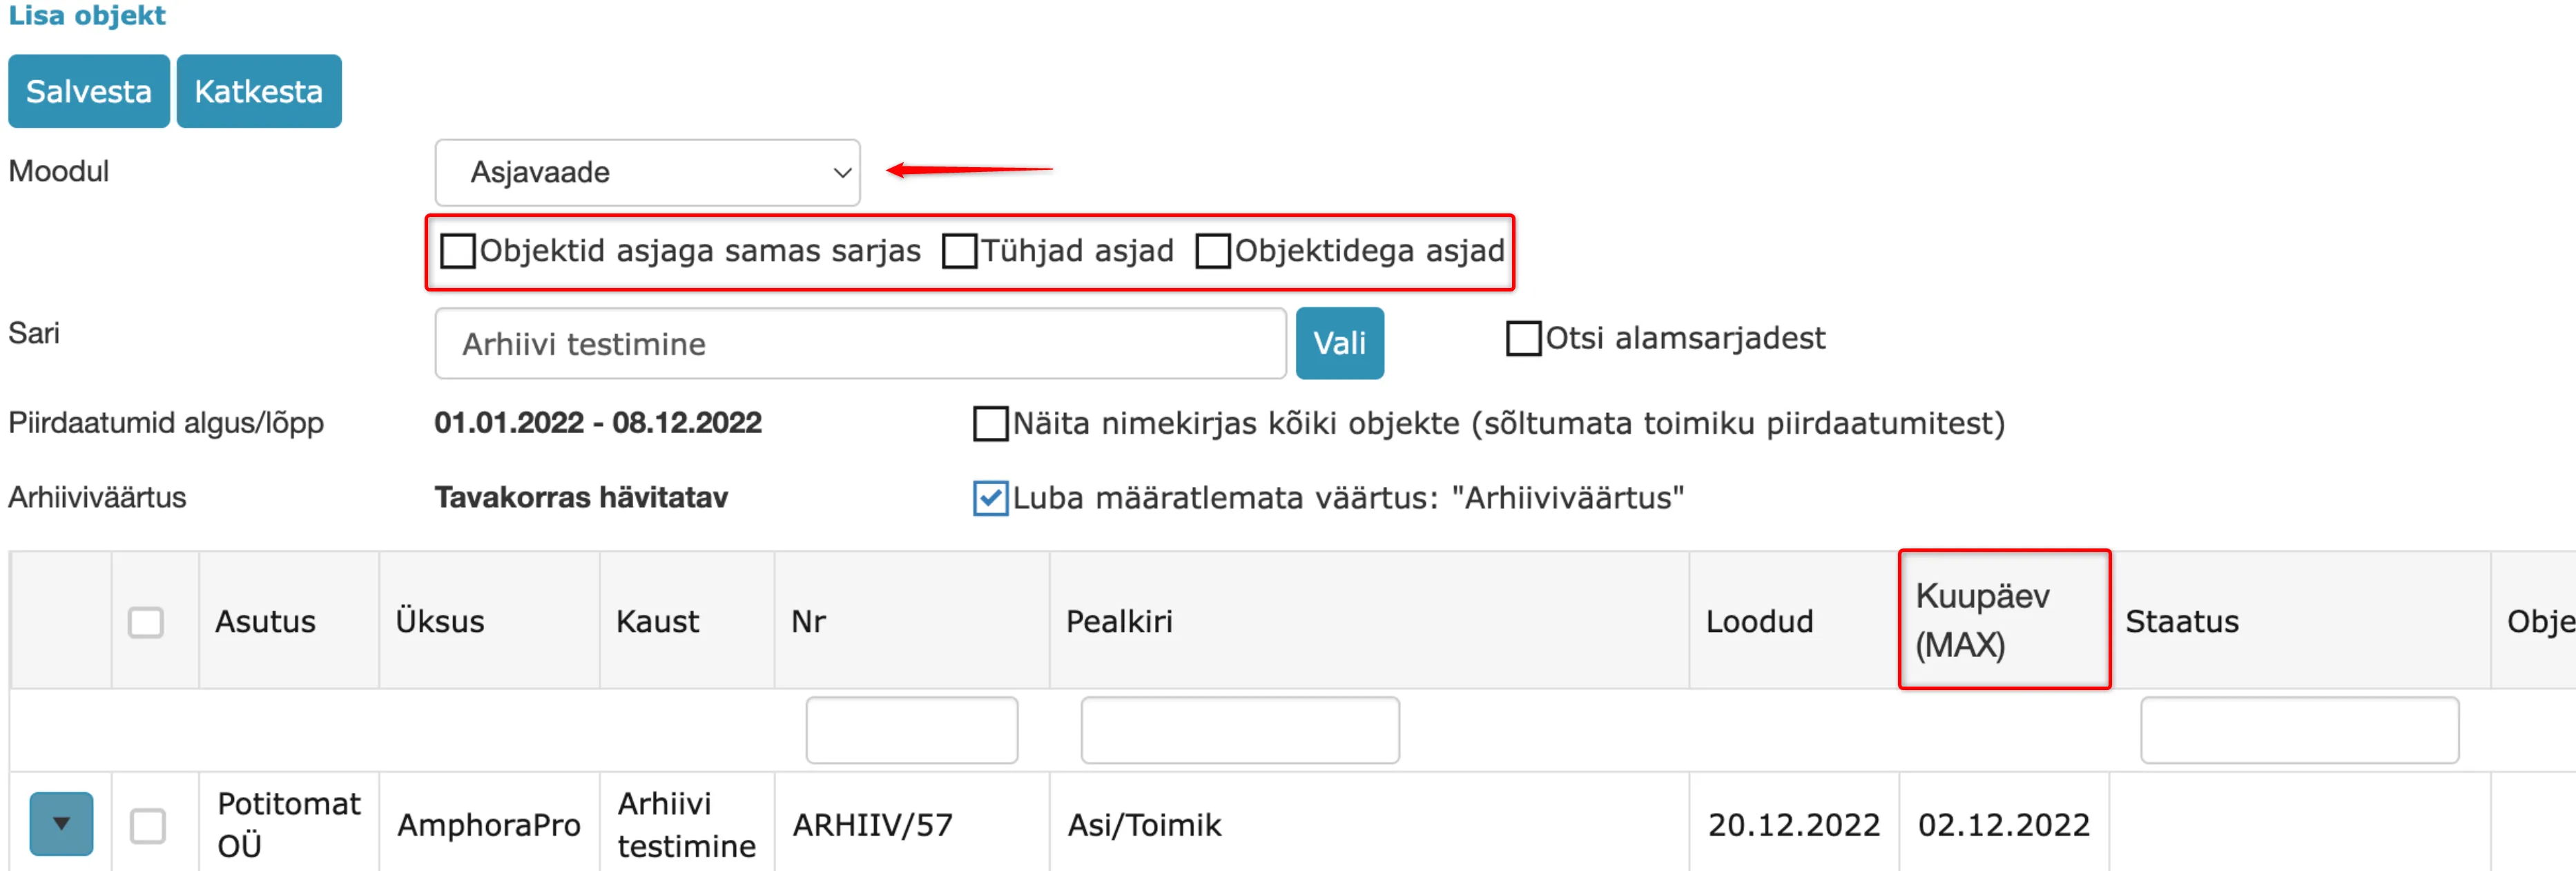 * For the Case view module, there are additional filters:
**Objects with case in same series** – Amphora displays cases where all case objects are in the same series as the case.</br>**Empty cases** – displays cases where the number of case objects is zero.</br>**Cases with objects** – Amphora displays cases that have at least one case object.
- Date (MAX) - for a case, Amphora checks all date fields on the case form and displays the largest date here. Amphora considers both the case's own dates and the case objects' dates, and both case and case object dates must fall within the boundary date period.
It is possible to sort by each column and there are filters (search) for NO, Title and Status columns.
In the table, each case file has a  button in front. This button makes all objects of that case visible. This gives the user the opportunity to check which case objects are in the case composition.
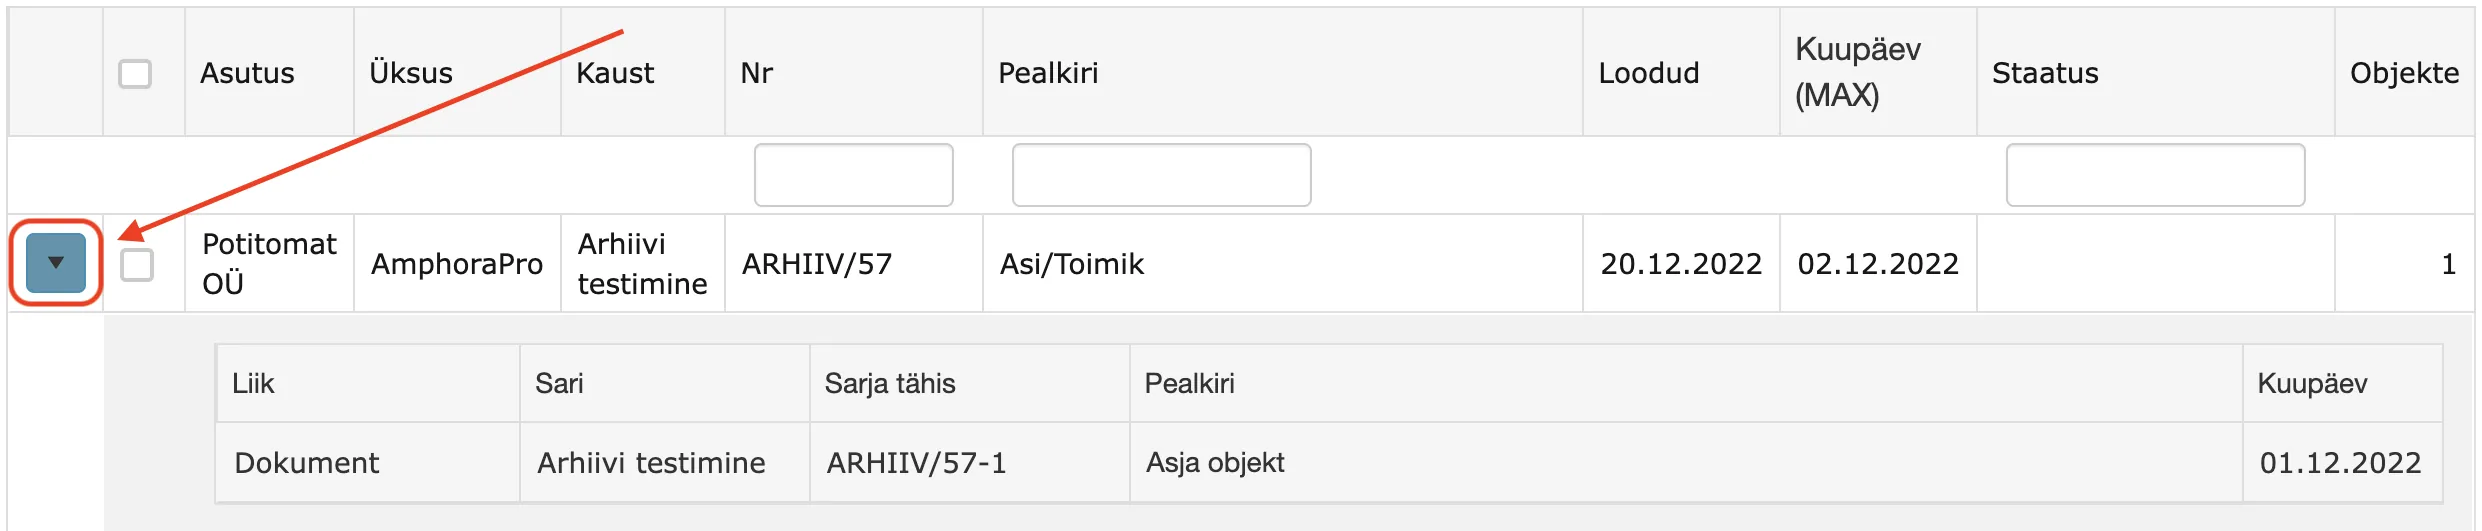 If a case is already selected for the archive file composition, then before archiving it is similarly possible to check which case objects are in the case composition.
The logic for archiving cases and their case objects is the same as for documents - archived cases and their case objects are not visible in the Case view module or other modules, but can be found with global search (the "Search also from archive" checkbox must be turned on).
Important
Amphora archives all case objects together with the case.
Invoice archiving
Select "Invoices" in the module dropdown selection.
It is possible to add both purchase and sales invoices to the archive file.
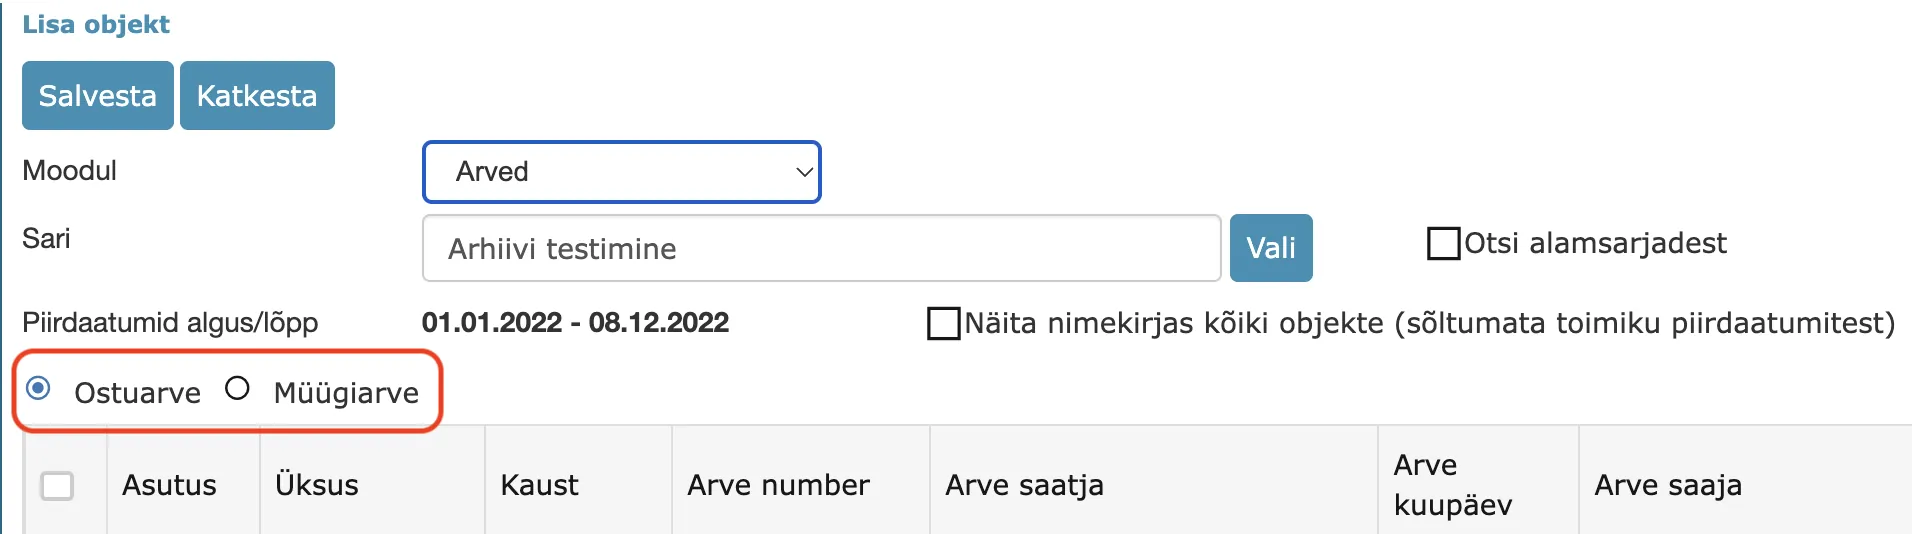 When displaying invoices within a specific boundary date range, the invoice Payment deadline is considered, and if that is missing, then the invoice Date.
It is possible to sort invoices by each column and there are filters (search) for Invoice number, Invoice sender and Invoice recipient columns.
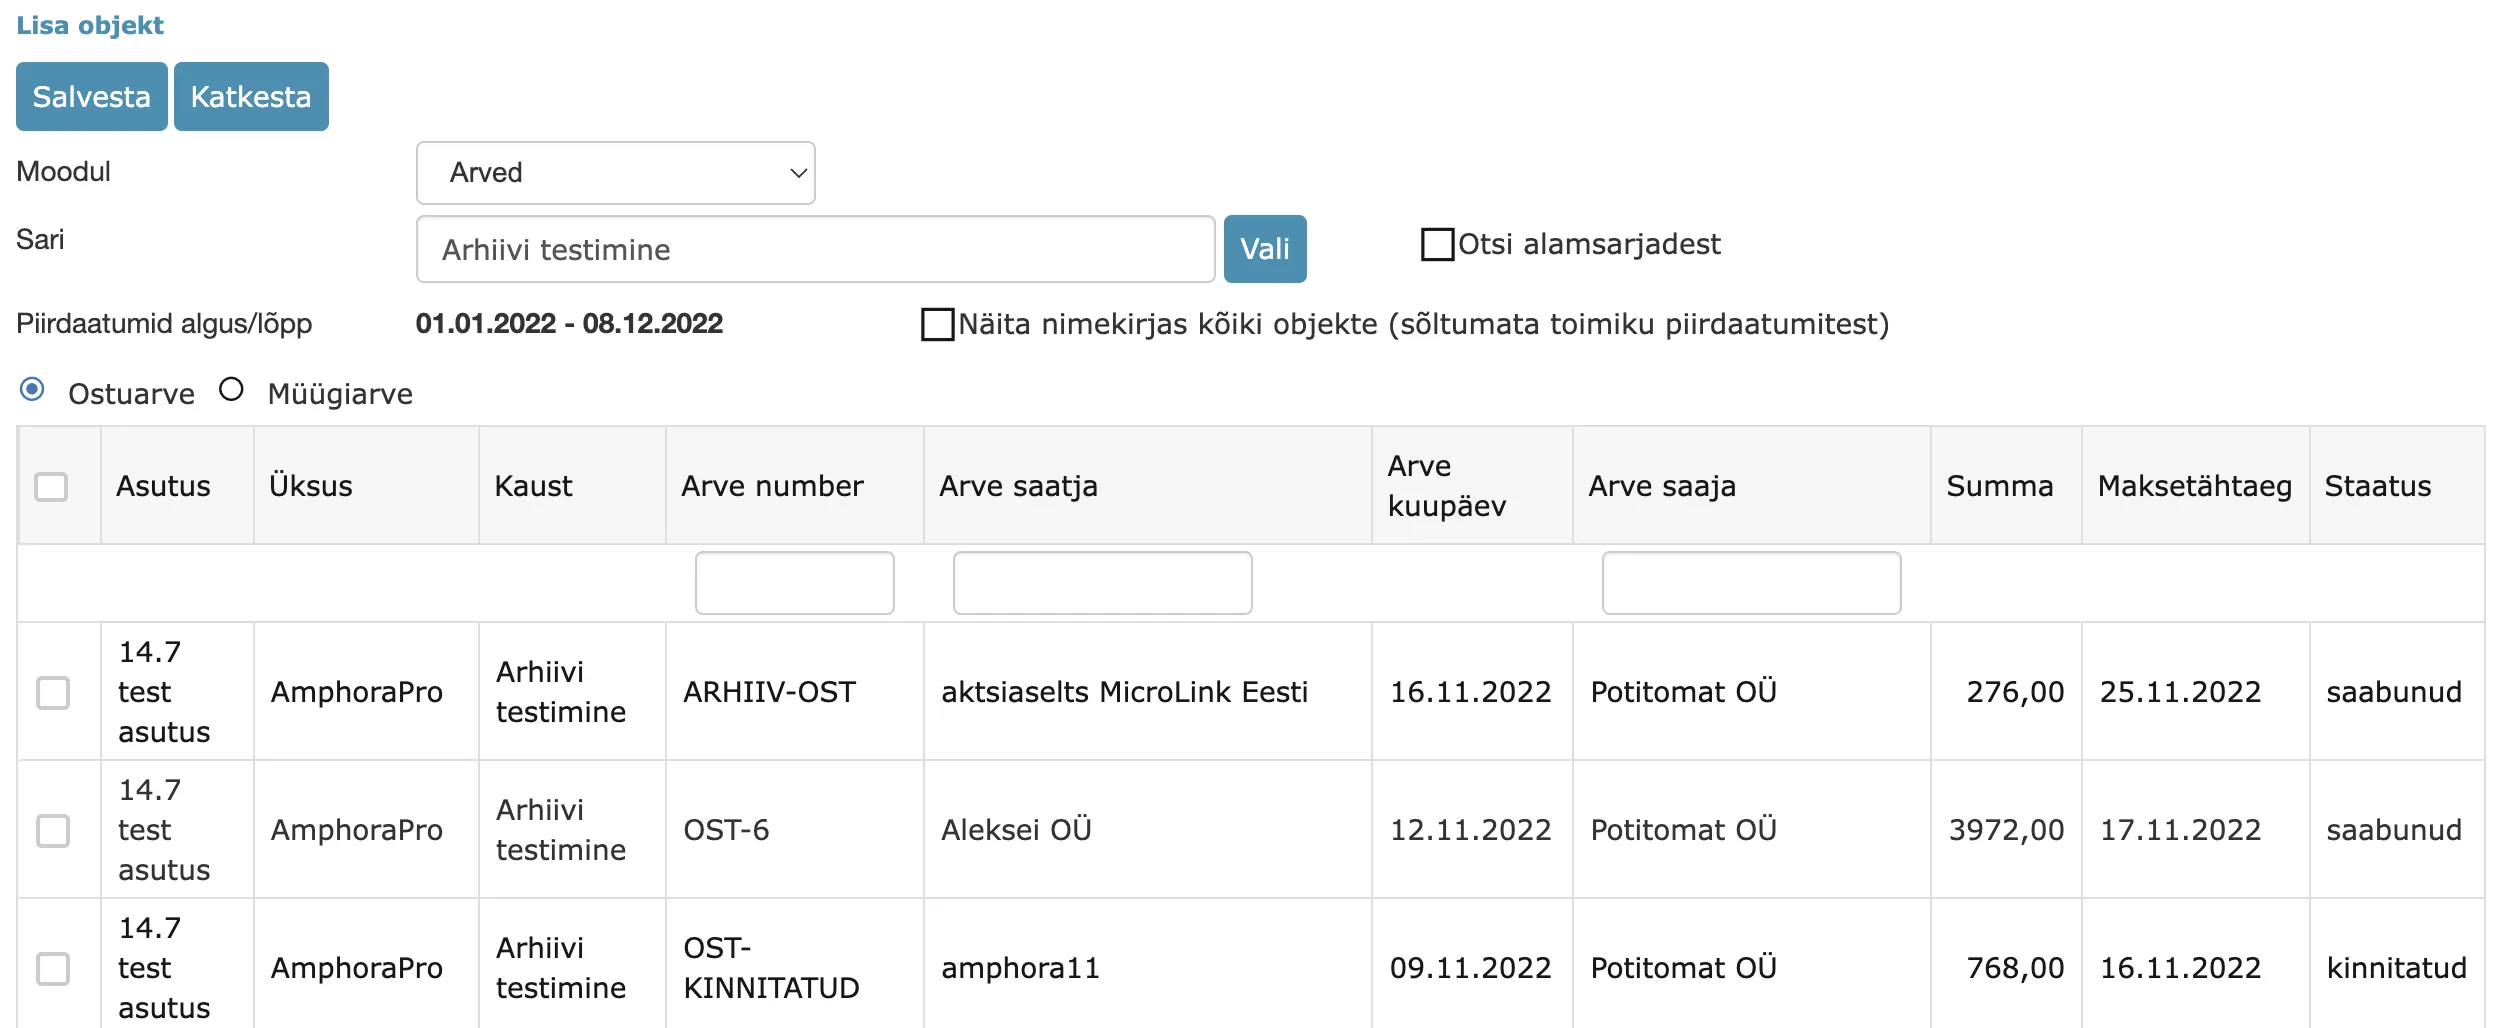 The logic for archiving invoices is the same as for documents. Archived invoices are not visible in the Invoices/Finance module, but can be found with global search (the "Search also from archive" checkbox must be turned on). Destroyed invoices can no longer be found with search.
Viewing list of archive files
The file view opens by clicking on the Archive module. Files have different statuses – for example "archived", "destroyed", etc. The file status determines what actions the user can perform with it - for example, archived files are only allowed to be viewed, not modified.
Files can be filtered by classification units (1), by status (2) and by Opened/Closed dates (3). Using the Series designation and Title boxes, it is also possible to search for files with specific series or titles. The Reset button clears the search fields, but the classification unit chosen in the tree stays selected. To clear it, choose "- Clear folder selection -" in the tree.
The files table also shows the number of objects in the file, number of files and file volume (MB).
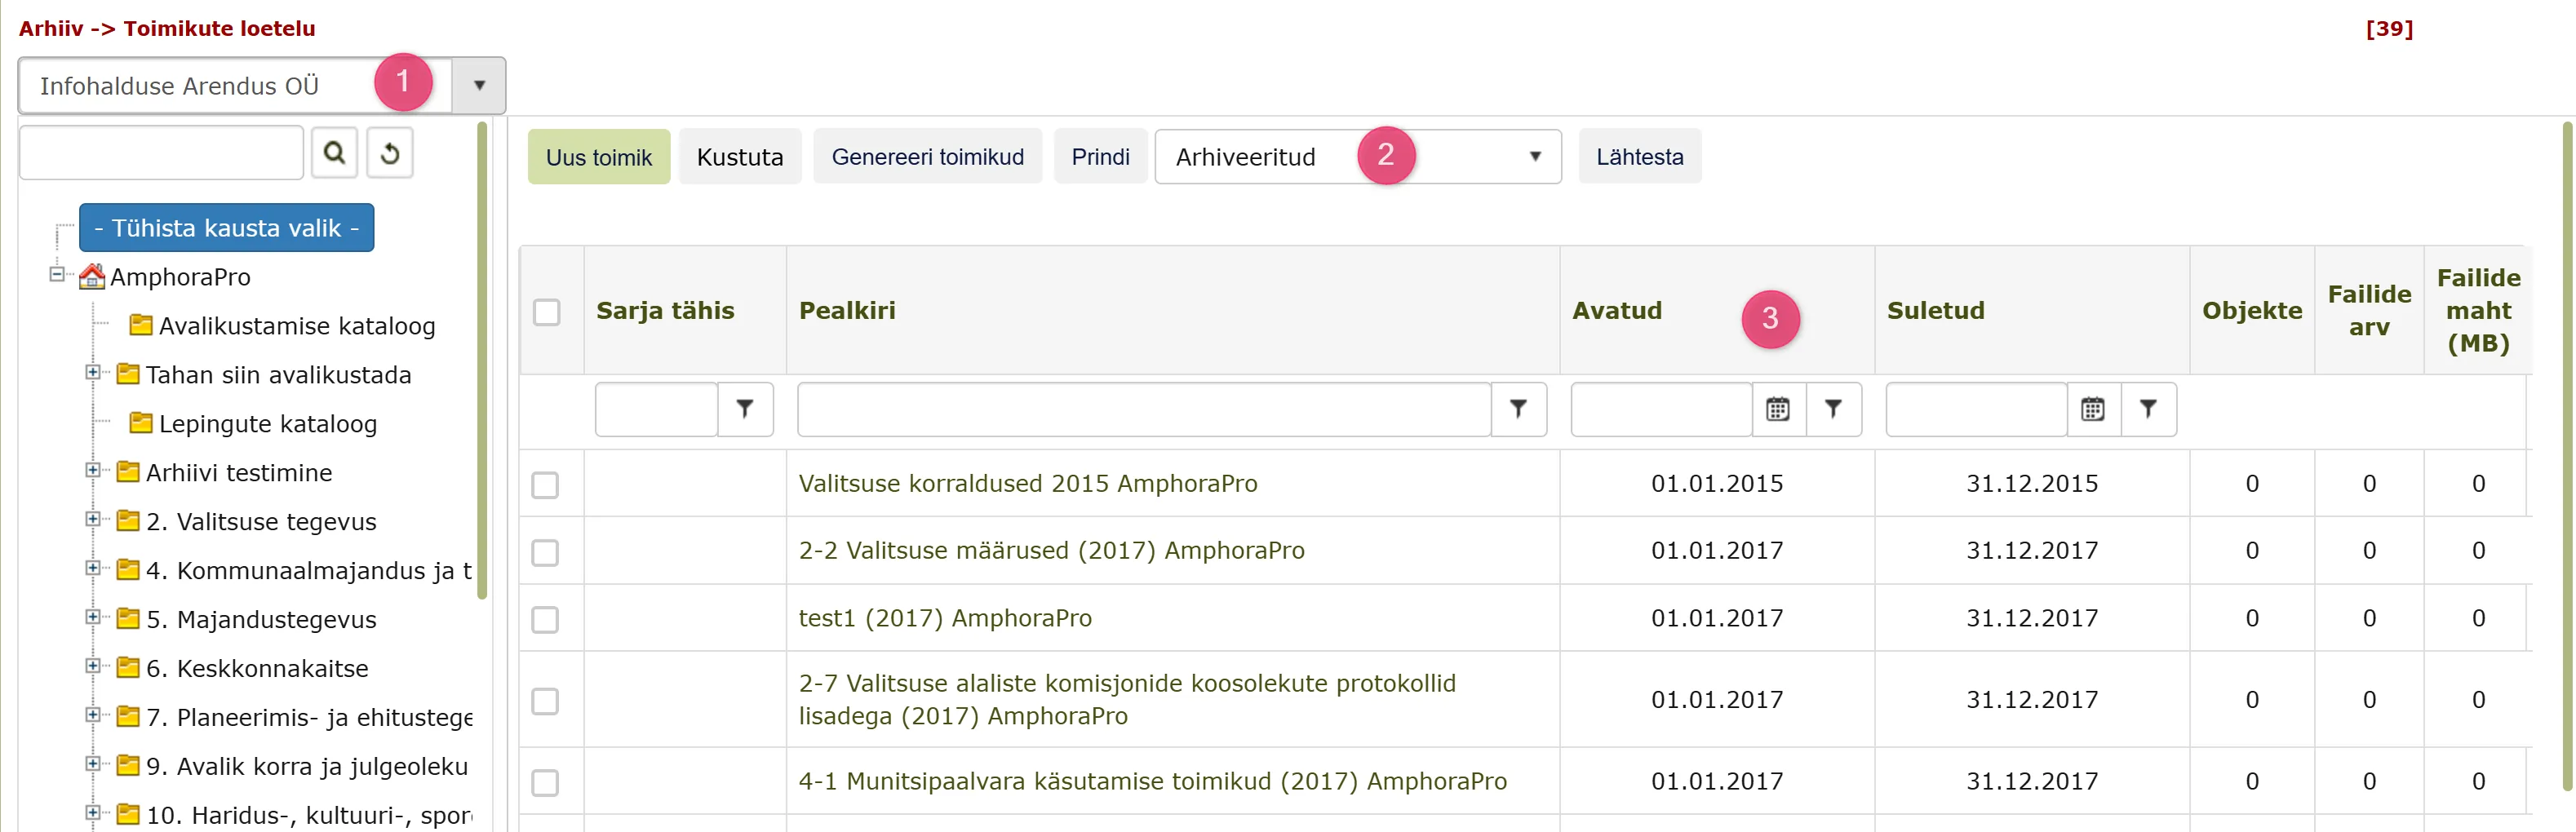 Statuses are assigned by the system according to their states:
- Not yet opened – file has been previously created, but its opening date has not been set
- Opened – date has been set and deals with the current business period
- Closed – date has passed, i.e., the closing date has passed
- Archived – archived files, visible only in read-only view
- Destroyed – list of files that have been destroyed and displays registry data in the files list
- Transferred to public archive – list of files that have been transferred to the archive
Viewing archive file data
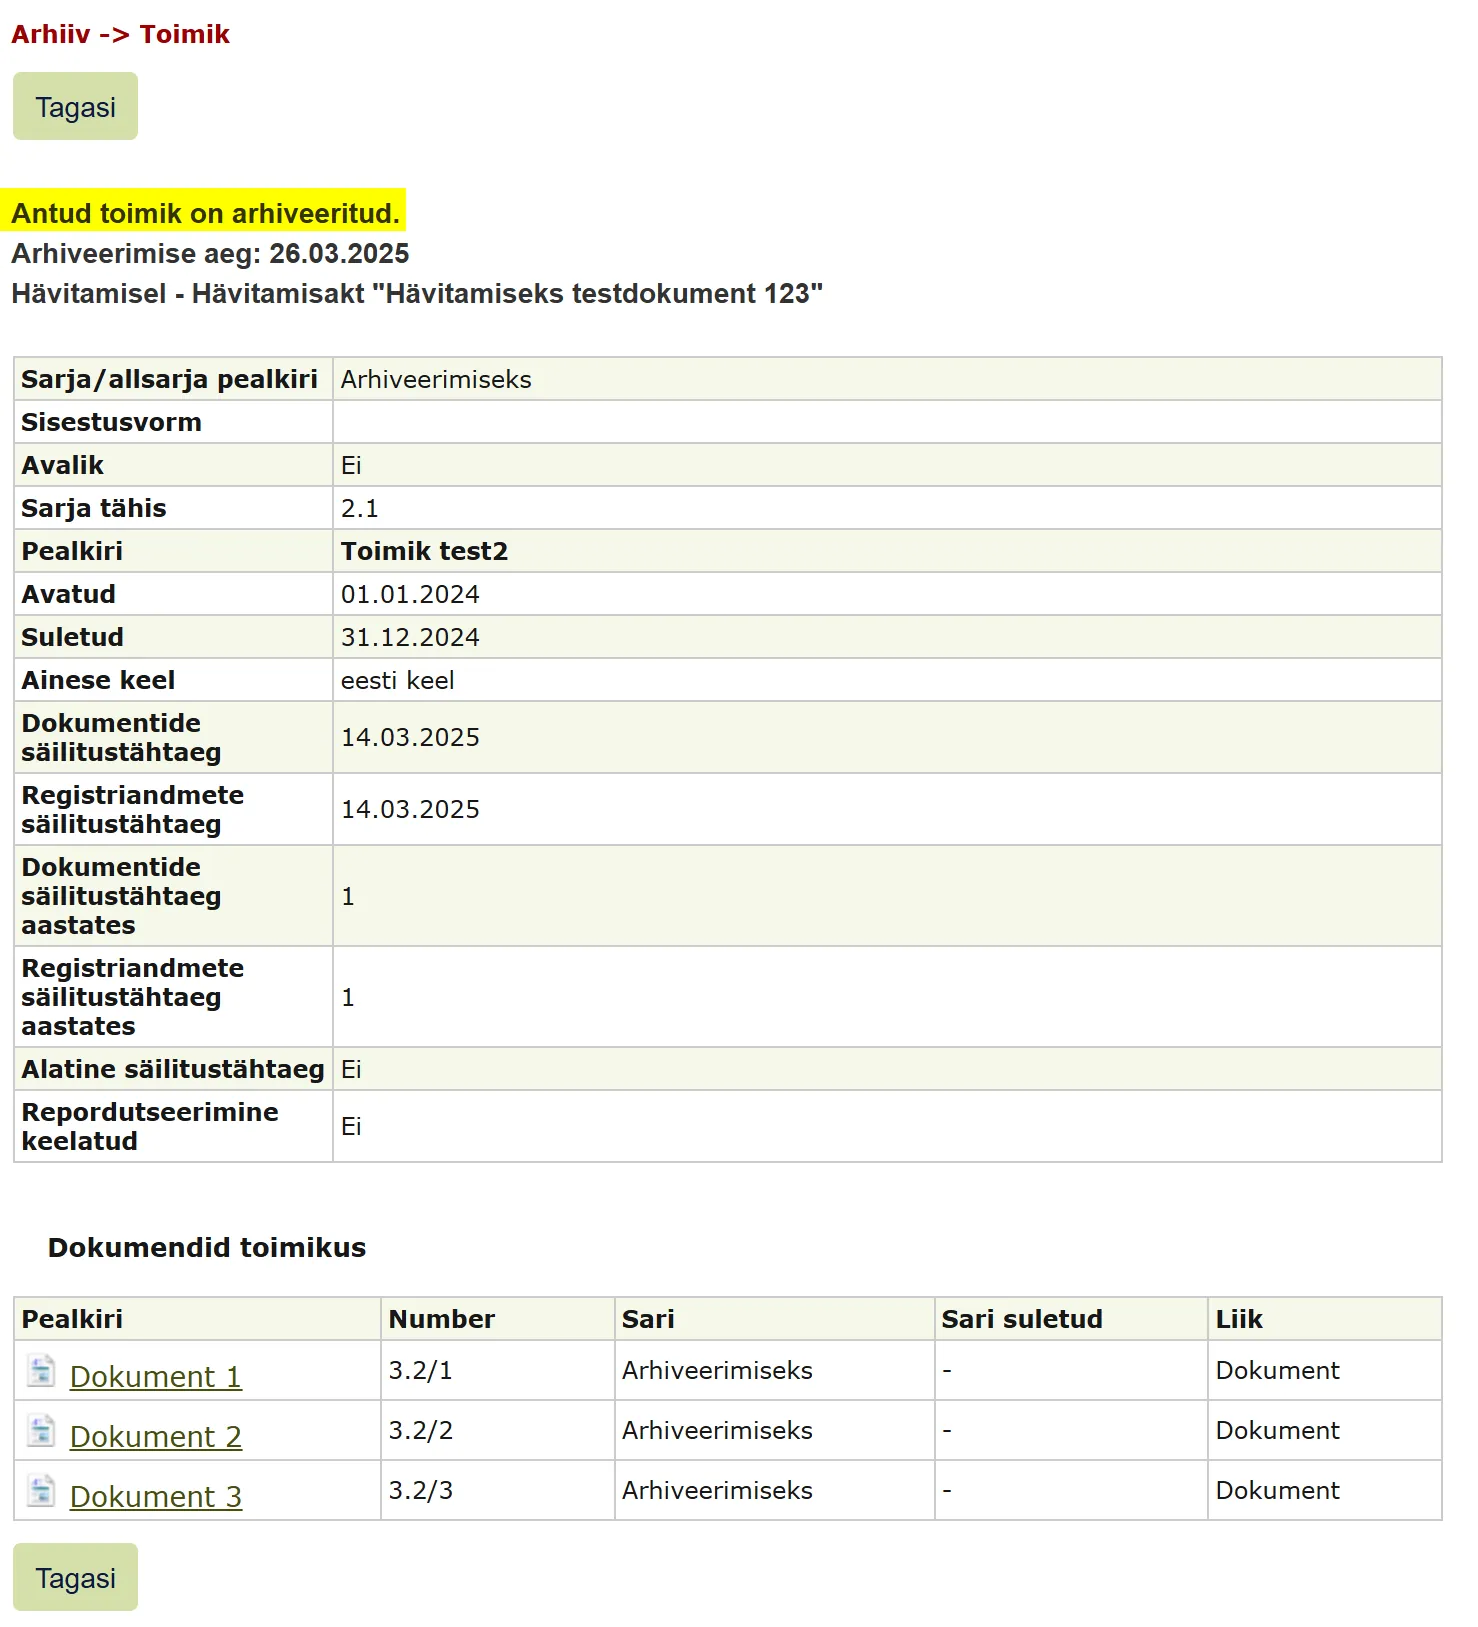
In the Archive module, clicking on a file in the files view opens that file's view. Non-archived files can be modified.
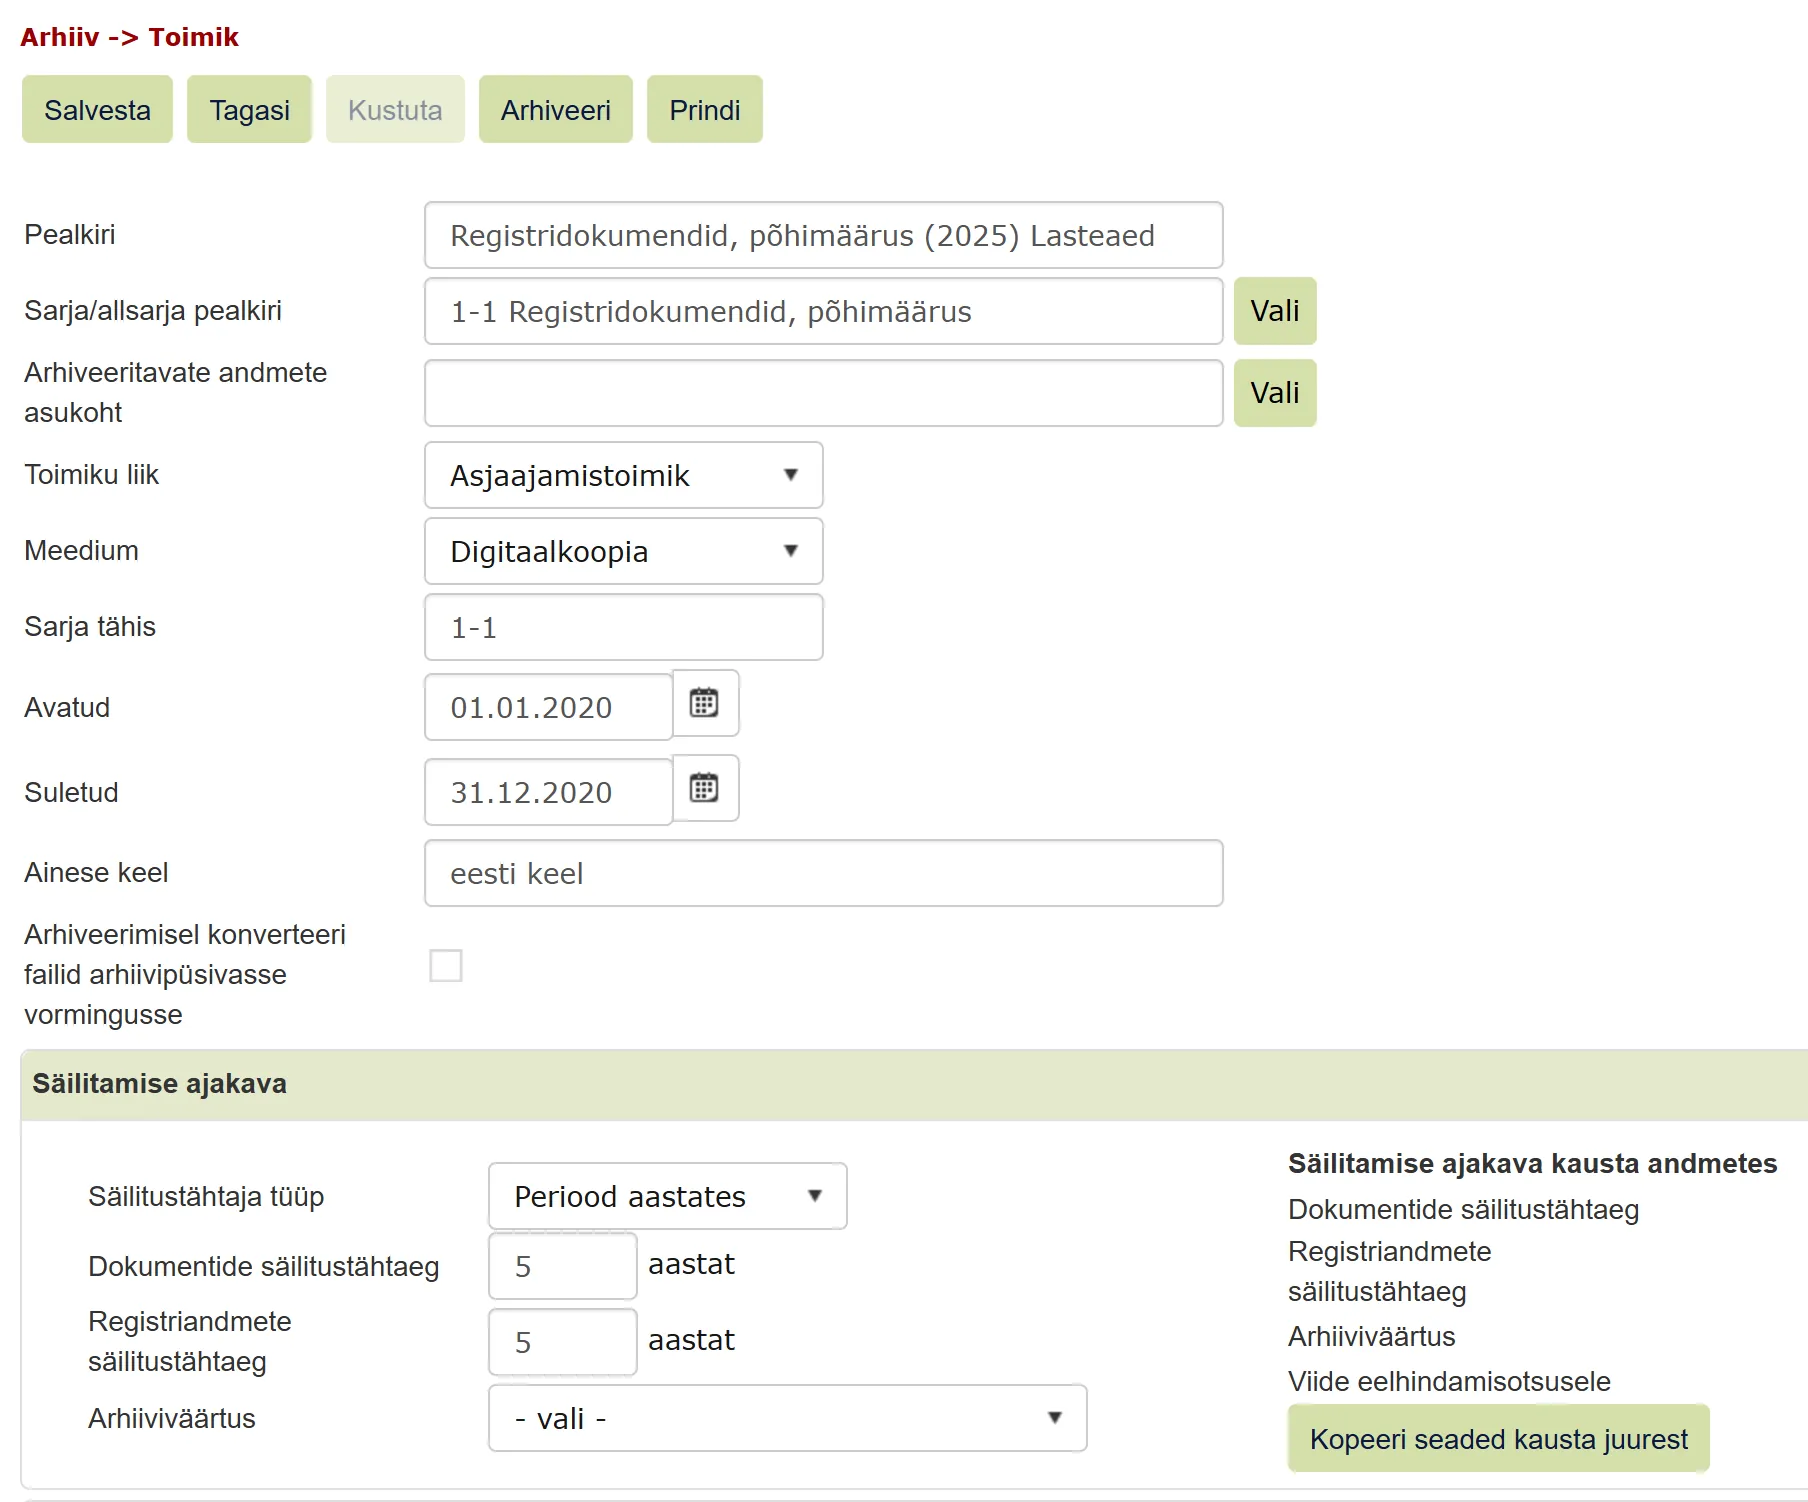
If a file is archived, it opens to the user only in read-only view, i.e., the file data can no longer be modified.
Converting files to archival format
Before archiving, a document's files can be converted to PDF. Amphora produces plain PDF, not PDF/A: PDF/A loses some formatting. Open the document and click "Files to archive format". Amphora converts both the main file and the additional files.
The button is shown only to users whose user group has the right Convert document to archival format (for letters, Convert message to archival format), see User groups.
If a file (for example a .zip) cannot be converted, Amphora shows "File conversion failed!" with the file name. Replace that file with one in a convertible format and try again.
File archiving
When archiving a file, it is separated from active database use and all post-archiving authorizations regarding actions apply to it (for example, non-modification, etc.).
To archive a file, open the file you want to archive and in the opened file view, click the "Archive" button.
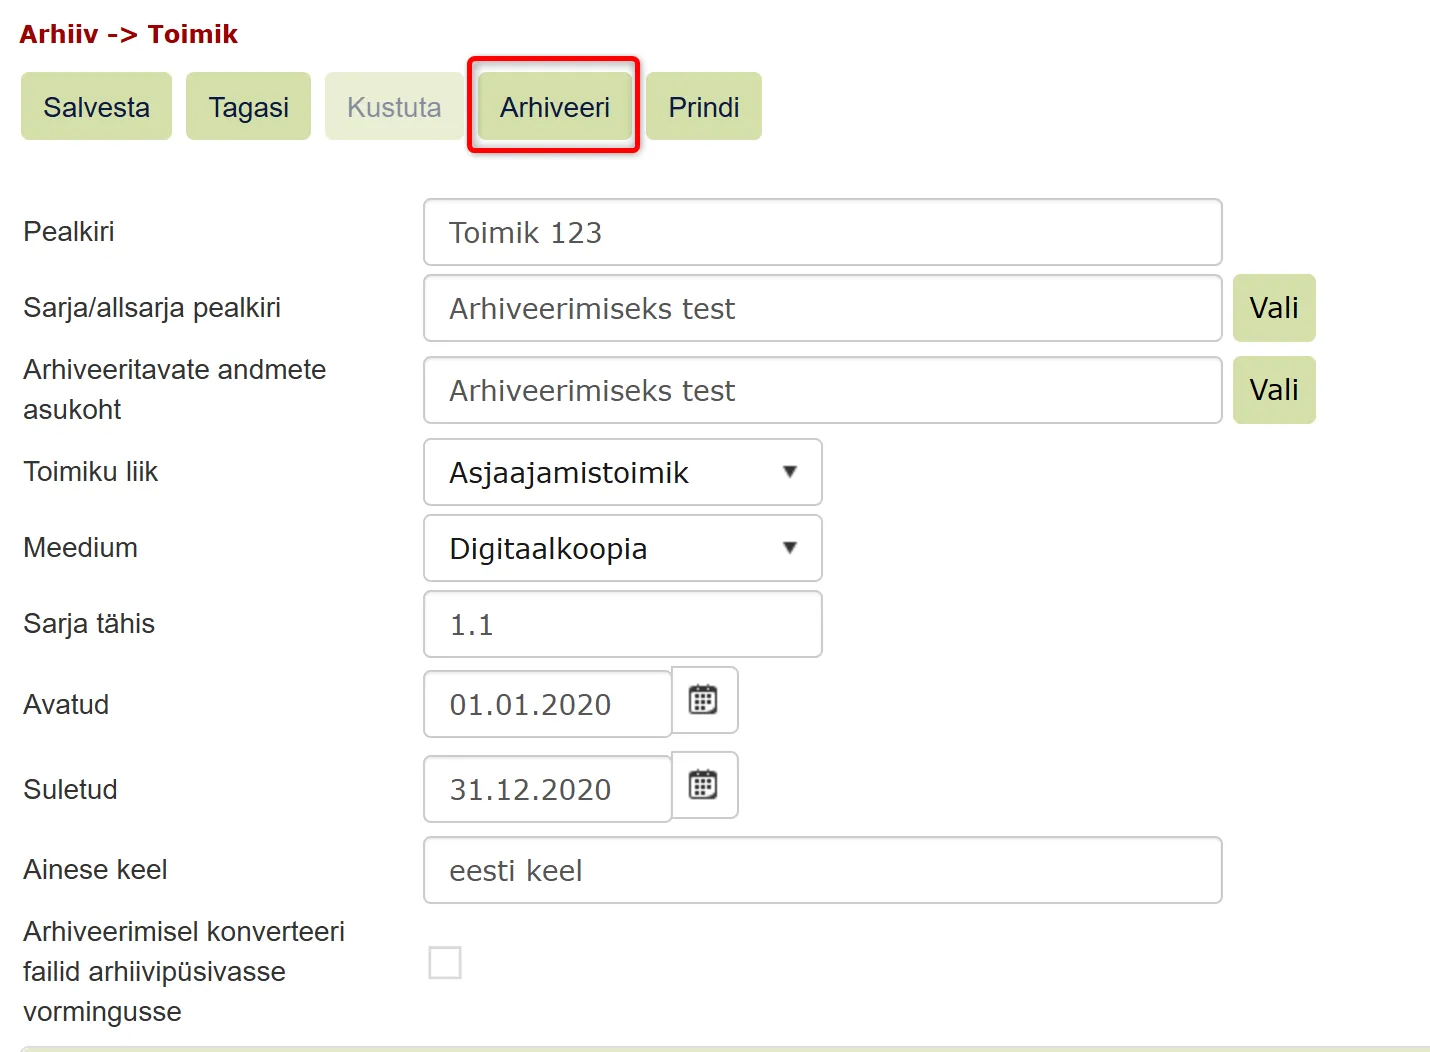
After that, the system asks for confirmation and displays a notification
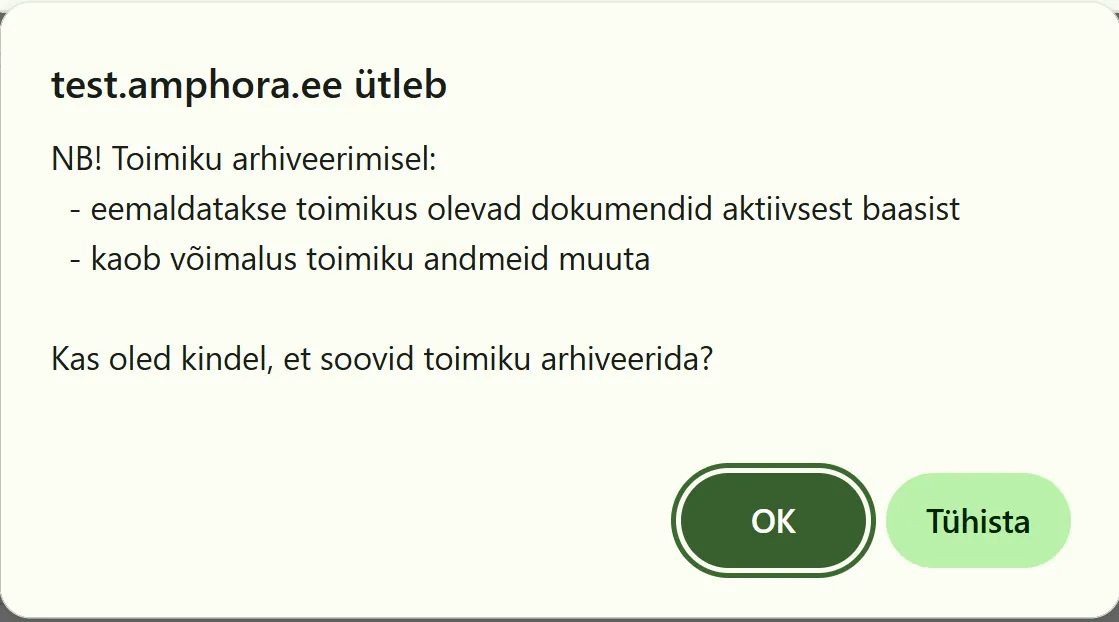
Important
If the business period is active, the Archive button is gray (inactive) and archiving is not possible.
When all necessary data for the file is available and the archiving command is given, the system performs the file archiving. After archiving, the file is only treatable in the system in read-only view, i.e., data in the archived file can no longer be changed.
Important
Before archiving, definitely perform a thorough check of the correctness of the file content!
NB!
When an archive file is archived, Amphora deletes the old versions of its documents – the last two versions and the editions are kept. The old versions are deleted permanently together with their files, and restoring the archive file does not bring them back. Letter versions are not deleted.
Restoring a file from the archive
An archived file can be restored from the archive: open the file and click "Restore from archive". The file and its objects are then no longer archived. The button is shown only on an archived file that is not destroyed and not added to a destruction act.
Searching archived documents
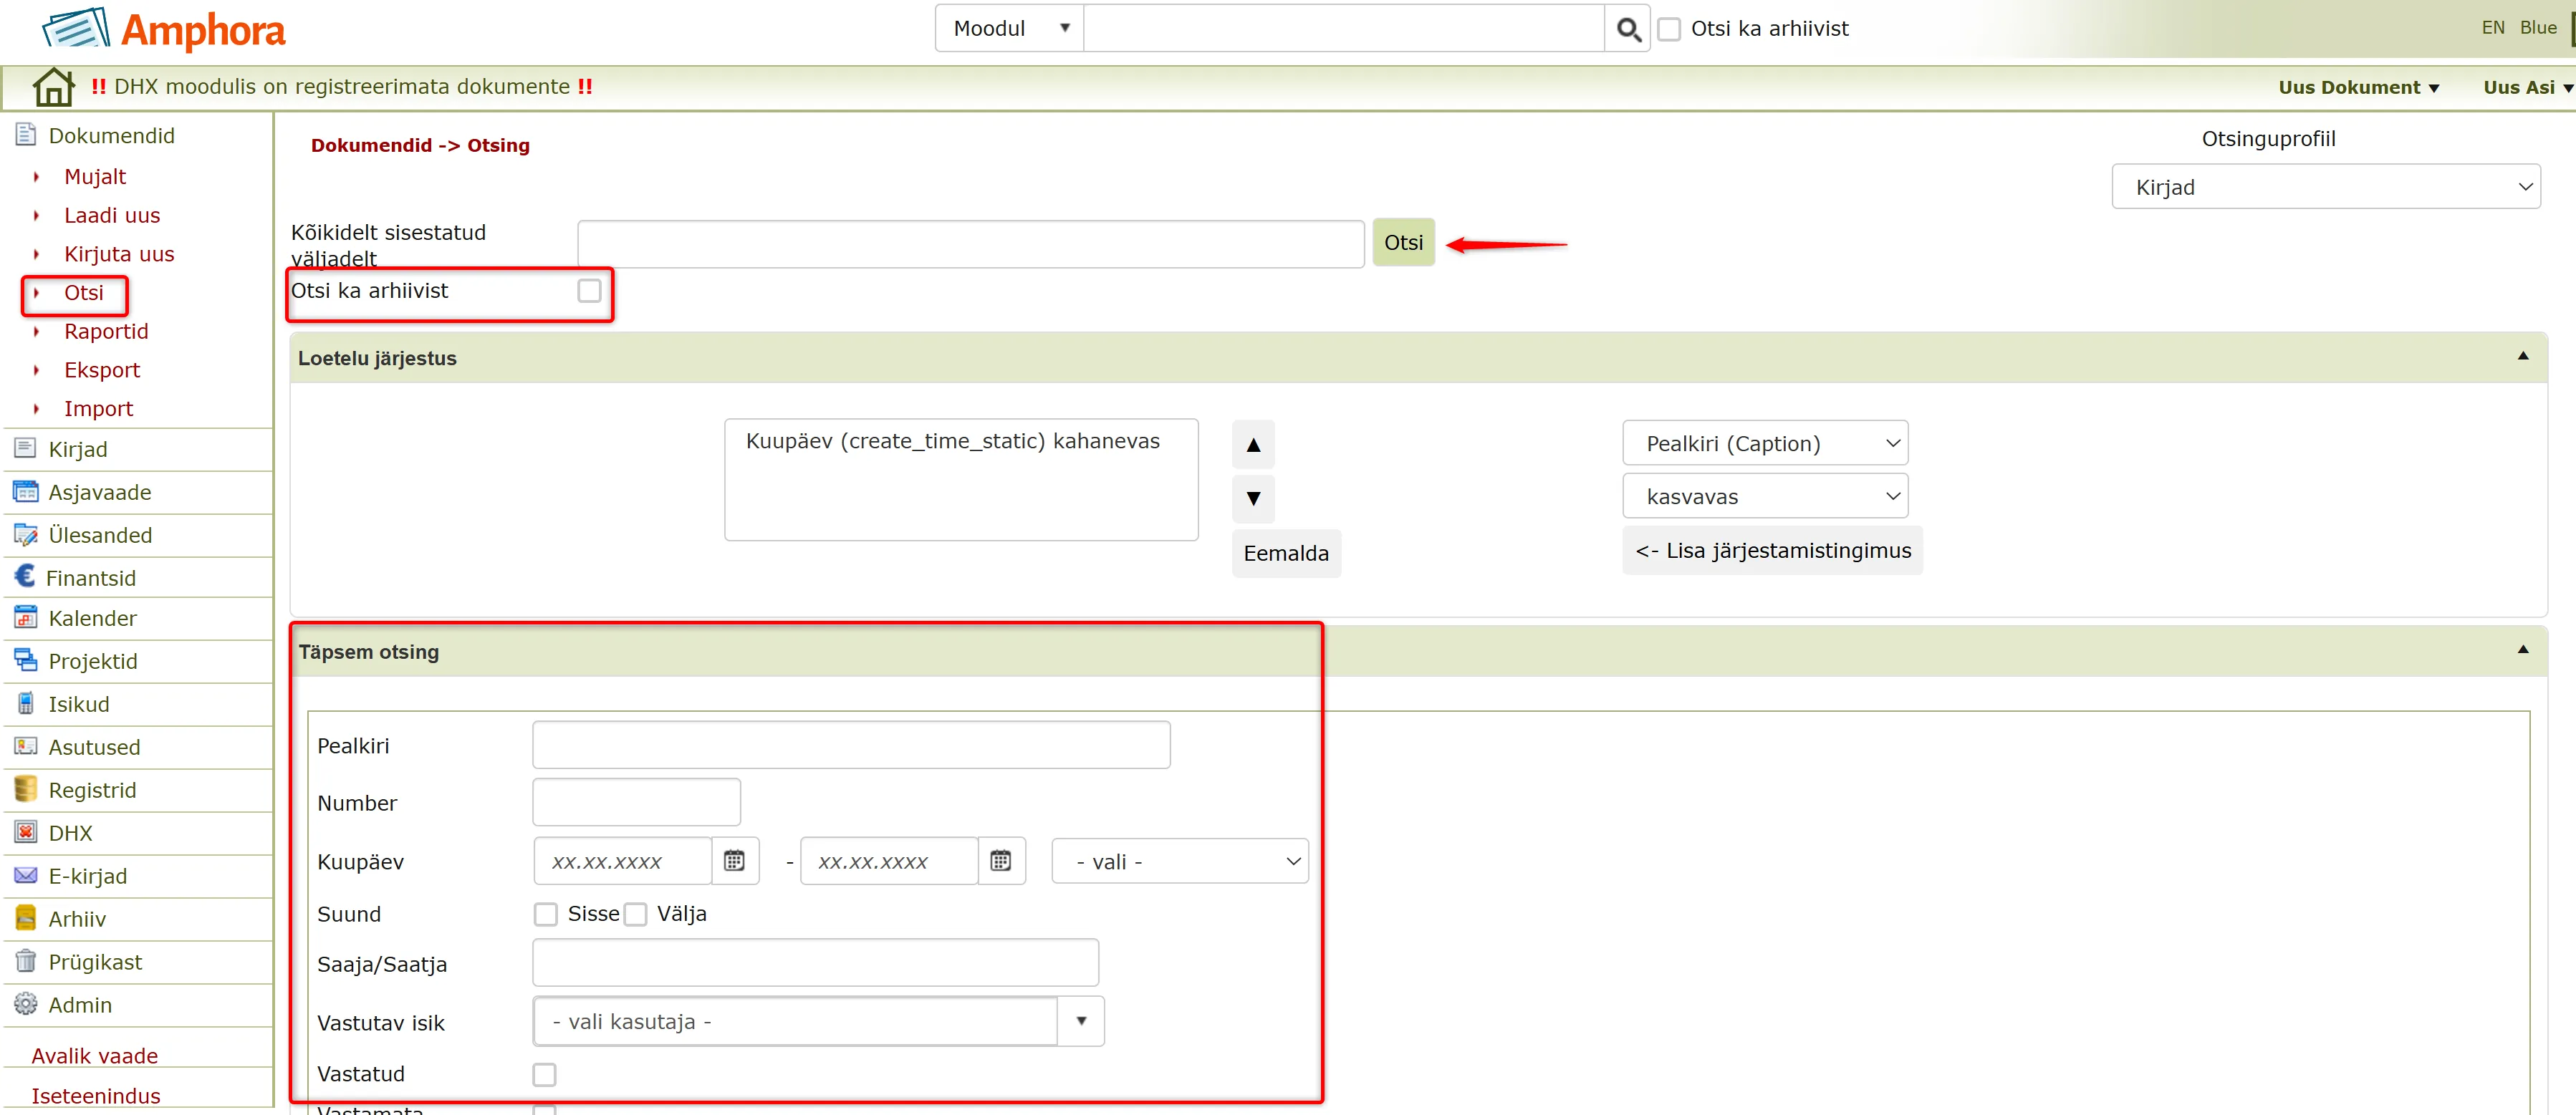
Archived documents can be searched using system-wide search. For this, you need to check the "Search also from archive" option.
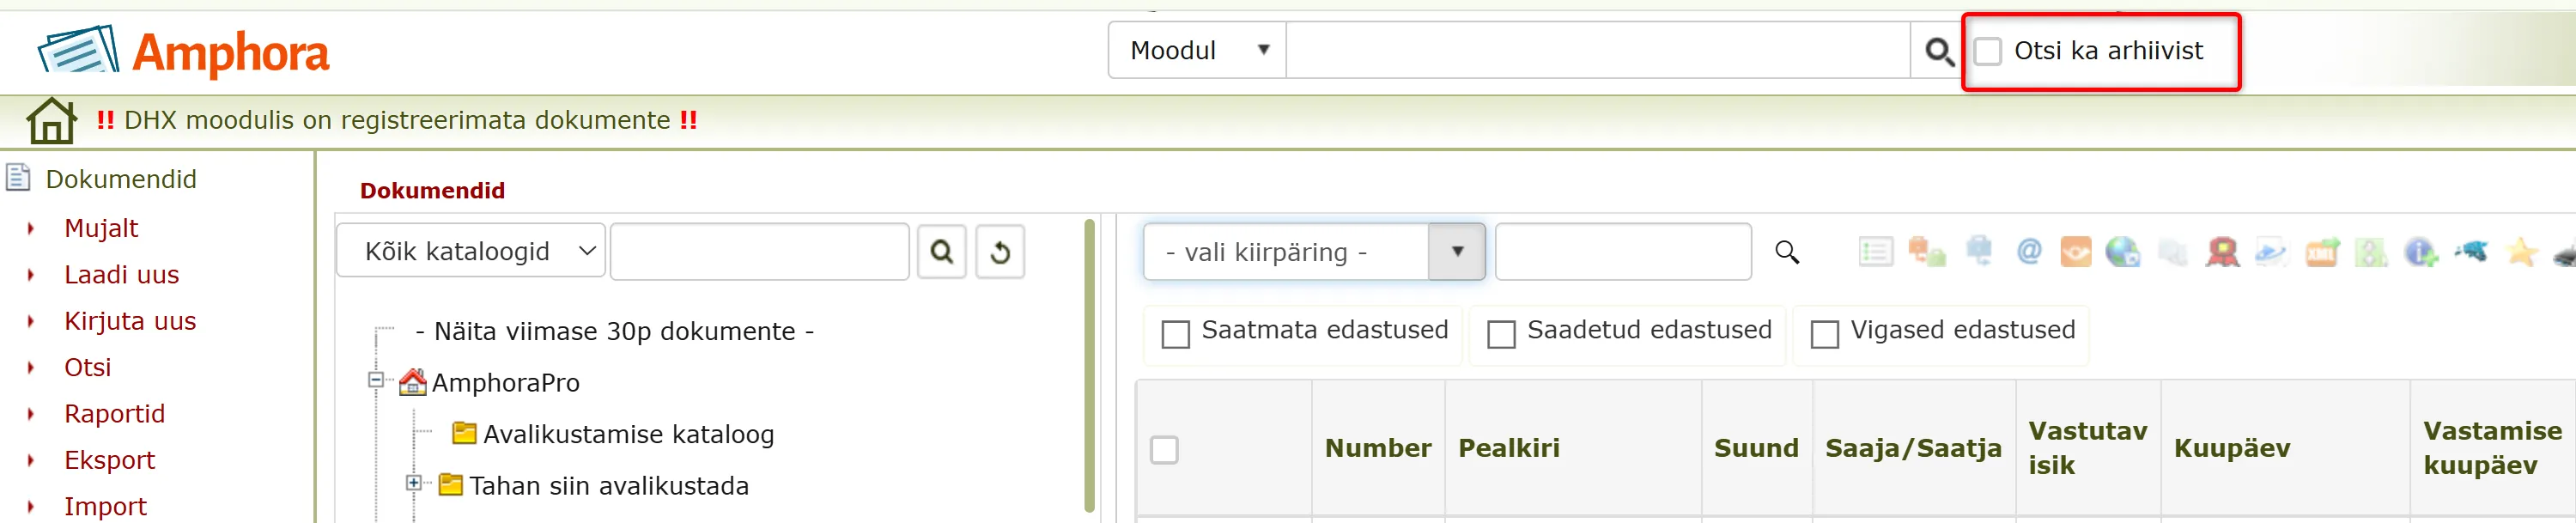 Another option is to search for documents using Documents module search by going to Documents -> Search, filling in the corresponding search criteria (adding the search phrase to the From all entered fields box or using Advanced search) and checking the "Search also from archive" option.
Viewing archived documents
All archived documents are in modification view and cannot be changed. Archived documents can be found:
- With search
- In the Archive module in files view
Viewing control reports
To view reports, open the Archive module and select "Reports".
 The system allows creating various control reports that help monitor activities related to archive organization. Depending on needs, different reports can be compiled to get the desired information.
The system displays the following reports:
- files exceeding retention period;
- non-archived documents – this displays non-archived documents left from previous business periods;
- documents without files – displays documents that do not belong to any file.
If the report selection is missing, they can be added to the user by going to Admin - Reports. Search for the corresponding report (e.g., "Non-archived documents"), open it and add the report to the desired user, save. More detailed instructions for adding reports to users are located here.
File destruction
The system allows destroying a file, group of files, case or document whose retention period has expired.
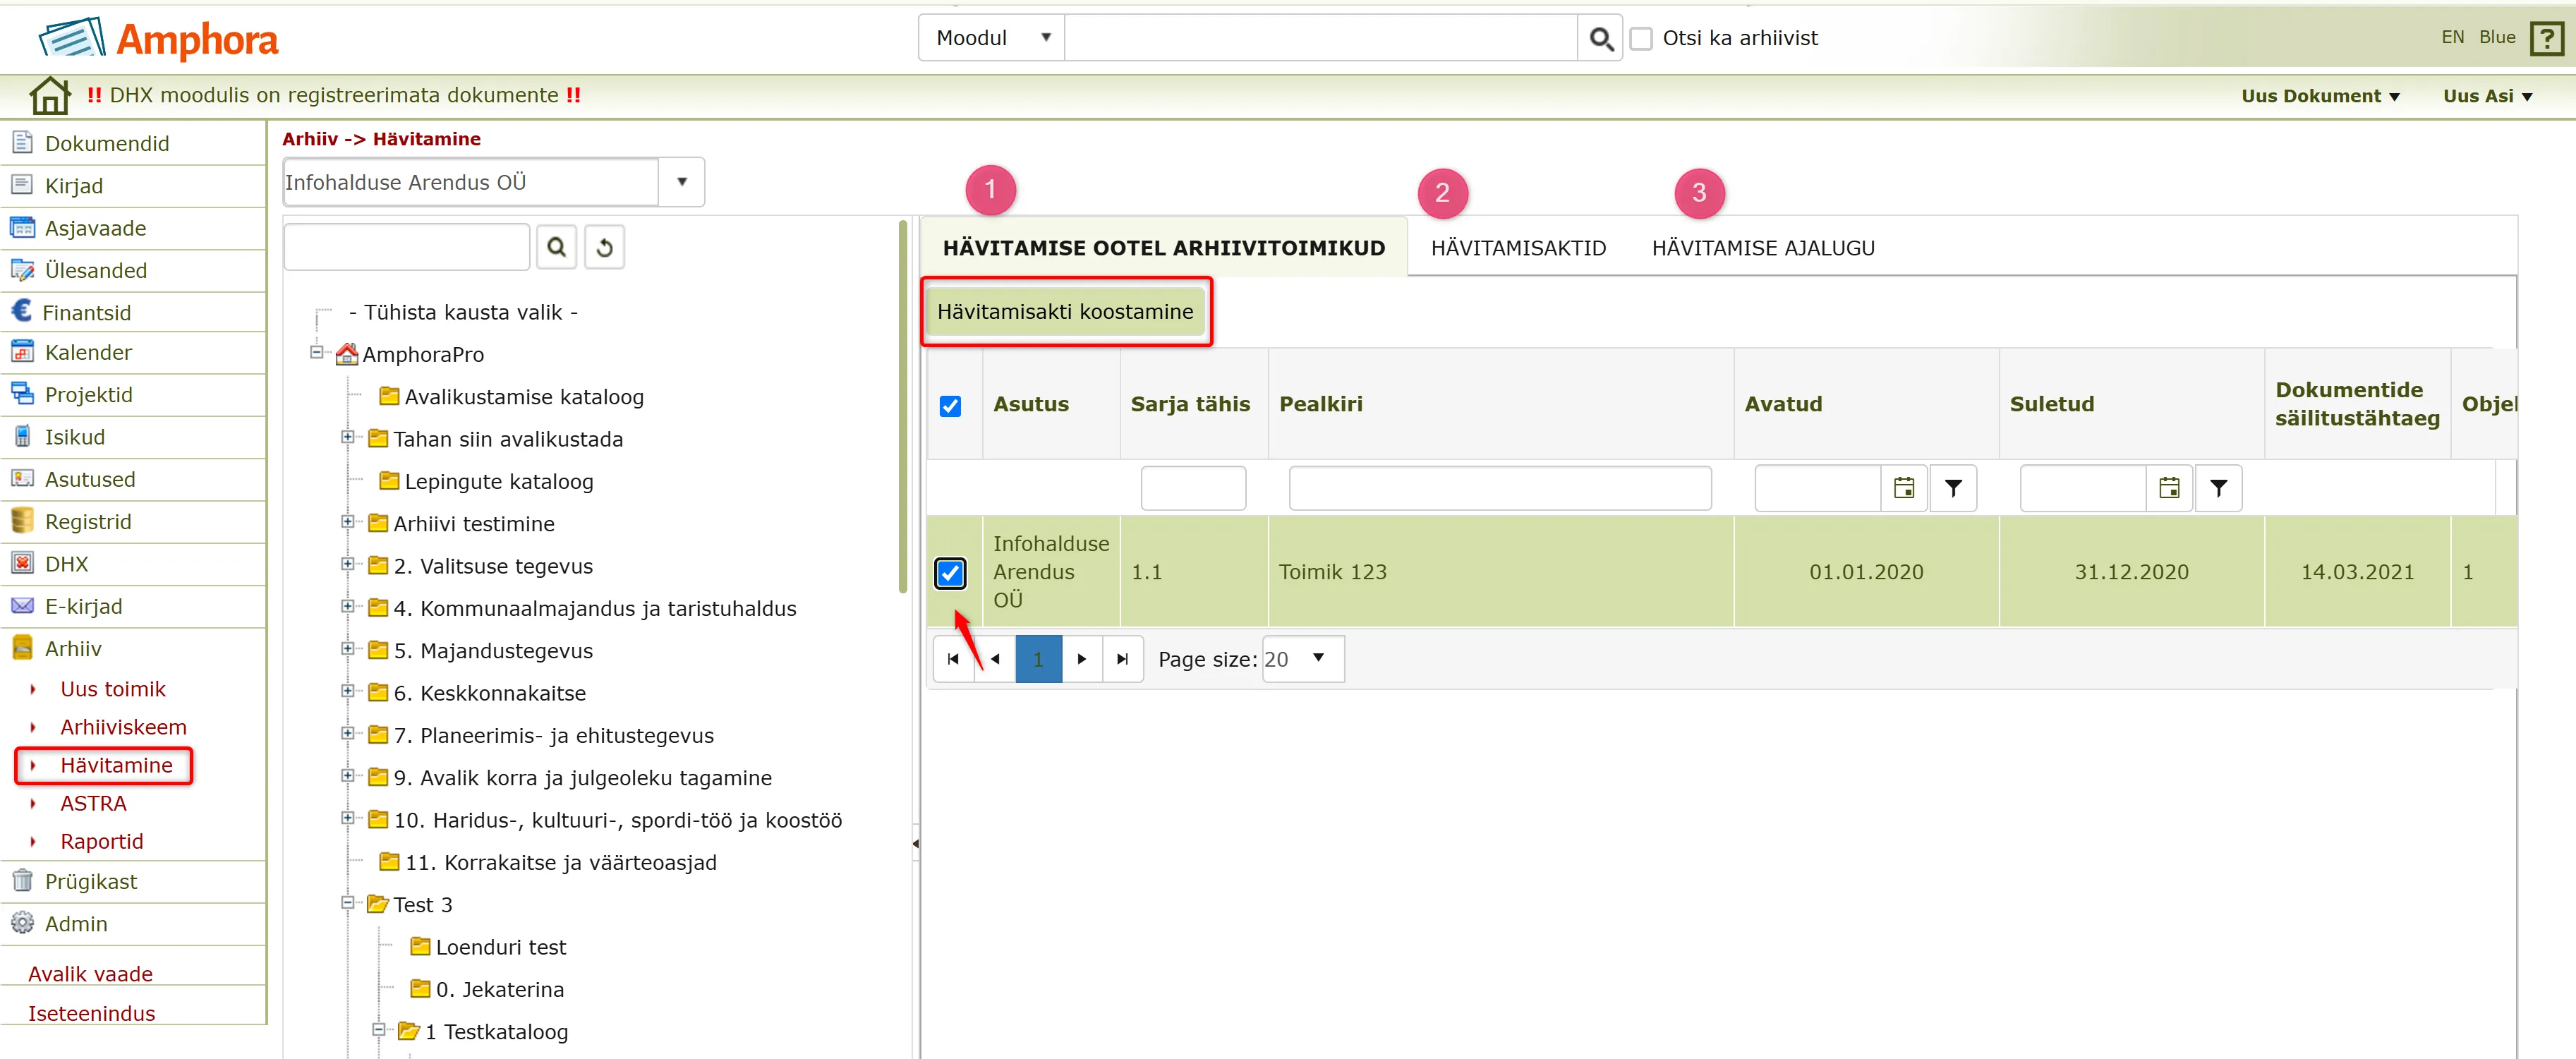
Go to Archive -> Destruction. Here you can get an overview of the following:
- Archive files awaiting destruction - the system displays a list of archived files that are ready for destruction (the retention period has passed, the file is not of archival value or permanently retained, and it has not been destroyed or transferred to the public archive). A file without a retention deadline is not listed. Here it is possible to sort and filter columns - this simplifies searching for archive files.
- Destruction acts - in this tab it is possible to see already compiled destruction acts for which destruction has not yet been carried out to the end (displays the corresponding organization, title, creation date, number of files, objects, files and volume).
- Destruction history - displays history of previous destruction actions (corresponding organization, title, creation date, number of files, objects, files and volume).
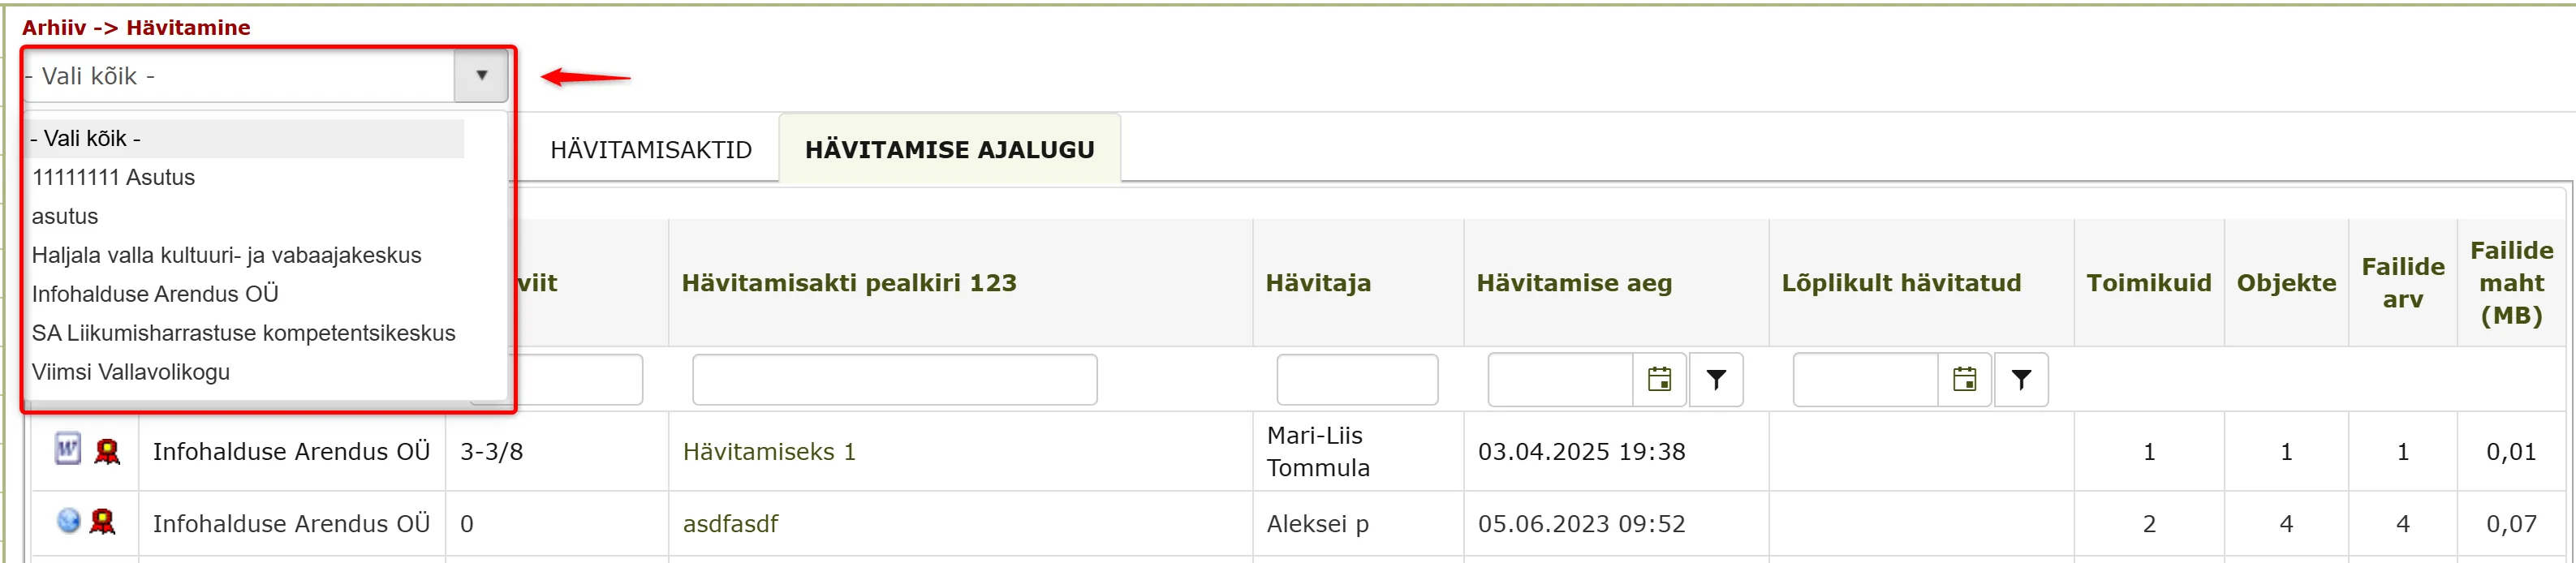
 * In the Destruction acts and Destruction history tabs, you can make an organization selection from the dropdown menu:
 * In the Destruction acts tab list view, there are file and procedure icons in front of each act. If you click on the file icon, you can open the file in preview or download it (HTML files open in preview, DOCX files and signature containers are downloaded). Clicking on the procedure icon opens the procedure detail view. If you move the mouse cursor over the procedure icon, the procedure data is displayed.
Generating destruction act
- Go to Archive files awaiting destruction view.
- In the list view, there is a checkbox next to each archived archive file. Check the archive files you want to add to the destruction act composition. You can select by page.
- Click the "Destruction act compilation" button (see image above).
After that, the system displays the destruction data form.
Destruction act compilation can also be started without any archive file being selected in the list view, since it is possible to select archive files separately in the destruction act compilation view.
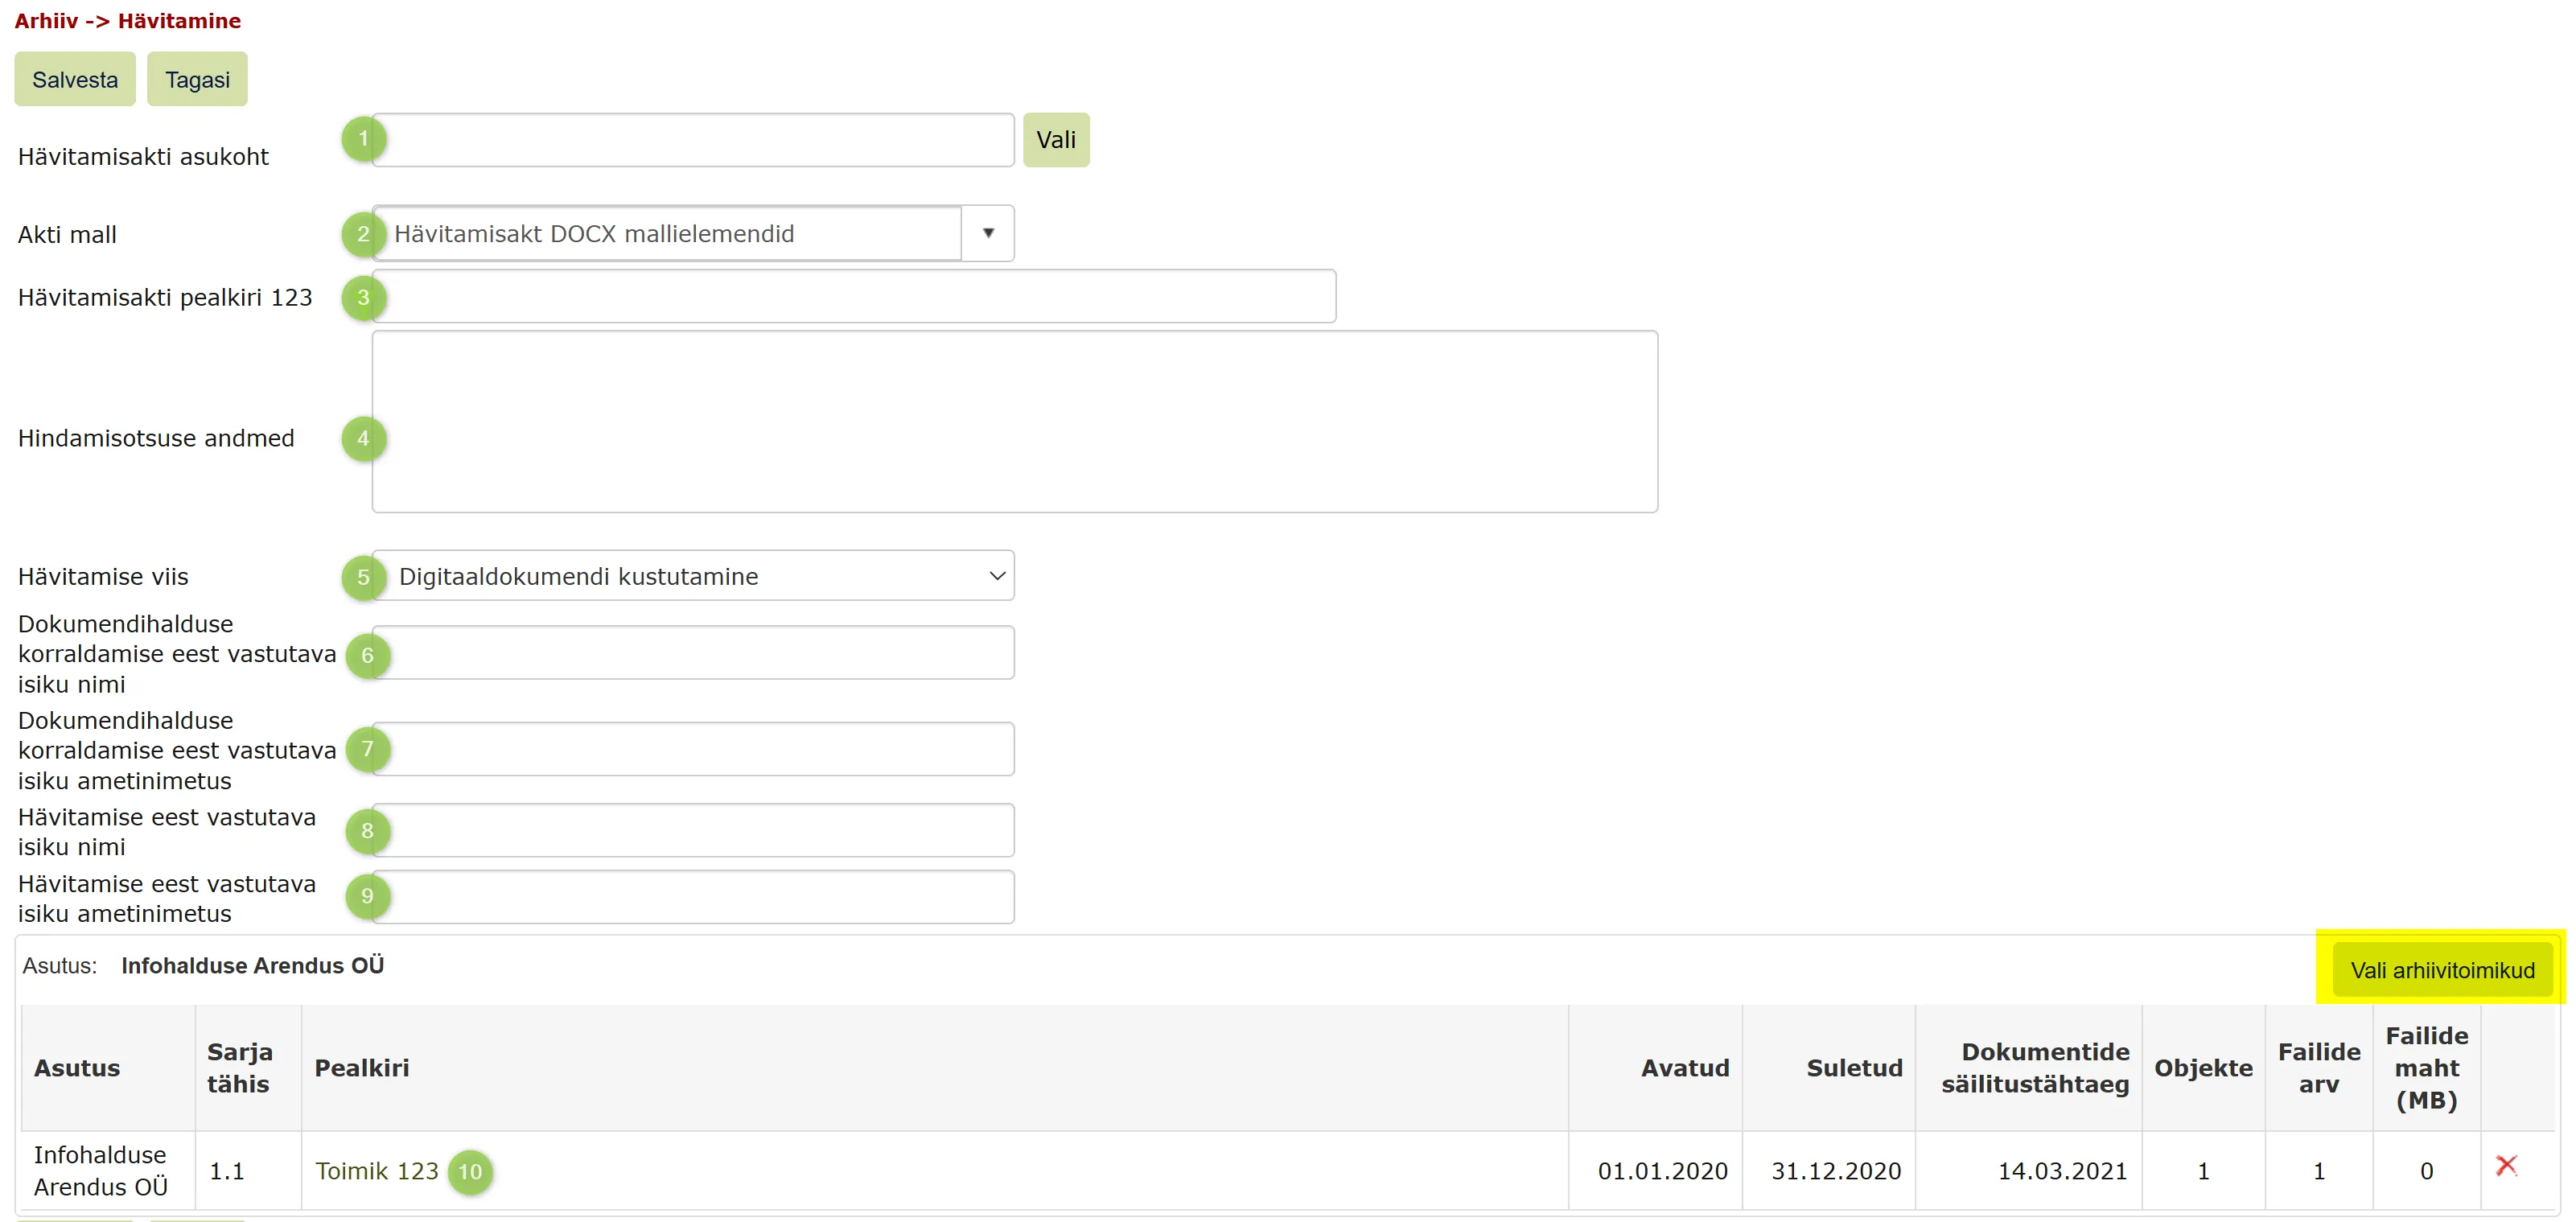 The form contains the following metadata:
- Location of disposal statement - series where the destruction act is registered
- Act template - if template settings have not been made separately, the system generates the destruction act based on a simple HTML template. If desired, it is possible to add an official design destruction act template.
- Destruction act title
- Assessment decision data
- Destruction method - Digital document deletion
- Name of person responsible for record keeping
- Post of person responsible for record keeping
- Name of person responsible for destruction
- Position of person responsible for destruction
- the table of files to destroy (above it: Organization: and the "Select archive files" button)
The "Select archive files" button allows adding files to the destruction act composition. Here it is possible to select archive files from different catalogs. The selection only displays archive files of the organization that is specified with the "Destruction act location" catalog. The destruction act location catalog and the archive file catalog do not need to be from the same organization - it is possible to add archive files from other units to the destruction act composition. For example, the Municipality Government can create a destruction act that it saves to its own active catalog tree and add an archive file from the old catalog tree to the destruction act composition.
Important
The destruction act location (Hävitamisakti asukoht) is required - without it the act is not saved. Once the location is chosen, the act is saved even when incomplete, but the destruction act document is created only when the evaluation decision data (Hindamisotsuse andmed) and the name and job title of the person responsible for destruction are filled in. Until then Amphora shows the notice "Akt koostatakse alles pärast kõigi andmete sisestamist" (The act is compiled only after all data is entered) with the list of missing fields.
Destruction act template
Destruction act templates can be manually compiled and added to Admin – Templates. Allowed template types are DOCX and HTML. If no template is selected, Amphora automatically selects the default HTML template. You can download a sample template here.
Template field names:
-
For the Assessment decision data field, there is template element ::DisposalDecisionInfo::, through which this field's information is passed to the template.
-
Template element ::DisposalYear:: simplifies displaying the archive file period, replacing repeated year numbers with one (for example, "2020" is displayed instead of "2020-2020"). Existing template elements ::DisposalMinYear:: and ::DisposalMaxYear:: are also usable.
-
Template element ::ActDocumentNumberNoSufix:: allows displaying the destruction act number without suffix (usually the suffix is the year). In parallel, you can also use the ::ActDocumentNumber:: template element, which adds the destruction act full number with suffix.
More information about templates can be read here, about destruction act templates here
Procedure completion and act signing
When metadata is filled, after clicking the save button, the system generates the Destruction Act. This document can be opened by clicking "Open document".
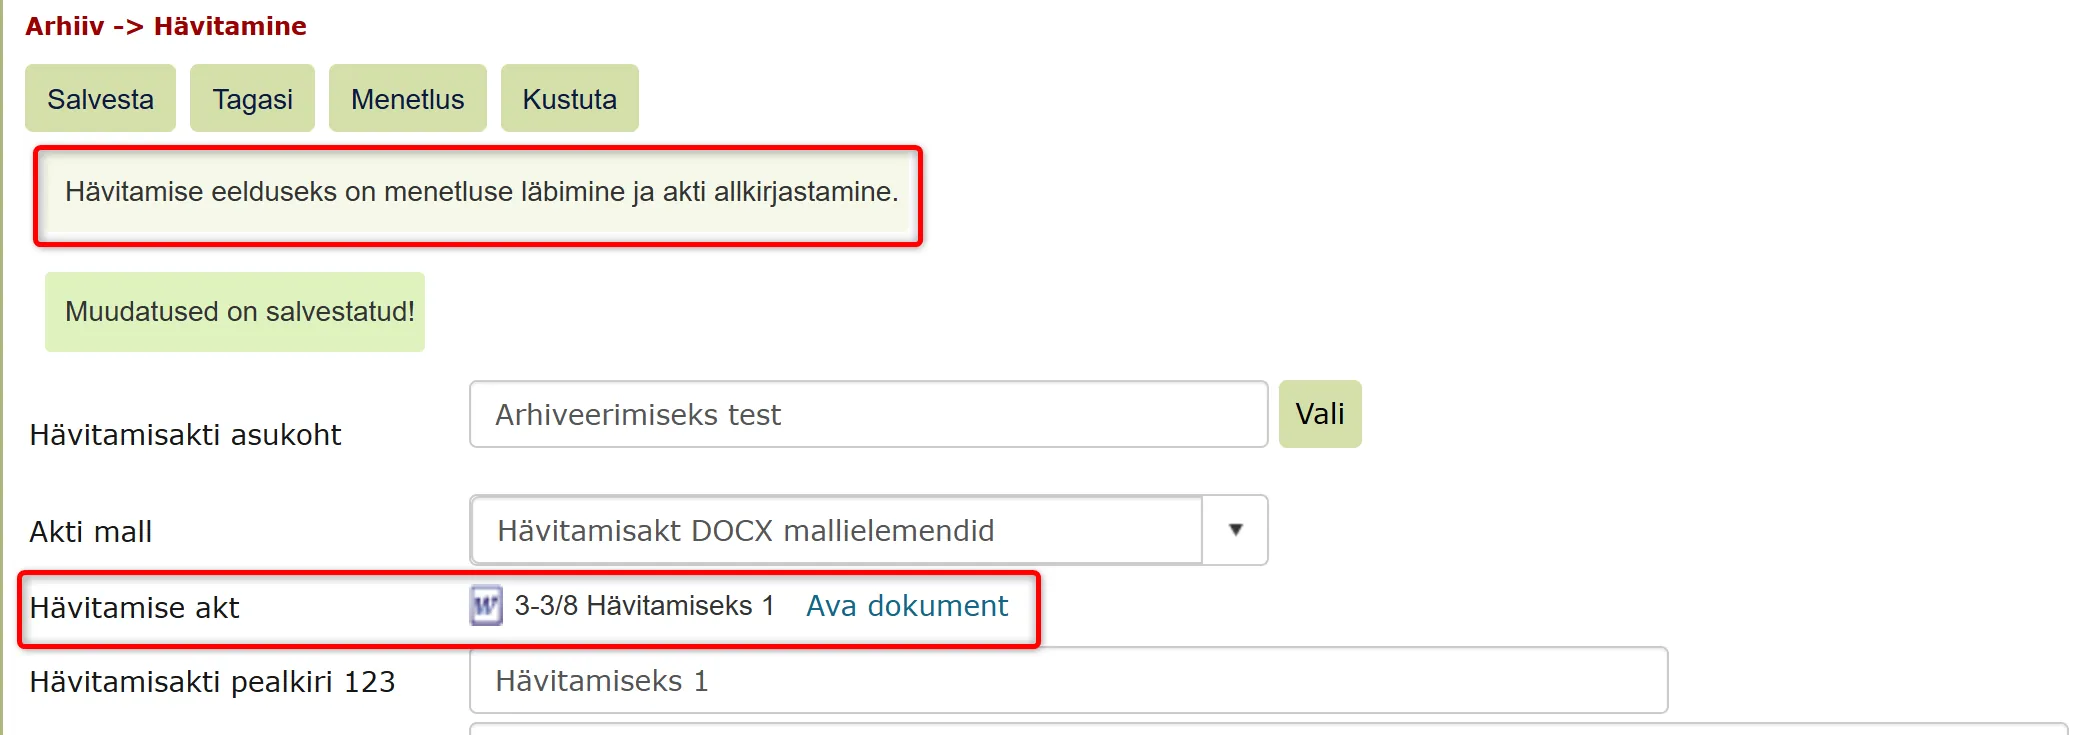 The prerequisite for destruction is signing the act - the system does not allow destroying files if the Destruction Act is not signed. For signing, it is possible to initiate a procedure by clicking the "Procedure" button and in the opened view it is possible to create a procedure for signing in the usual way.
Before adding a procedure/signing the destruction act, it is still possible to change the destruction act data, but once a procedure or signature has been added, the possibility to change disappears. Amphora also displays corresponding notifications about this:
"Destruction act actions are in progress and therefore the act data cannot be changed."
"A signed act cannot be changed. To change, signatures must be removed from the document."
When the destruction act is signed, the "Destroy" button becomes active. Amphora does not check that the procedure is completed, so complete it before destroying. Additionally, a checkbox appears in front of the destruction act in the list view and the destruction act can be destroyed directly from the list view. The system also asks for confirmation "Are you sure you want to carry out the destruction?"
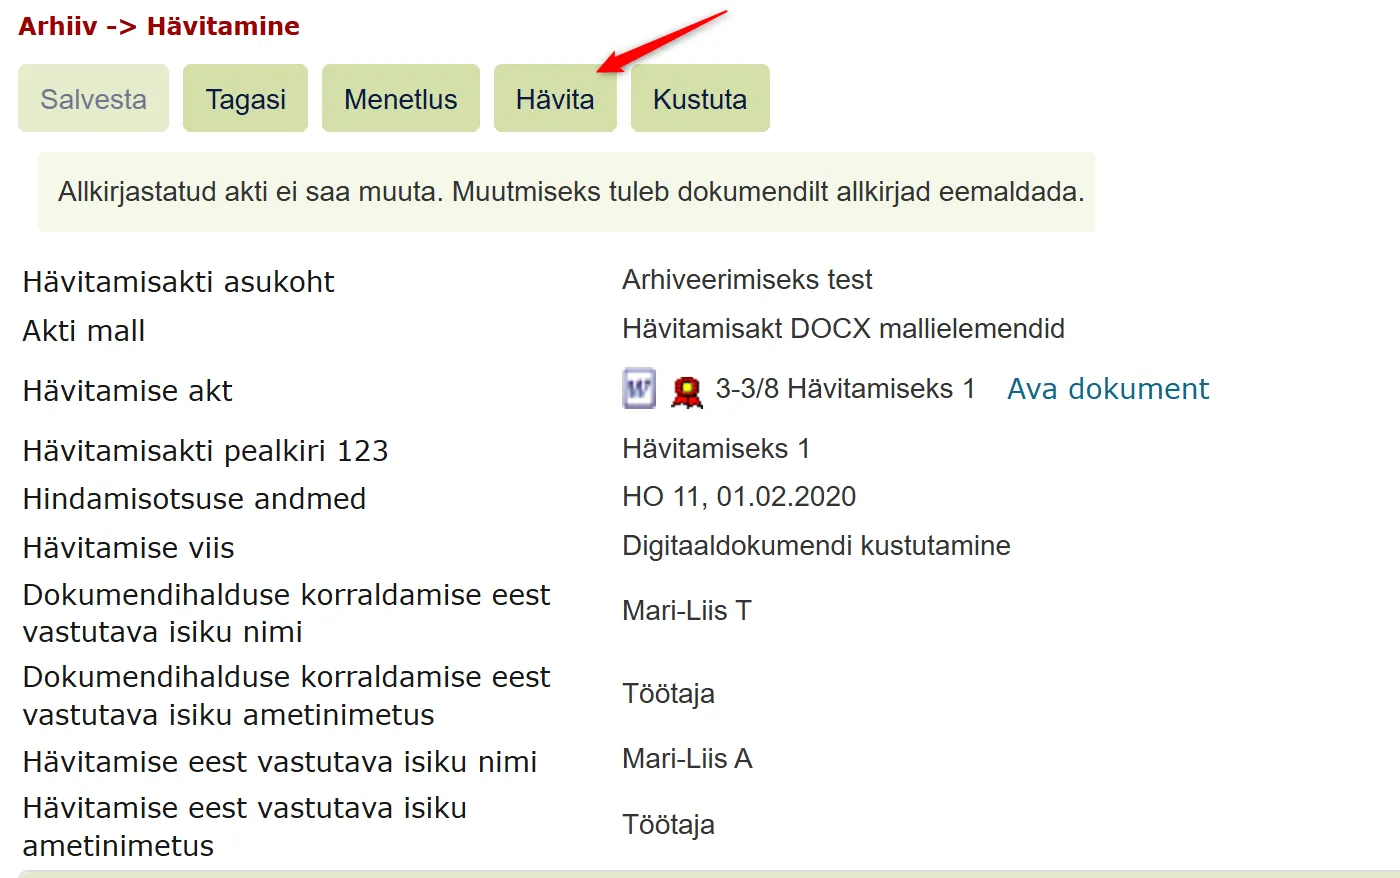
After confirmation, Amphora displays the destruction report.
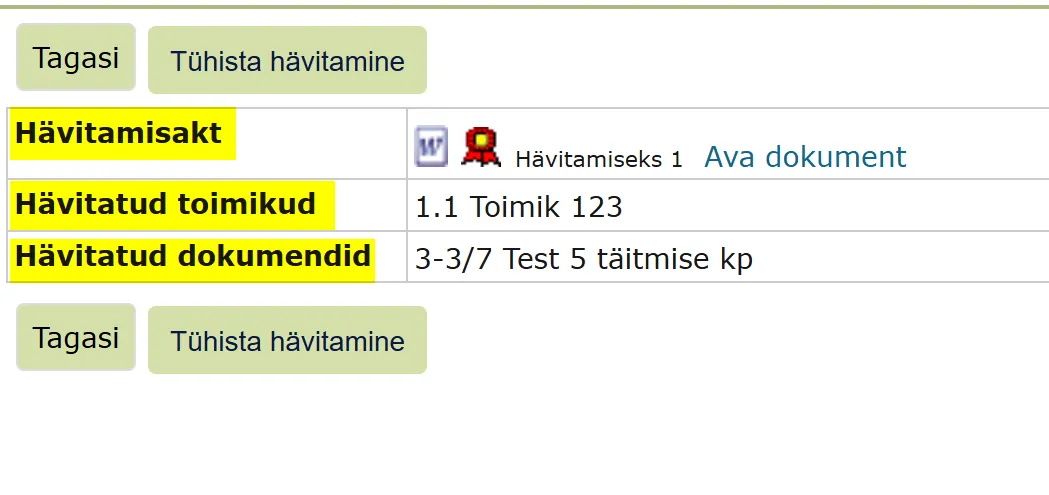
In the "Destruction history" tab you can see already destroyed destruction acts. Amphora does not perform final destruction, so a destruction can be undone: in the "Destruction history" tab open the destruction report and click "Undo the destruction". Amphora restores all archive files of that act. Destroyed objects can no longer be found with search or visible in public view.
Sending to National Archives (ASTRA)
From the Amphora environment, it is possible to transfer archived archival-value documents to the National Archives through the ASTRA environment. This can be done in the Archive module - ASTRA view. The view works when the ASTRA interface is set up for your environment; otherwise Amphora shows a notice or "Configuration is missing!". Contact Amphora support to set it up.
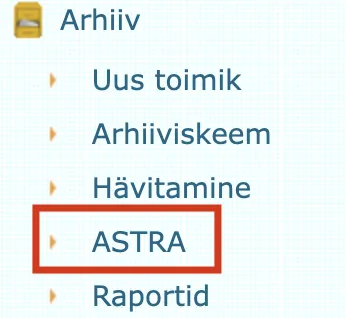
In the Archive module, the ASTRA view displays archived archive files whose archive value is Archival value and whose closed date is in the past. It is possible to send both individual and multiple archive files at once.
Before sending to ASTRA, .zip containers must be created for the files. To do this, select the desired archive files (mark them with the checkbox on the left) and click the Export file folders (1) button. A .zip file icon appears in front of the archive files (2), which can be clicked to download the container.
After creating .zip containers, select the desired archive files again and click the Forward to ASTRA for sending (3) button.
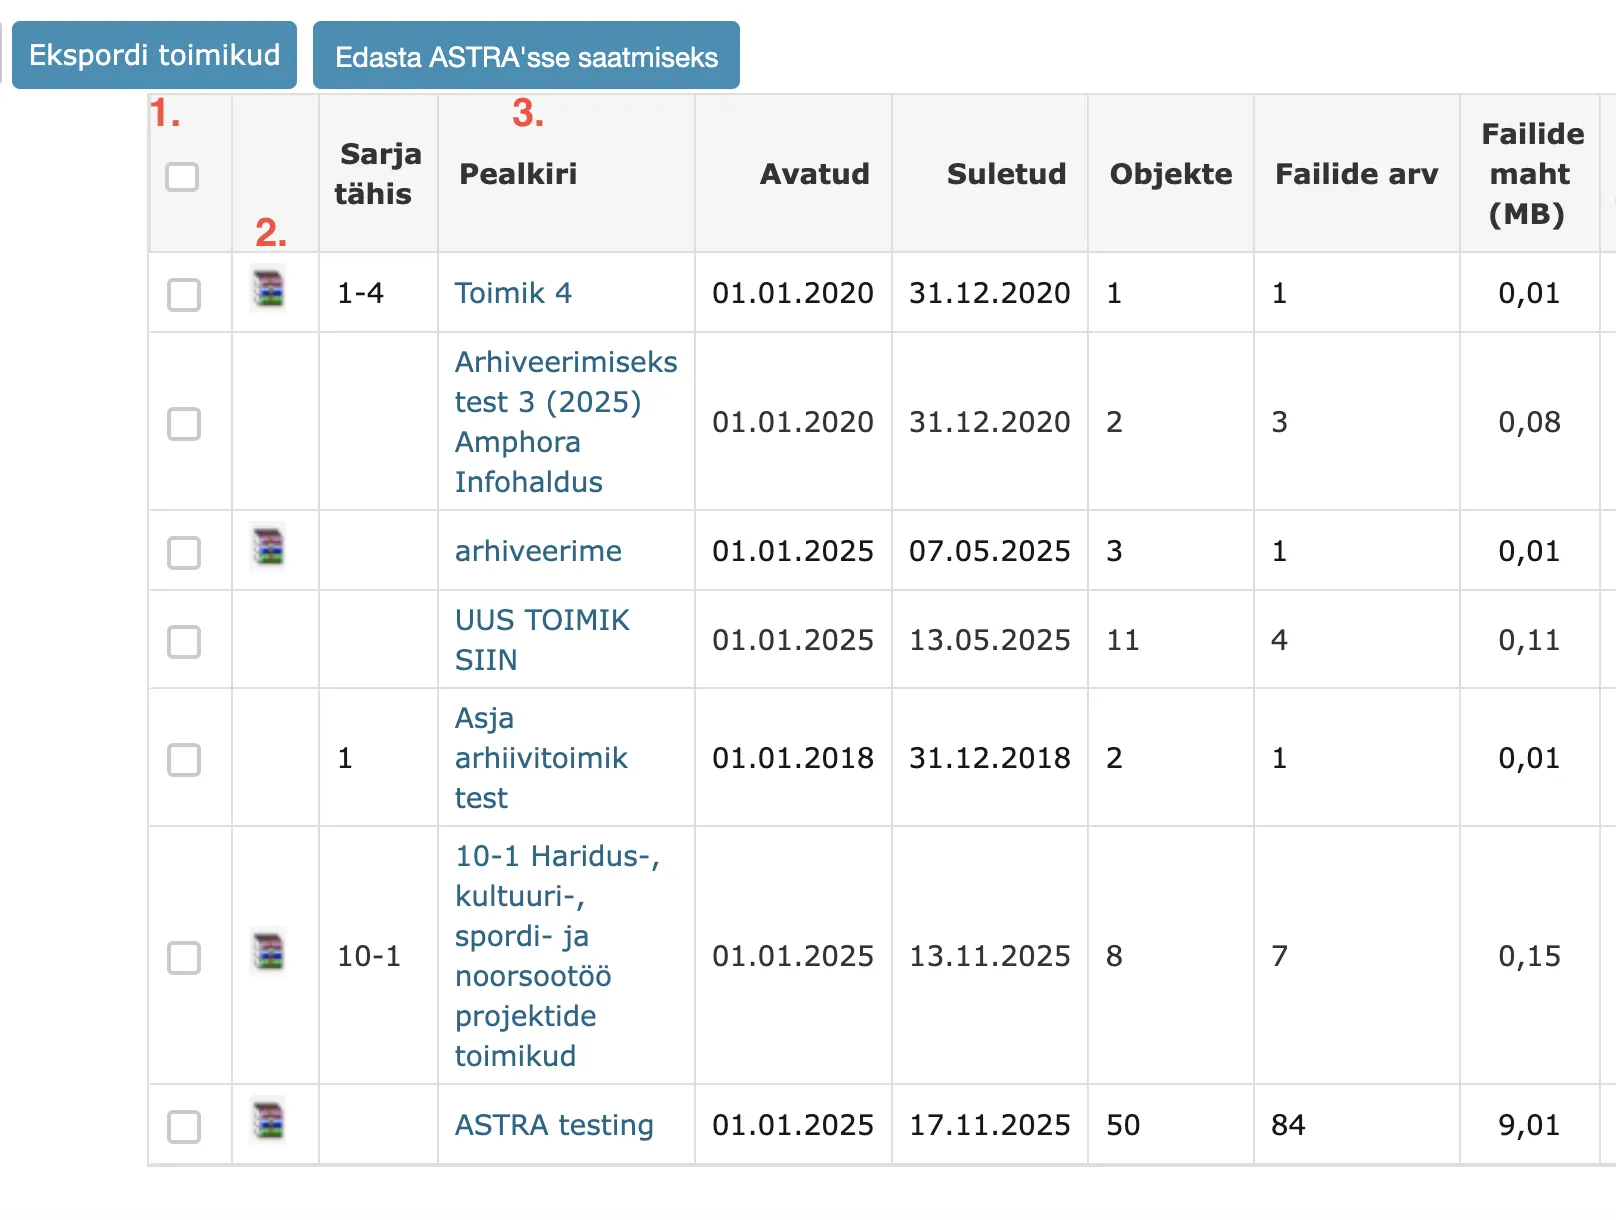
If sending succeeds, Amphora displays a corresponding notification (10-1 Education, culture, sports and youth work project files: OK) for each sent archive file. Additionally, Amphora fills the following data:
- Status
- Upload start
- Upload end
Changing access for archived documents and letters
Archived documents and letters can be made public/non-public and access restrictions can be added/removed after the fact. Additionally, the main file and additional files can be made public/non-public.
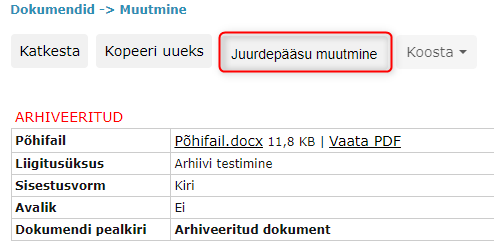
In the archived object reading view, there is a Changing access button.
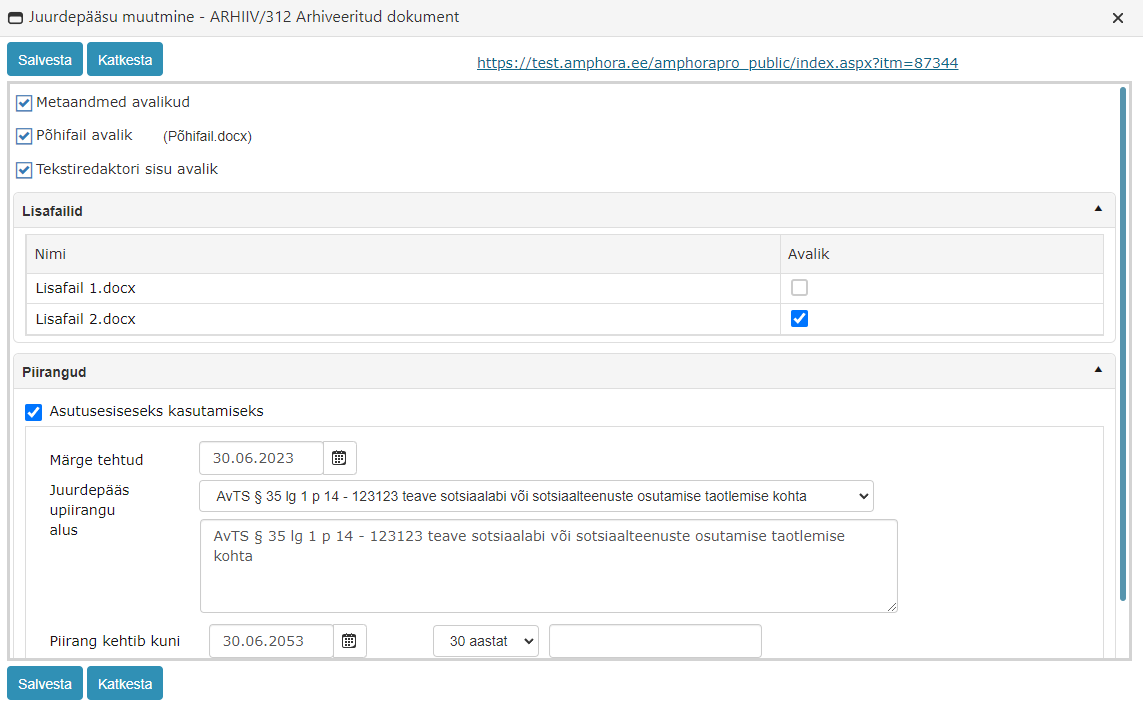
In the opened window, you can separately make metadata, main file, text editor content and additional files public/non-public. Additionally, you can activate For in-house use. At the top, there is also a direct link to the object's public view.
After saving, Amphora adds a history event to the document or letter history panel.
Archive file object selection Valid Until date enhancement
When selecting objects for archive file composition, Amphora considers the Valid until (Not_valid_after) date only for contract forms (Contract upload and Contract writing). If this field exists on some other form (e.g., SPOKU form or Legal Act form), it is not considered in the archive file object selection view.
Last modified: 09 October 2026, 15:35:22