Frequently Asked Questions
- Information for working with Amphora
- Login problems
- Why doesn't signing work in Google Chrome and Mozilla Firefox web browsers?
- Why doesn't Amphora send out email (error message appears)?
- Why can't I mass-sign?
- Document doesn't get the correct number when registered
- How to remove username and password login?
- Document is not visible in public view
- Document main file is not visible in public view
- Additional file is not visible in public view
- Why can't users make documents or files public?
- Why is the organization not visible in public view?
- How to add access restriction basis to dropdown menu?
- Why can't I delete a directory?
- Can a form be set for use only by certain users?
- Process has wrong deadline
- When sending document via DHX, the following message appears - "Document type is missing"
- User lacks access to folder or unit
- How to see completed processes after 90 days have passed?
- The "Edit" button next to main file doesn't work
- I can't forward the process to the right user
- Sending letter to multiple addressees so that other addressees are not visible
- Sending letter to multiple addressees so that other addressees are visible
- How to register a document as a document appendix after the fact?
- AKT file content editing
Here are frequently asked questions.
Information for working with Amphora
Within one session, you must not open Amphora in different tabs. If you want to work in Amphora in different tabs (e.g., view different documents simultaneously), use another web browser or incognito mode.
Login problems
- Make sure your username is correct. Amphora supports Estonian characters (õ, ä, ö, ü). If you suspect an error in the username, ask the main user or system administrator to check it.
- With Mobile-ID authentication, the phone number is not correctly added to the user. The phone number must be added to the GSM field.
- Unlike ID-card login, Mobile-ID and Smart-ID methods require entering a username.
- When logging in with ID-card, selecting the wrong certificate (user is shown error 403). Make sure you select your valid ID-card certificate when logging in.
- When logging in with ID-card, do not press the Cancel button in the certificate selection window. Pressing this button makes it impossible to log in with ID-card or Mobile-ID in the same session. In this case, you can only log in with username and password or Smart-ID. The certificate selection window is restored only after closing and reopening all web browser windows.
Why doesn't signing work in Google Chrome and Mozilla Firefox web browsers?
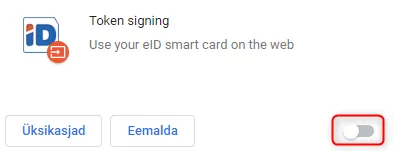
By default, Google Chrome and Mozilla Firefox do not allow using ID-card for signing. To sign with Google Chrome and Mozilla Firefox web browsers, you need to enable an extension called Token signing.
Google Chrome:
You need to open Google Chrome customization and control  > More tools -> Extensions. The extension called Token signing must be turned on.
 Mozilla Firefox:
You need to open Mozilla Firefox menu  and then add-ons (Ctrl + Shift + A). There is a menu on the right side and from there you should select Extensions. If the Token signing extension is disabled, it must be enabled.
 ***
***
Why doesn't Amphora send out email (error message appears)?
The following error message appears:
Error sending letter. Check addresses and if error persists, contact help desk.
The length of message data exceeds maximum allowed limit for the given server.
This error message indicates that an attempt was made to send a file that is too large. The file size limit depends on the mail server, but preferably the file size should stay below 10 MB. Files over 10 MB should not be sent (may still succeed), but definitely file size should not exceed 25 MB. In such cases, it is guaranteed that the mail server will not send the letter.
You can send large files as a link by opening the Edit delivery and checking the option "Send files as link".
Why can't I mass-sign?
- You should check that the latest Amphora Extension version is installed. This can be installed from Amphora public view.
- Mass-signing works only with ID-card. You should check that the ID-card is connected to the computer.
- If the mass-signing license has just been added, the user should log out and then log in again before mass-signing.
- If signing with ID-card doesn't work, it's worth checking whether the correct valid certificate is selected.
A detailed mass-signing guide is available at this link.
Document doesn't get the correct number when registered
If the document doesn't get the correct number, this can be caused by different circumstances:
-
A document has been registered in the meantime that was later deleted. The Amphora counter does not update automatically after document deletion, so the counter must be "rolled back" (guide here).
-
Check with which form you are registering the document in the directory. The directory counter is configured so that numbers are given only to documents whose form is selected in the counter composition. Instructions for viewing or changing forms added to the counter are here.
Example: if you want to register a document in the correspondence directory, the form should be selected as "Letter". If you select "Simple upload" as the form, Amphora will not give the document a number and you may get a message from Amphora in this situation:
 3. The counter is not updated for the new records management period. In this case, similar to point 2, you will get a message "When registering in this folder, the document will not get a number. Have you updated the counters for the current year? The guide is HERE".
 -
When saving a document unrelated to a case in the Cases/files directory, Amphora does not give the document a number, because in this directory documents get numbers by case sequence and a case counter is used there (read more here).
-
You have manually set the number during document registration. The next documents cannot then get numbers automatically, because Amphora remembers this choice. For Amphora to automatically give numbers to documents again, you need to register a new document and restore the "Automatic" selection.
 ***
***
How to remove username and password login?
To remove the ability for users to log in with username and password at the organization level, you should change the organization settings. This can be done by a user with administration rights.
Go to Admin --> Organization settings --> General settings. Find "Activate form-based authentication (username/password)" and remove the checkmark -> Save.
You can find more detailed information about organization settings HERE.
Document is not visible in public view
For a document and its metadata to be visible in the public document registry, it is necessary that the document has the mark "Metadata public".
The same applies vice versa - if you want the document not to be visible in public view, you must remove the checkmark from the "Metadata public" option.
The metadata fields that go to the public view are those that have been marked as visible in the public view when setting up forms. You can read more about form setup HERE.
 ***
***
Document main file is not visible in public view
If the main file is not visible in public view, then when registering the document, the checkmark was not made for the option "File public". For the user to be able to make this checkmark, the user's user group must have the corresponding policy enabled.
 ***
***
Additional file is not visible in public view
For an additional file to be visible in public view, the "Public" option must be selected for the respective file in the Additional Files panel.
 When setting up forms, the Additional File panel must be set to public.
Why can't users make documents or files public?
If users lack the options "Metadata public", "File public" or, on the attachment row, "Avalik" when registering documents, it means that the user group does not have the corresponding policy enabled. Information about how policies work and how to change them can be found HERE.
Why is the organization not visible in public view?
For the organization associated with the unit to appear in the organization selection in the public view, the following conditions must be met:
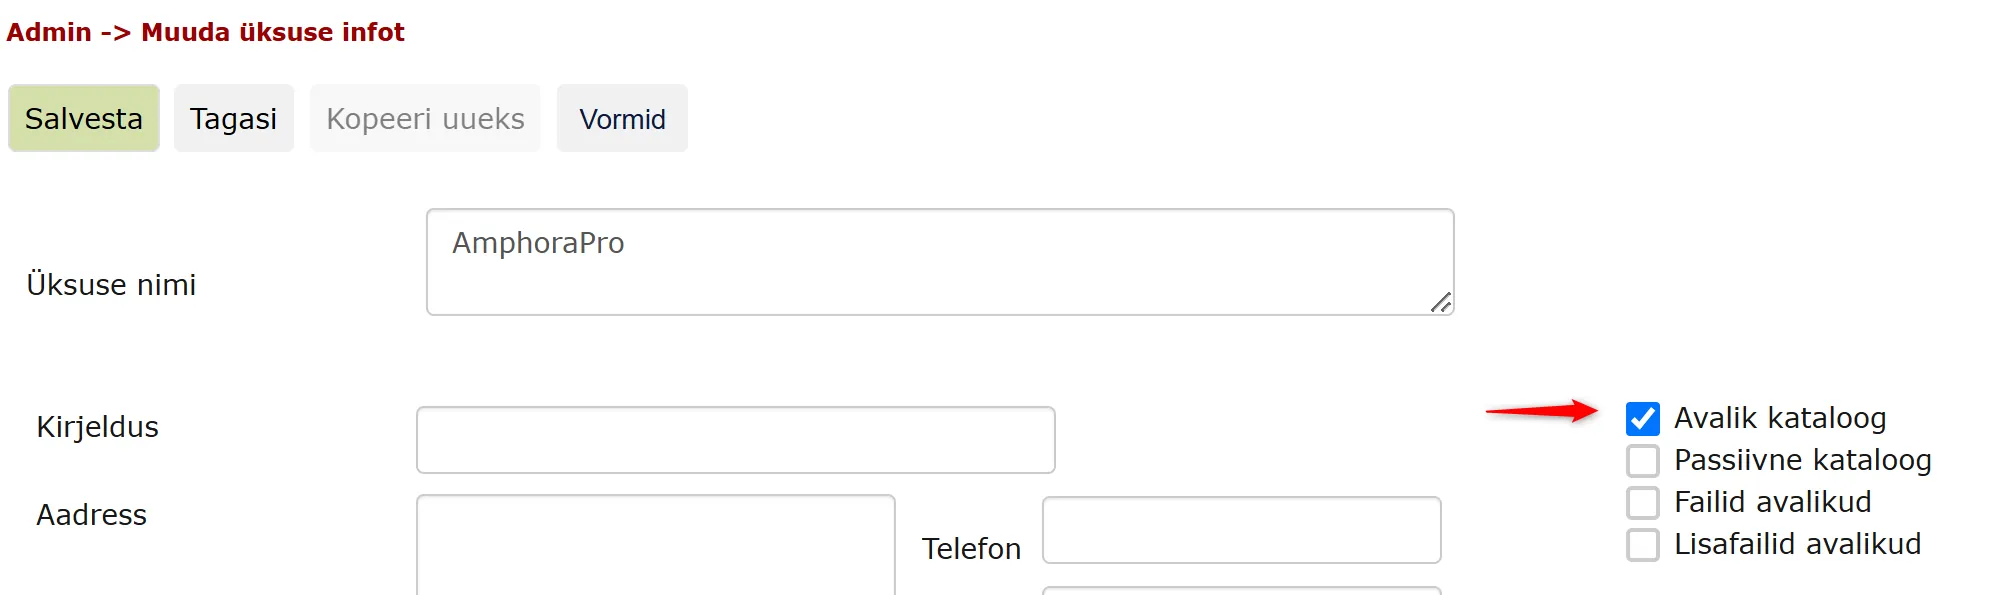
- In the unit settings, the "Public directory" option must be checked. Go to Admin -> Directories module -> select the desired unit (AmphoraPro selected in the picture) -> Edit -> Check the "Public directory" option -> Save.
- At least one object must be public in this unit's directories (i.e., the document has the "Metadata public" option marked).
How to add access restriction basis to dropdown menu?
To add a new access restriction basis to the dropdown menu:
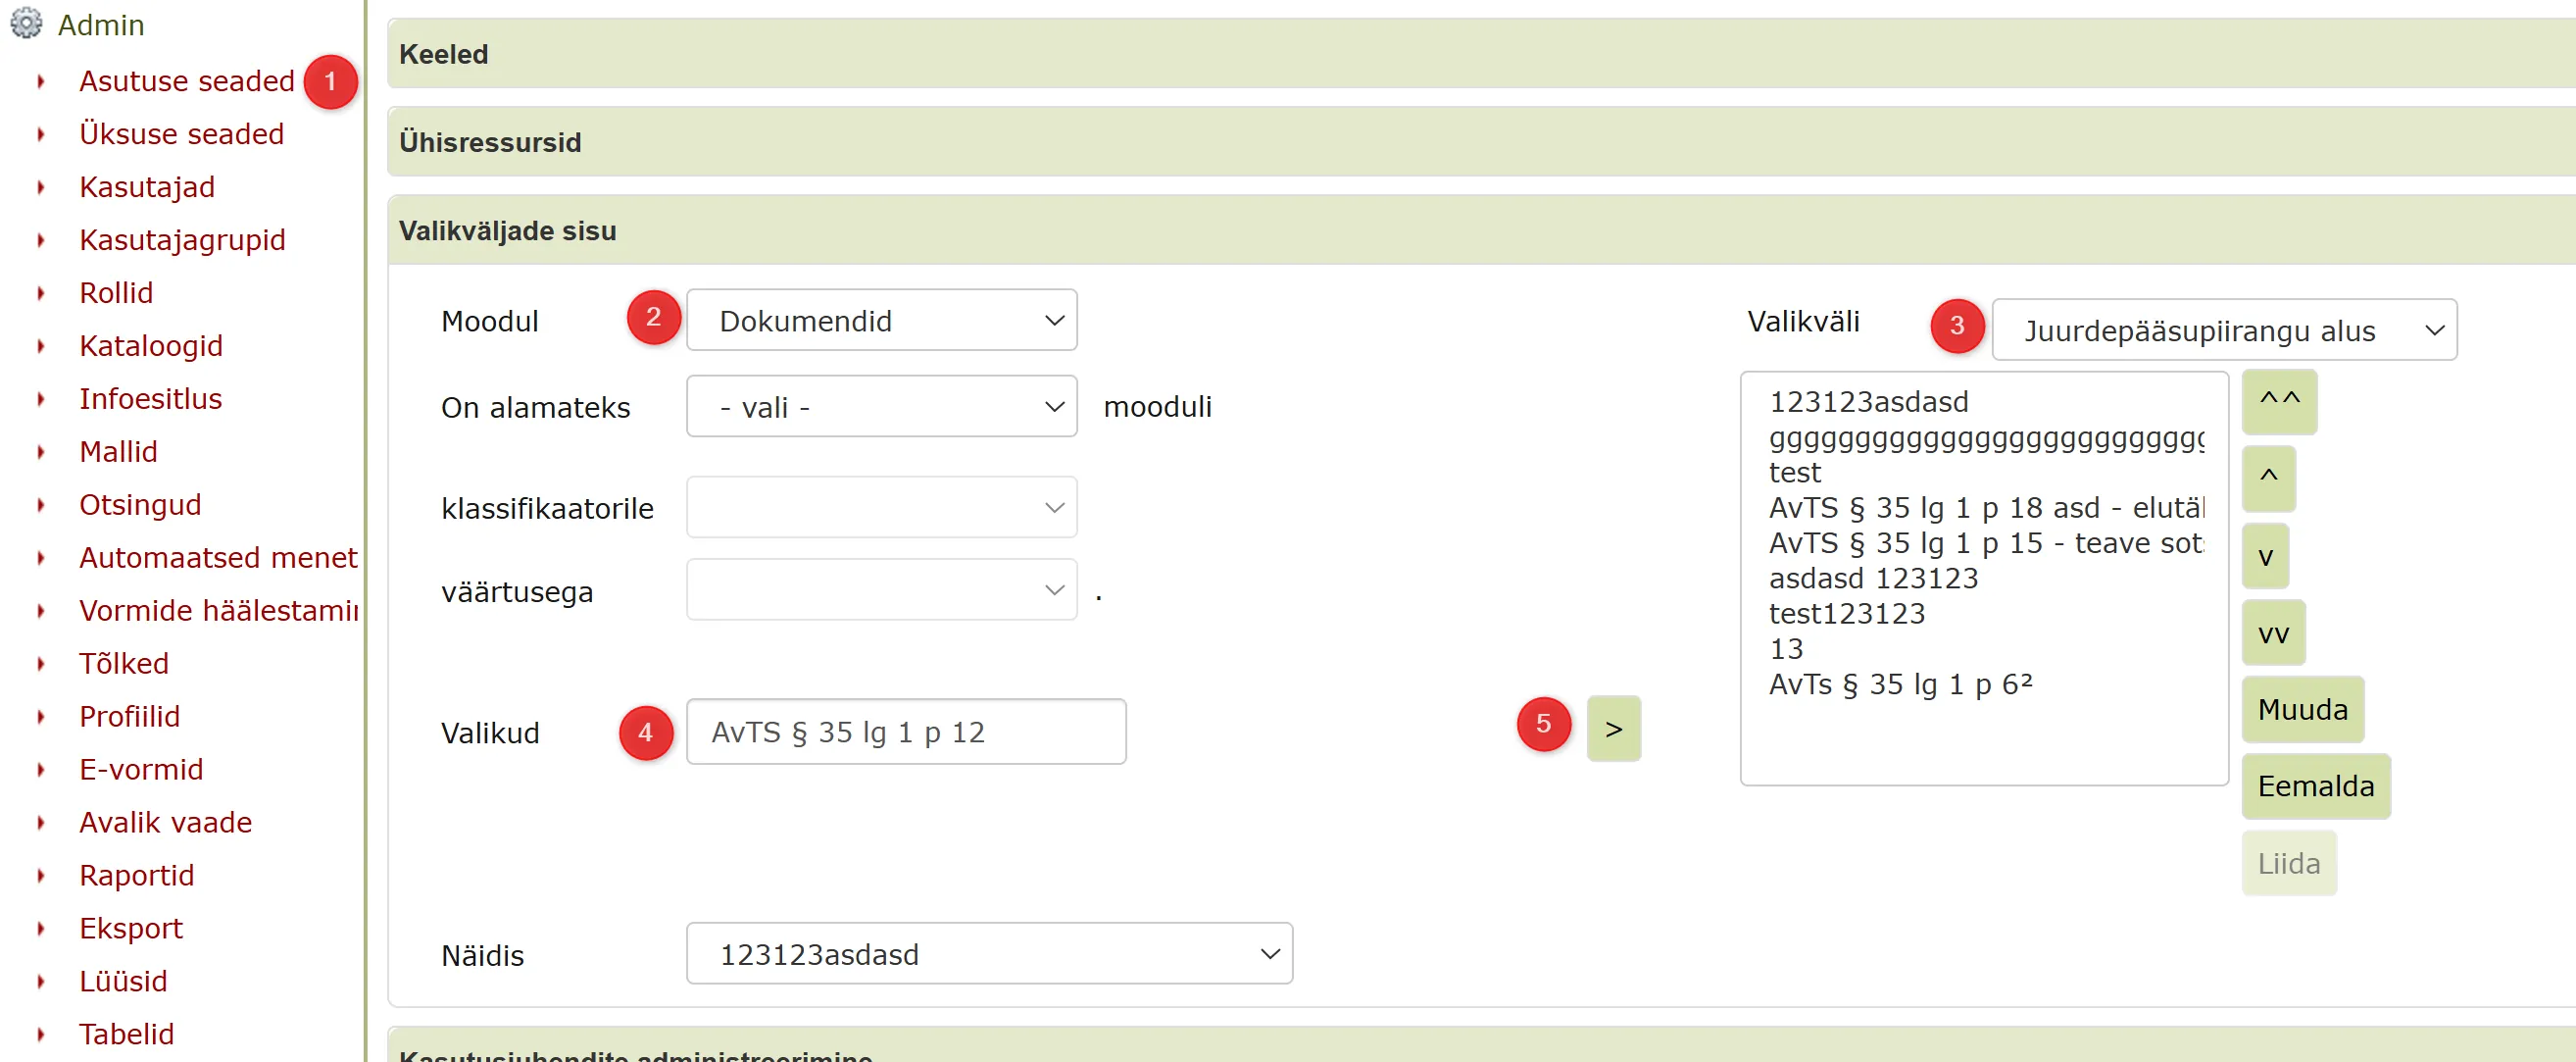
- Open Admin -> Organization settings -> go to the Option field content panel.
- Module - documents.
- Option field - access restriction basis.
- Options - enter the desired access restriction basis text in the box.
- Click the button
 - adds the text to the box on the right.
 - Save changes
 ***
***
Why can't I delete a directory?
To delete a directory in Amphora, it must be empty and no documents must be associated with it. If the directory is empty but you still get the message "Directory contains objects. First delete the objects, then the directory!" when deleting the directory, there may be objects associated with this directory in the trash, correspondence or case modules. If the modules are hidden, they must first be reactivated from the directory settings.
For this, go to Admin - Directories. Click on the directory you want to delete - Edit. Here you need to enable the respective modules.
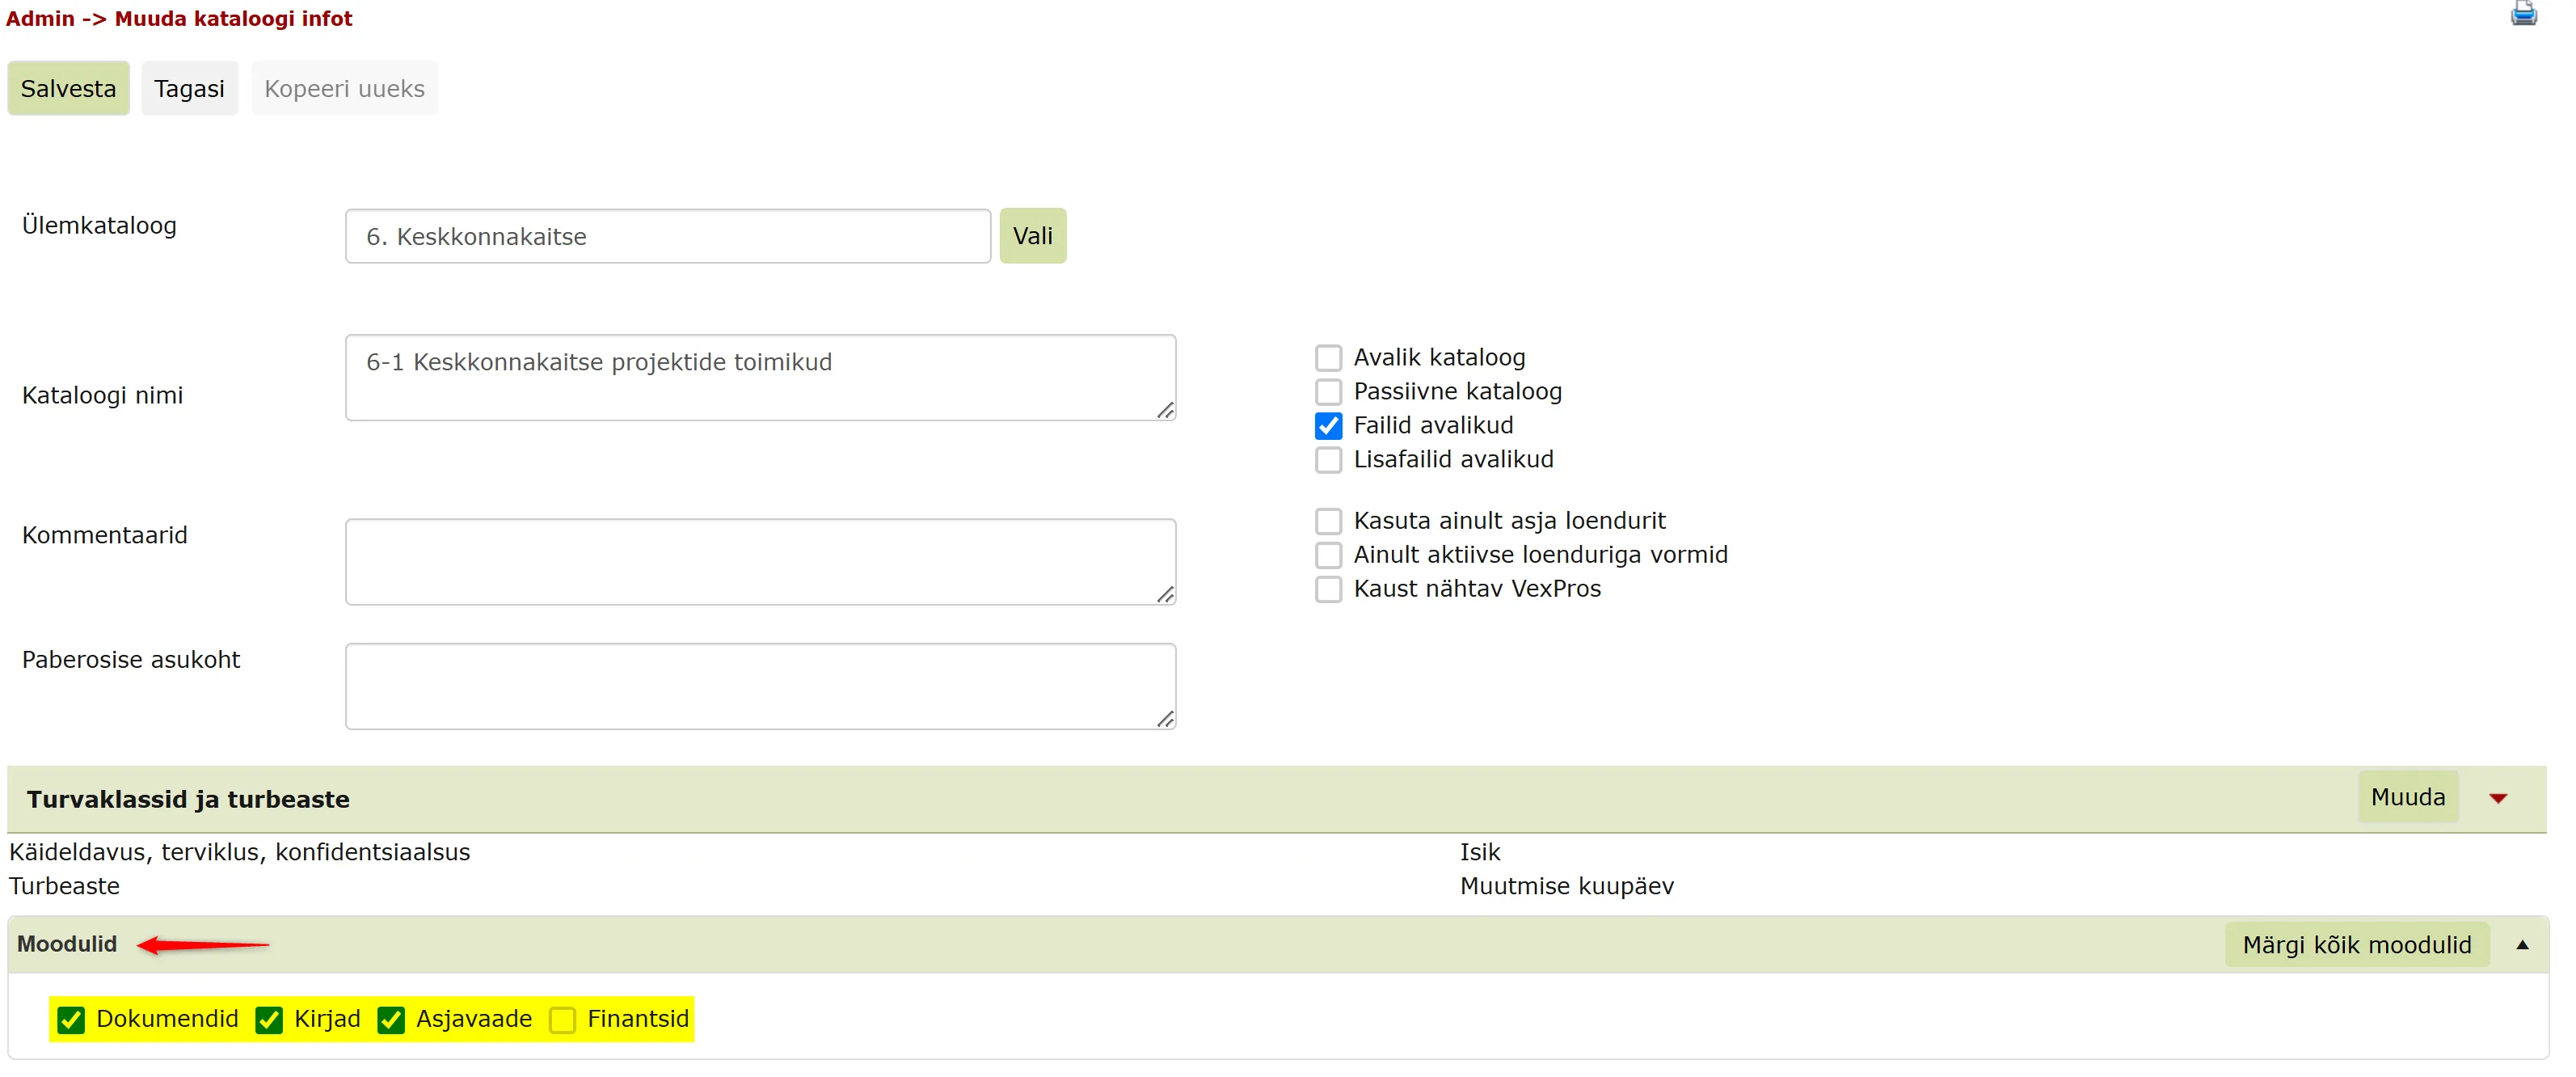 After activating the modules, delete the objects associated with the directory from the respective module (trash, correspondence or cases) and then try to delete the directory again.
The trash module has a filtering option that helps find documents associated with the directory faster. The guide for this is here.
Can a form be set for use only by certain users?
Yes, a form can be set for use based on unit and user group. The guide for this is here.
Process has wrong deadline
After creating a process, changing the deadline is not possible for a regular user.
Try deleting the existing process and creating a new one with the correct deadline.
Always check before creating a process that the deadline is set correctly.
When sending document via DHX, the following message appears - "Document type is missing"
When sending a document with Letter form via DHX, there is usually no such problem, because this form has the document type selected by default (Letter).
If you use some other form (e.g., "Contract upload"), the document type may not be selected by default when sending the document.
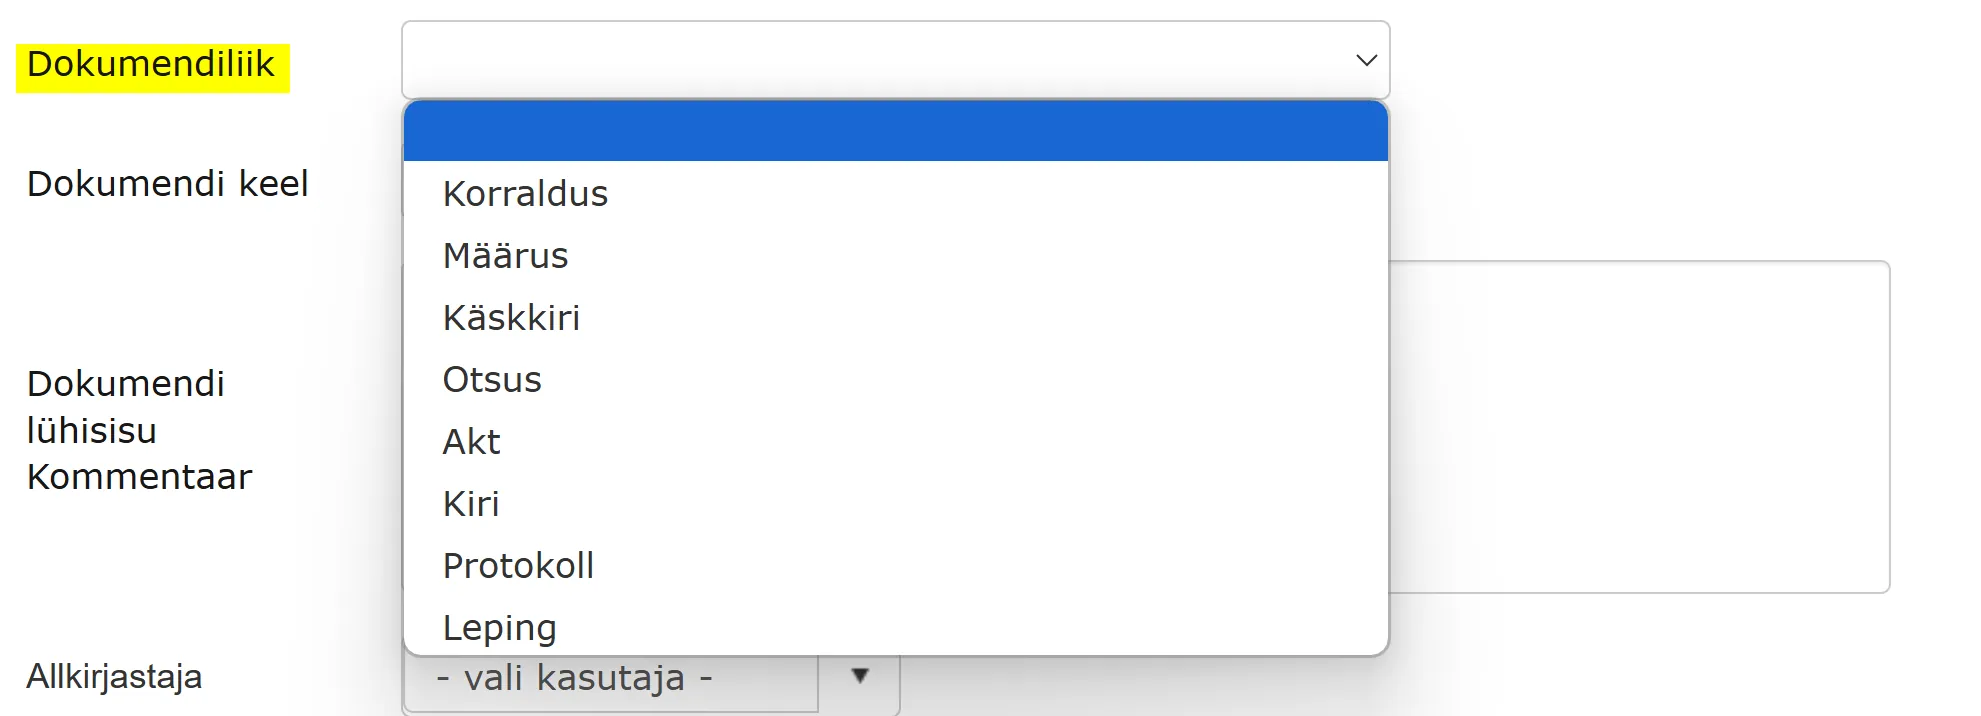 If the document type selection is completely missing, this field must be added in form setup so that when sending with DHX, the "Document_form_id" Amp. field name is available. The form setup guide is here.
User lacks access to folder or unit
User access rights to folders/units are determined in two ways - with rights added to the user group and with rights added separately to the user. Rights assigned to a user can be seen by going to Admin -> Users -> find the user whose rights you want to view and click on the user.
The user edit view opens, where you can see the Rights and Group rights panels.
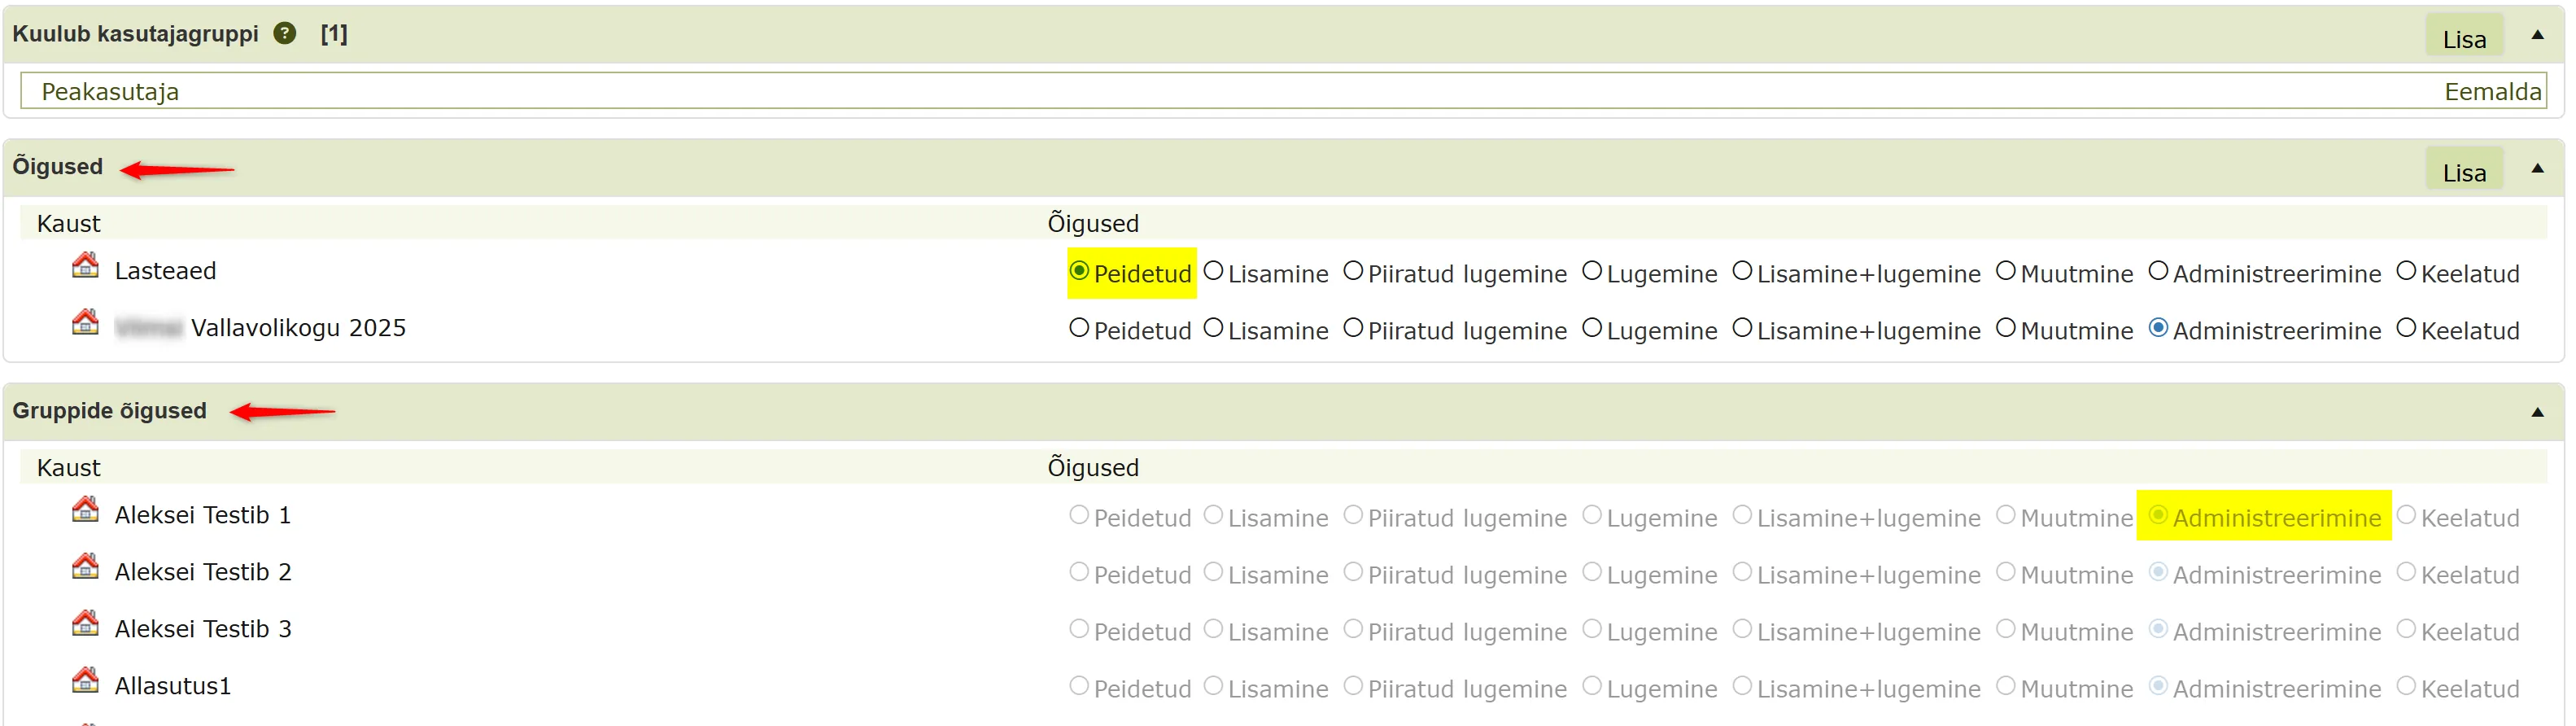 * The Rights panel shows unit/directory rights assigned to the specific user, these can be changed here (while in the user edit view).
* The Group rights panel shows the user group-derived rights that apply to the user, these can be changed by changing the user group (cannot be changed in the user edit view).
* The Rights panel shows unit/directory rights assigned to the specific user, these can be changed here (while in the user edit view).
* The Group rights panel shows the user group-derived rights that apply to the user, these can be changed by changing the user group (cannot be changed in the user edit view).
Generally, the access set in the Rights panel is "stronger" than the rights that come from Group rights. However, if the user group rights have set a Forbidden right for a directory, then the rights added separately to the user will not override it and the Forbidden right will remain in effect for the user.
What the different rights levels mean (hidden, addition, limited reading, etc.) can be read in more detail here.
For changing and adding user and user group rights, you can ask for help from the system administrator, main user or super user.
How to see completed processes after 90 days have passed?
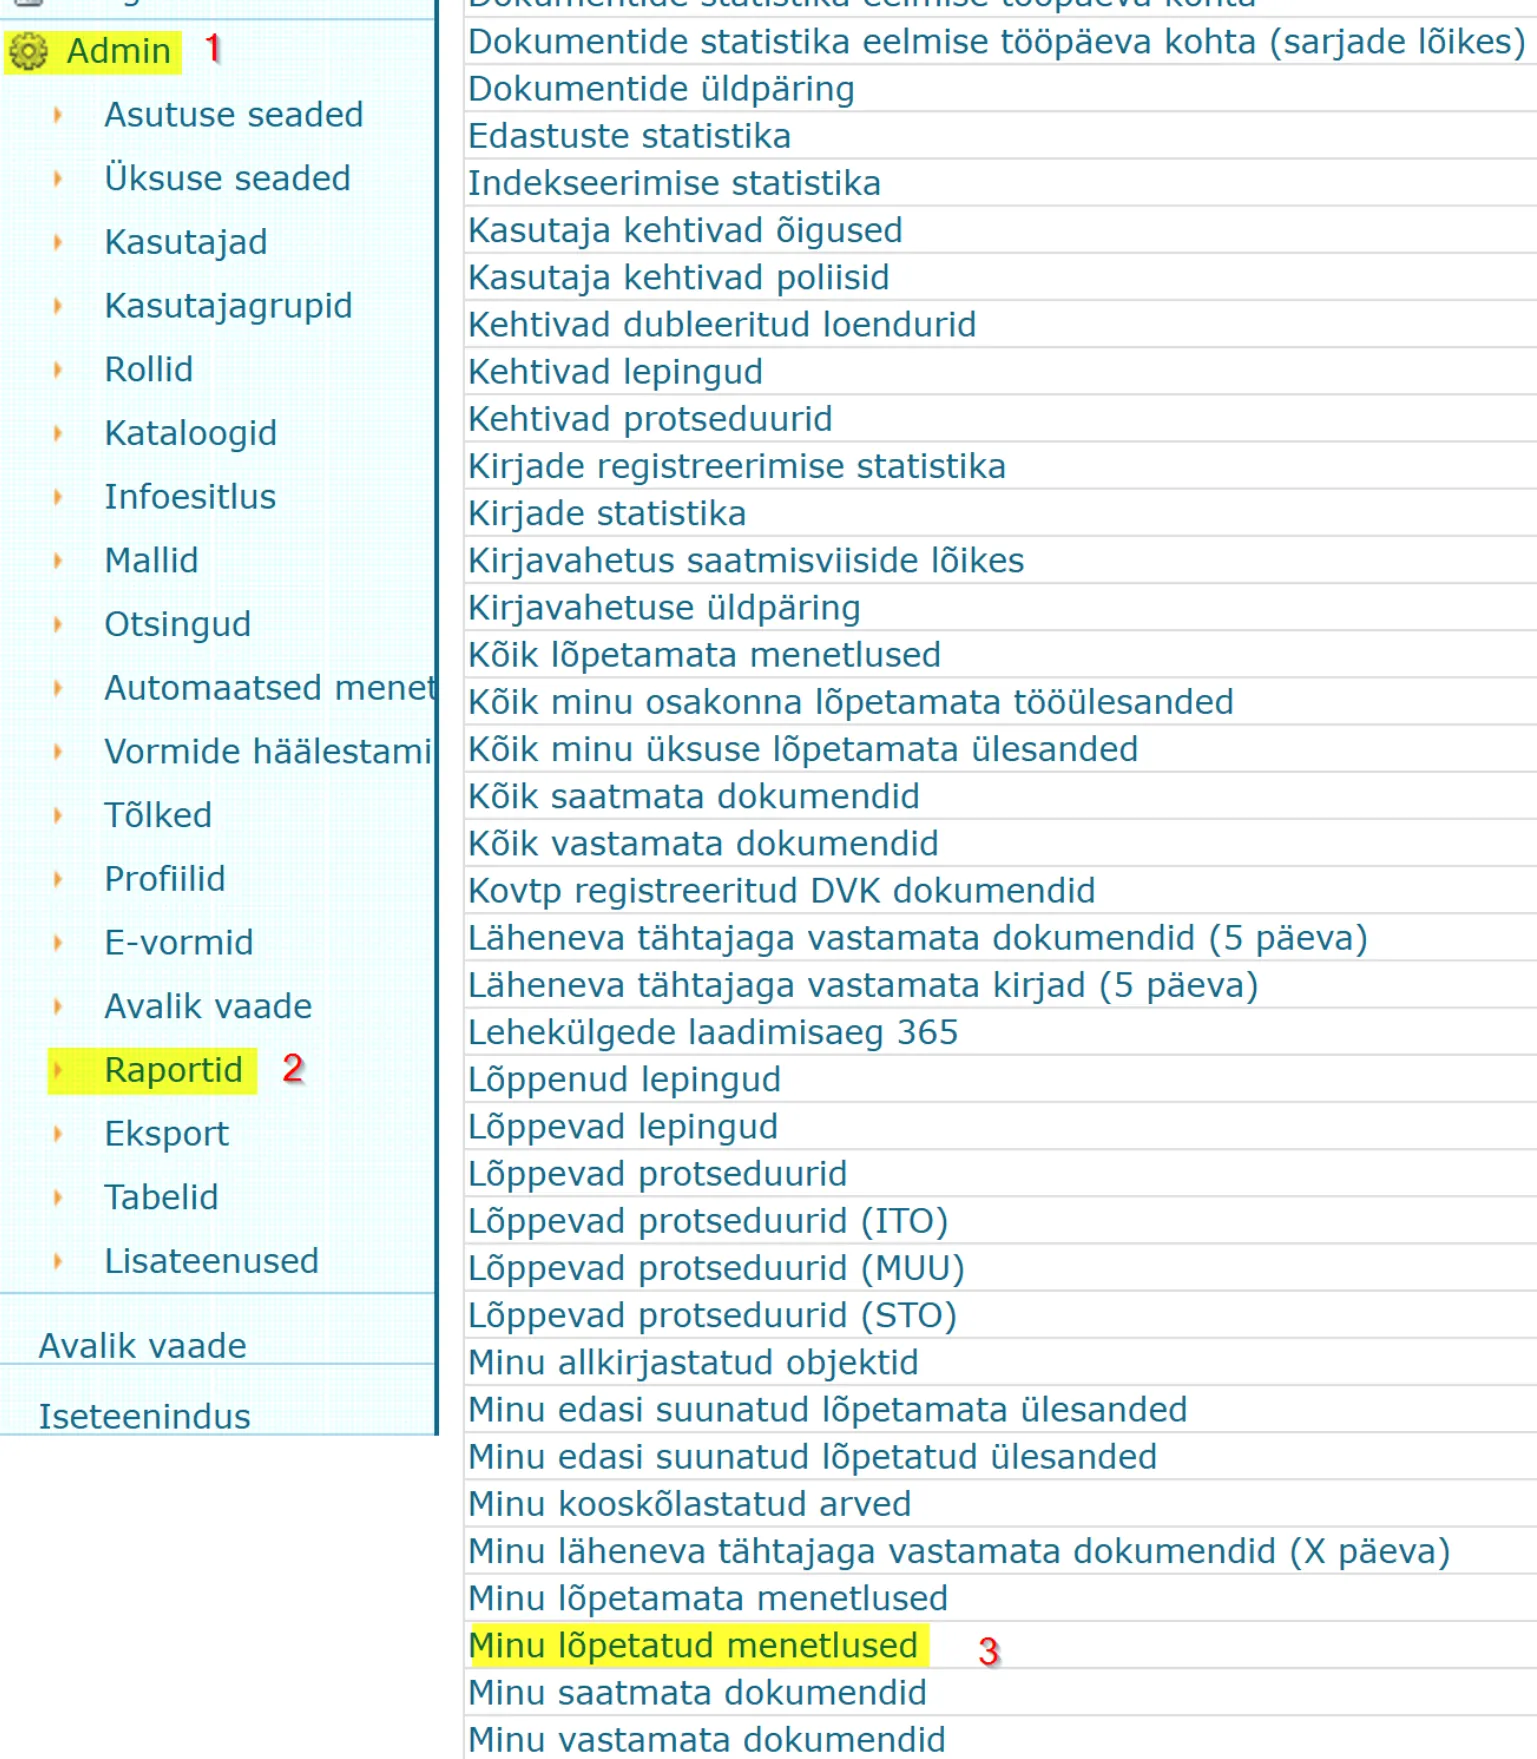
In Amphora, completed processes are visible on the homepage "Forwards" panel for 90 days from the end of the process. If users want to see their completed processes even after 90 days have passed, the system administrator can add the report "My completed processes" to the users' homepage.
For this, go to Admin - Reports - find the report "My completed processes".
 Then you can add users who can run the given report.
1. Select Users
2. From the dropdown menu, select the user to whom you want to add the report
3. Check the "On homepage" option
4. Press the Add button.
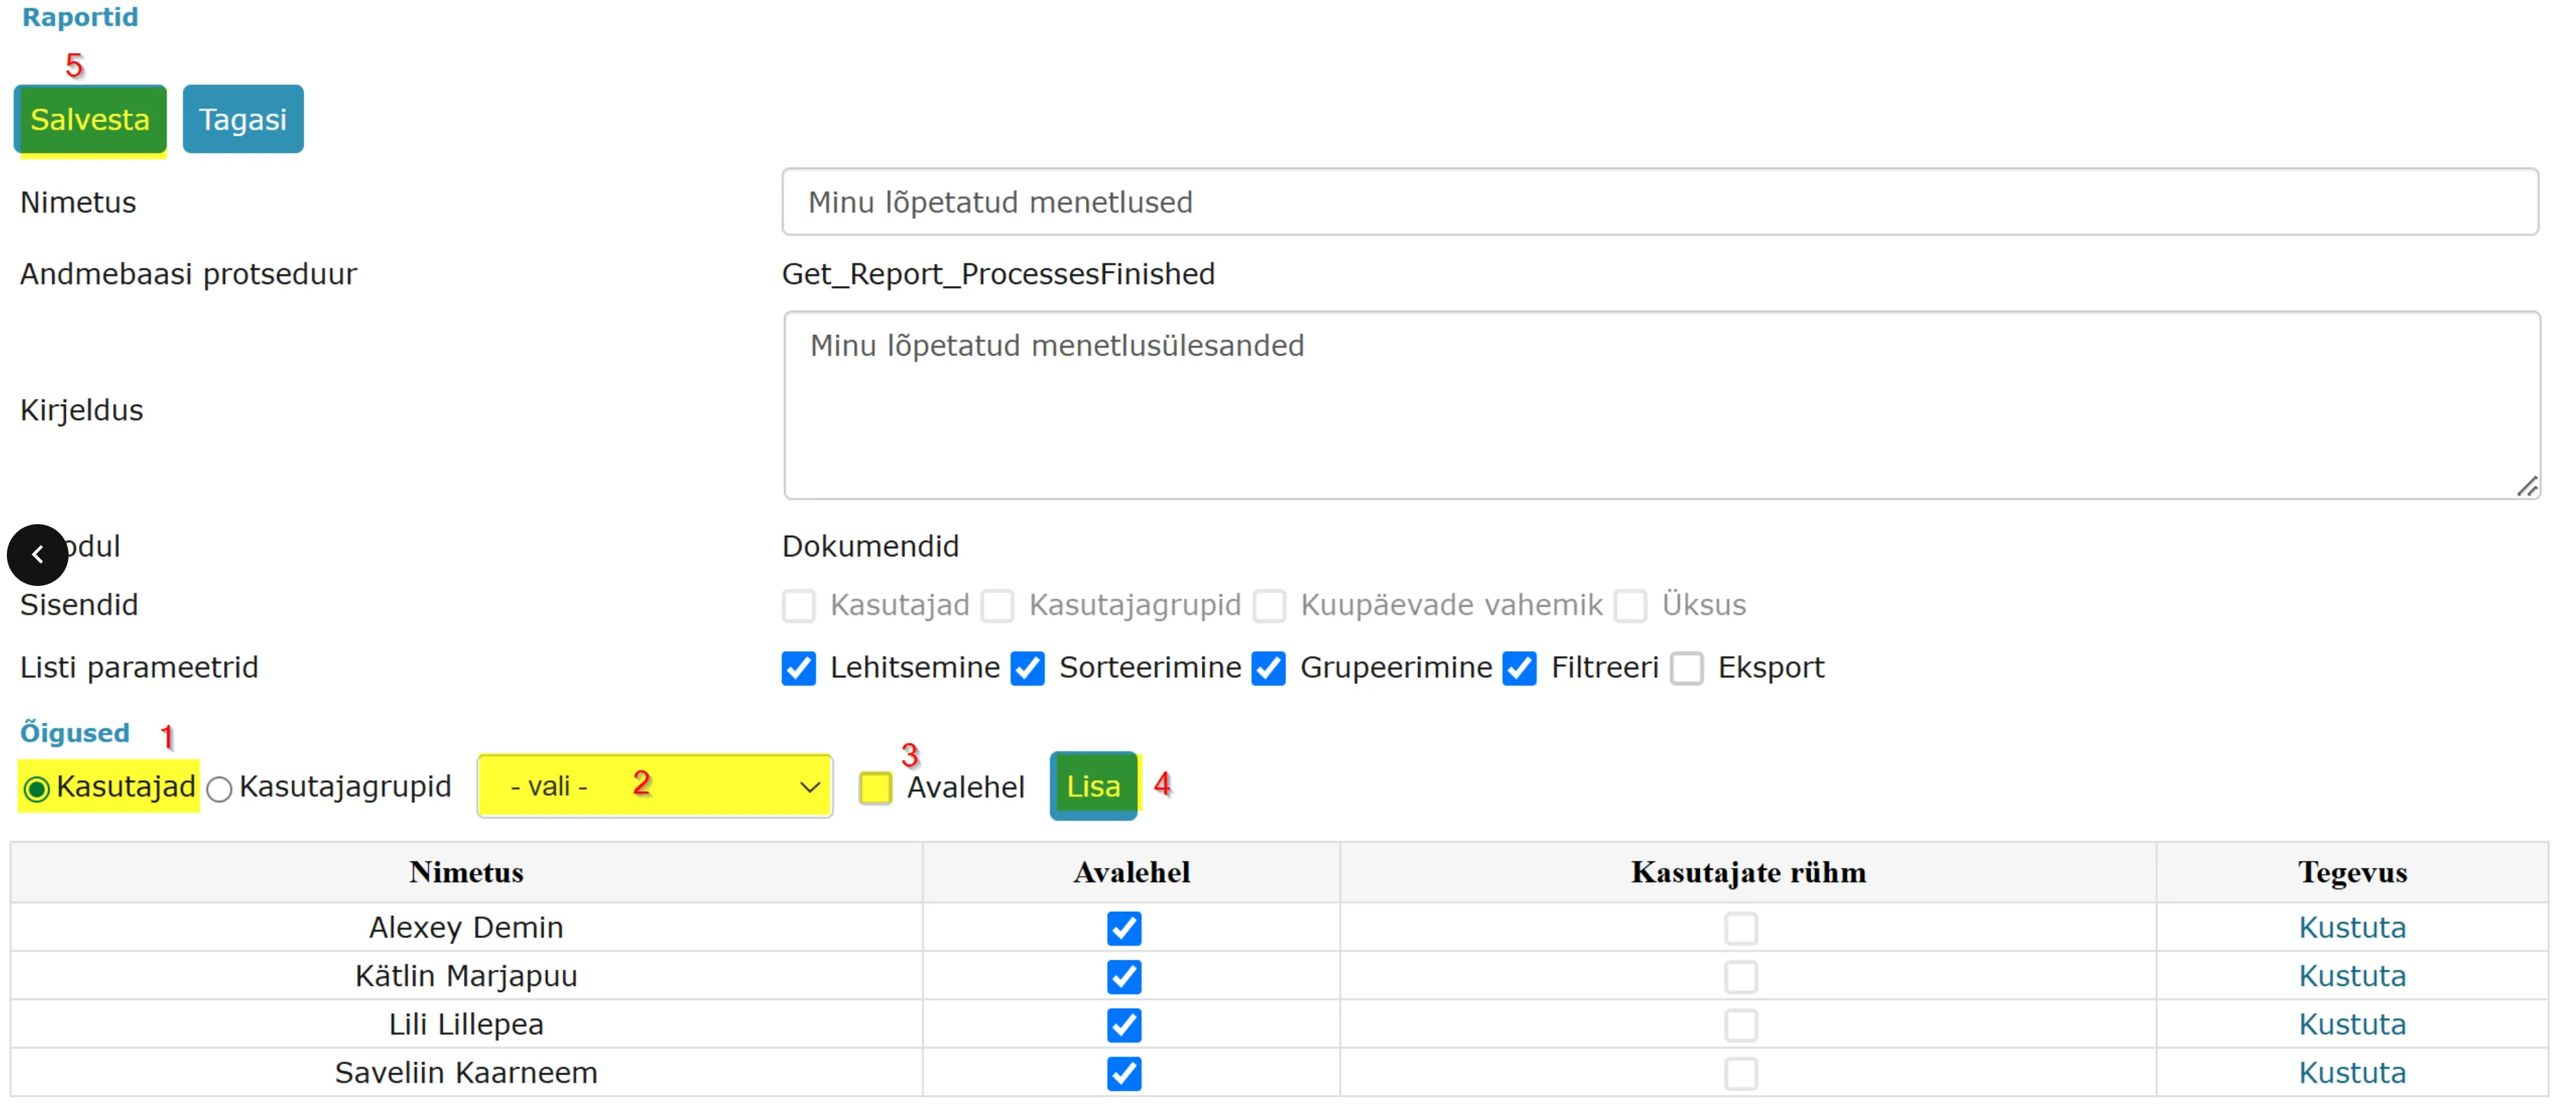 You can repeat the same process with all users who need to see their completed process tasks. Save the changes.
On the homepage, this will appear to users in the Reports panel.
 ***
***
The "Edit" link next to main file doesn't work
If you get a message when clicking the Edit link next to the main file: "This action requires a protocol installation. Select OK to download the protocol installer," it means that the computer either does not have the WebDAV program or its extension is not enabled.
 The program should be downloaded and installed and/or the extension (IT Hit Edit Doc Opener 5) should be enabled, the guide for this is here.
I can't forward the process to the right user
When forwarding a process, users from your unit and users from units where you have administration rights appear in the selection by default. To see users from other units/sub-organizations, turn on the option "Show users/user groups from all units". Then you will see all users in the list along with the units they belong to. Select the appropriate user, move them to the right-hand box and save.
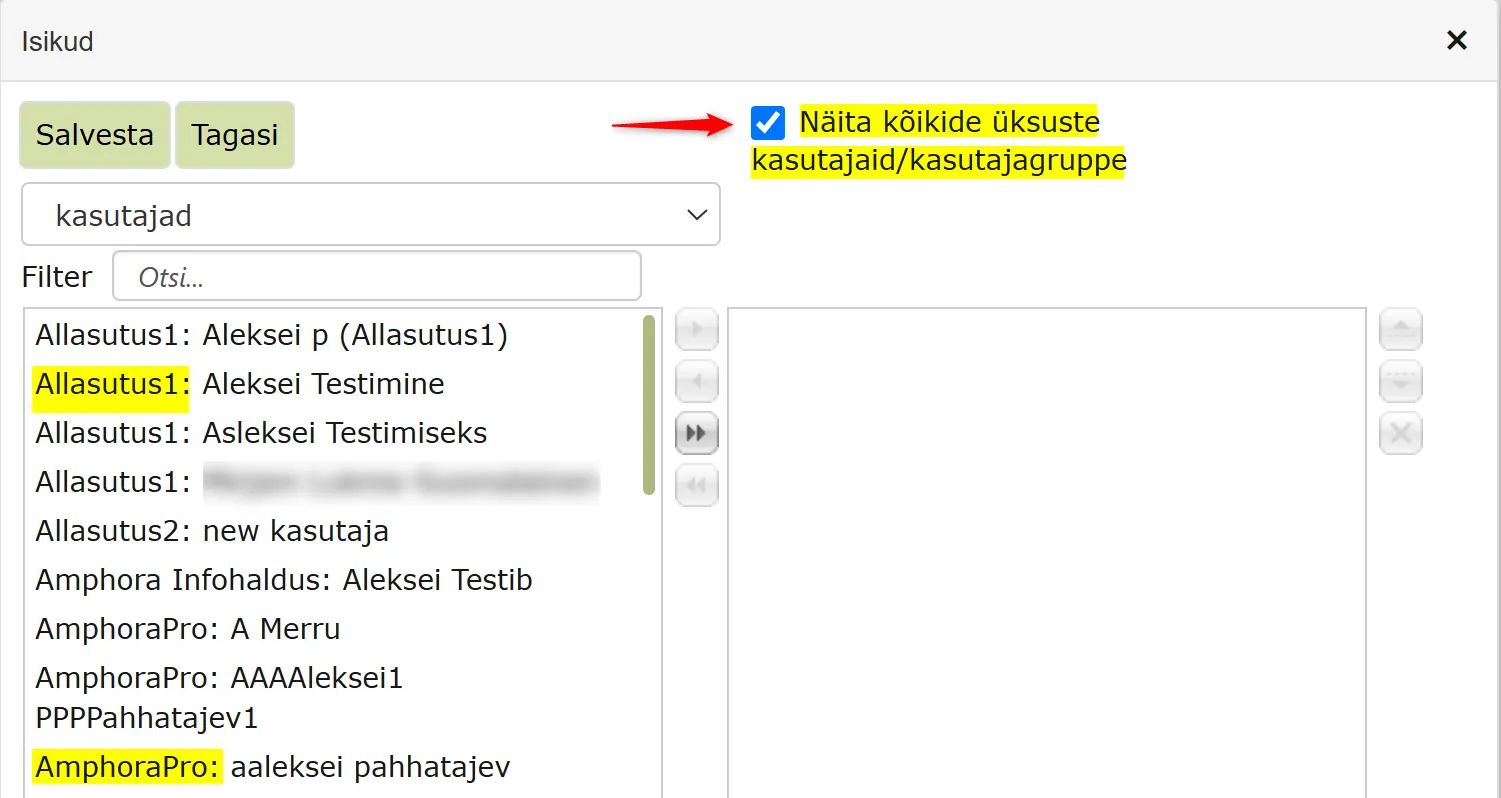 In Amphora, it is important to distinguish between users and persons. Users can access the Amphora internal environment and all process tasks can be created for them.
Persons only have access to the self-service environment, and process tasks can only be created for them for signing and information. When a process is created for a person, Amphora sends them a link to the self-service environment by email. It is important to know that every Amphora user automatically has an associated person in the Persons module.
Sending letter to multiple addressees so that other addressees are not visible
When sending through the deliveries panel, no additional settings are needed - the system automatically sends a separate letter to each addressee.
If you use the @ icon for sending, there are two options:
- Check that "Separate letter to each addressee" is selected (this option is already selected by default).
- Add addressees to the Bcc (blind copy) field.
How to send a letter to multiple addressees so that other addressees are visible
If you want letter recipients to see other addressees, use the @ icon for sending and:
- Remove the checkmark from "Separate letter to each addressee"
- Add addressees to the "Recipient" field. You can also use the Cc (copy) field.
How to register a document as a document appendix after the fact?
If you want to re-register a previously registered document as an appendix to another document, you can do this as follows:
- Open the document in Amphora that you want to re-register as a document appendix.
-
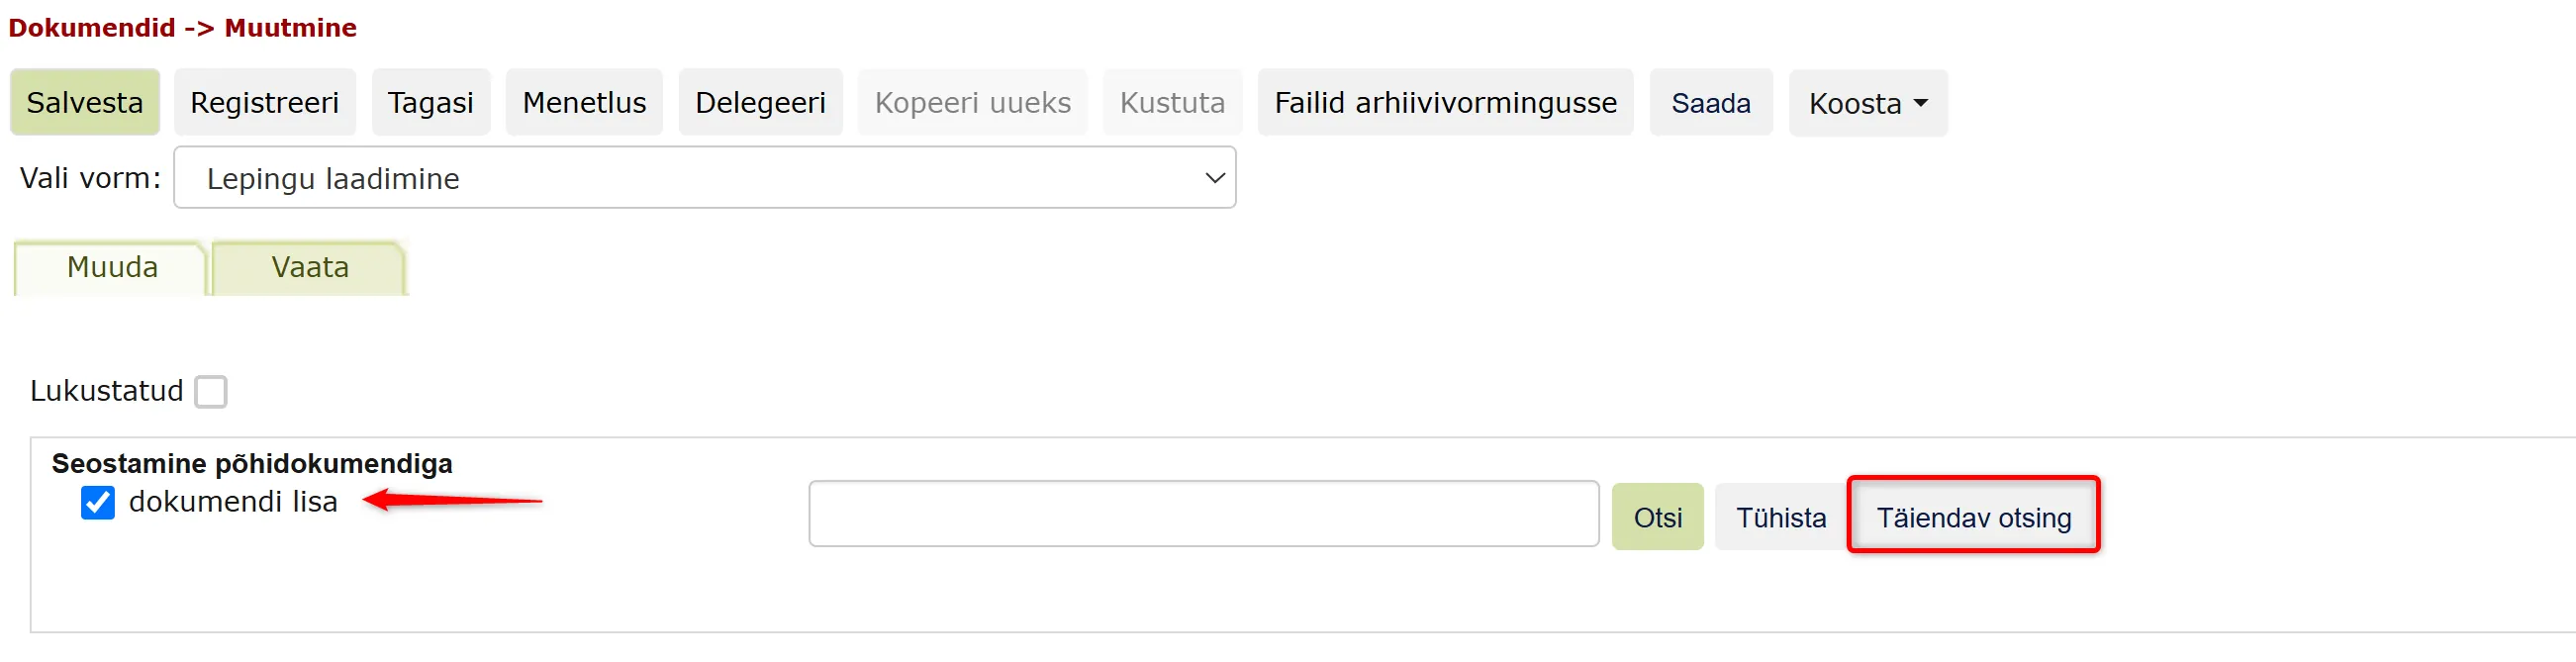
In the document edit view, you will see a box with text "Association with main document". Check the "Document appendix" checkbox and click on the "Additional search" button on the right.
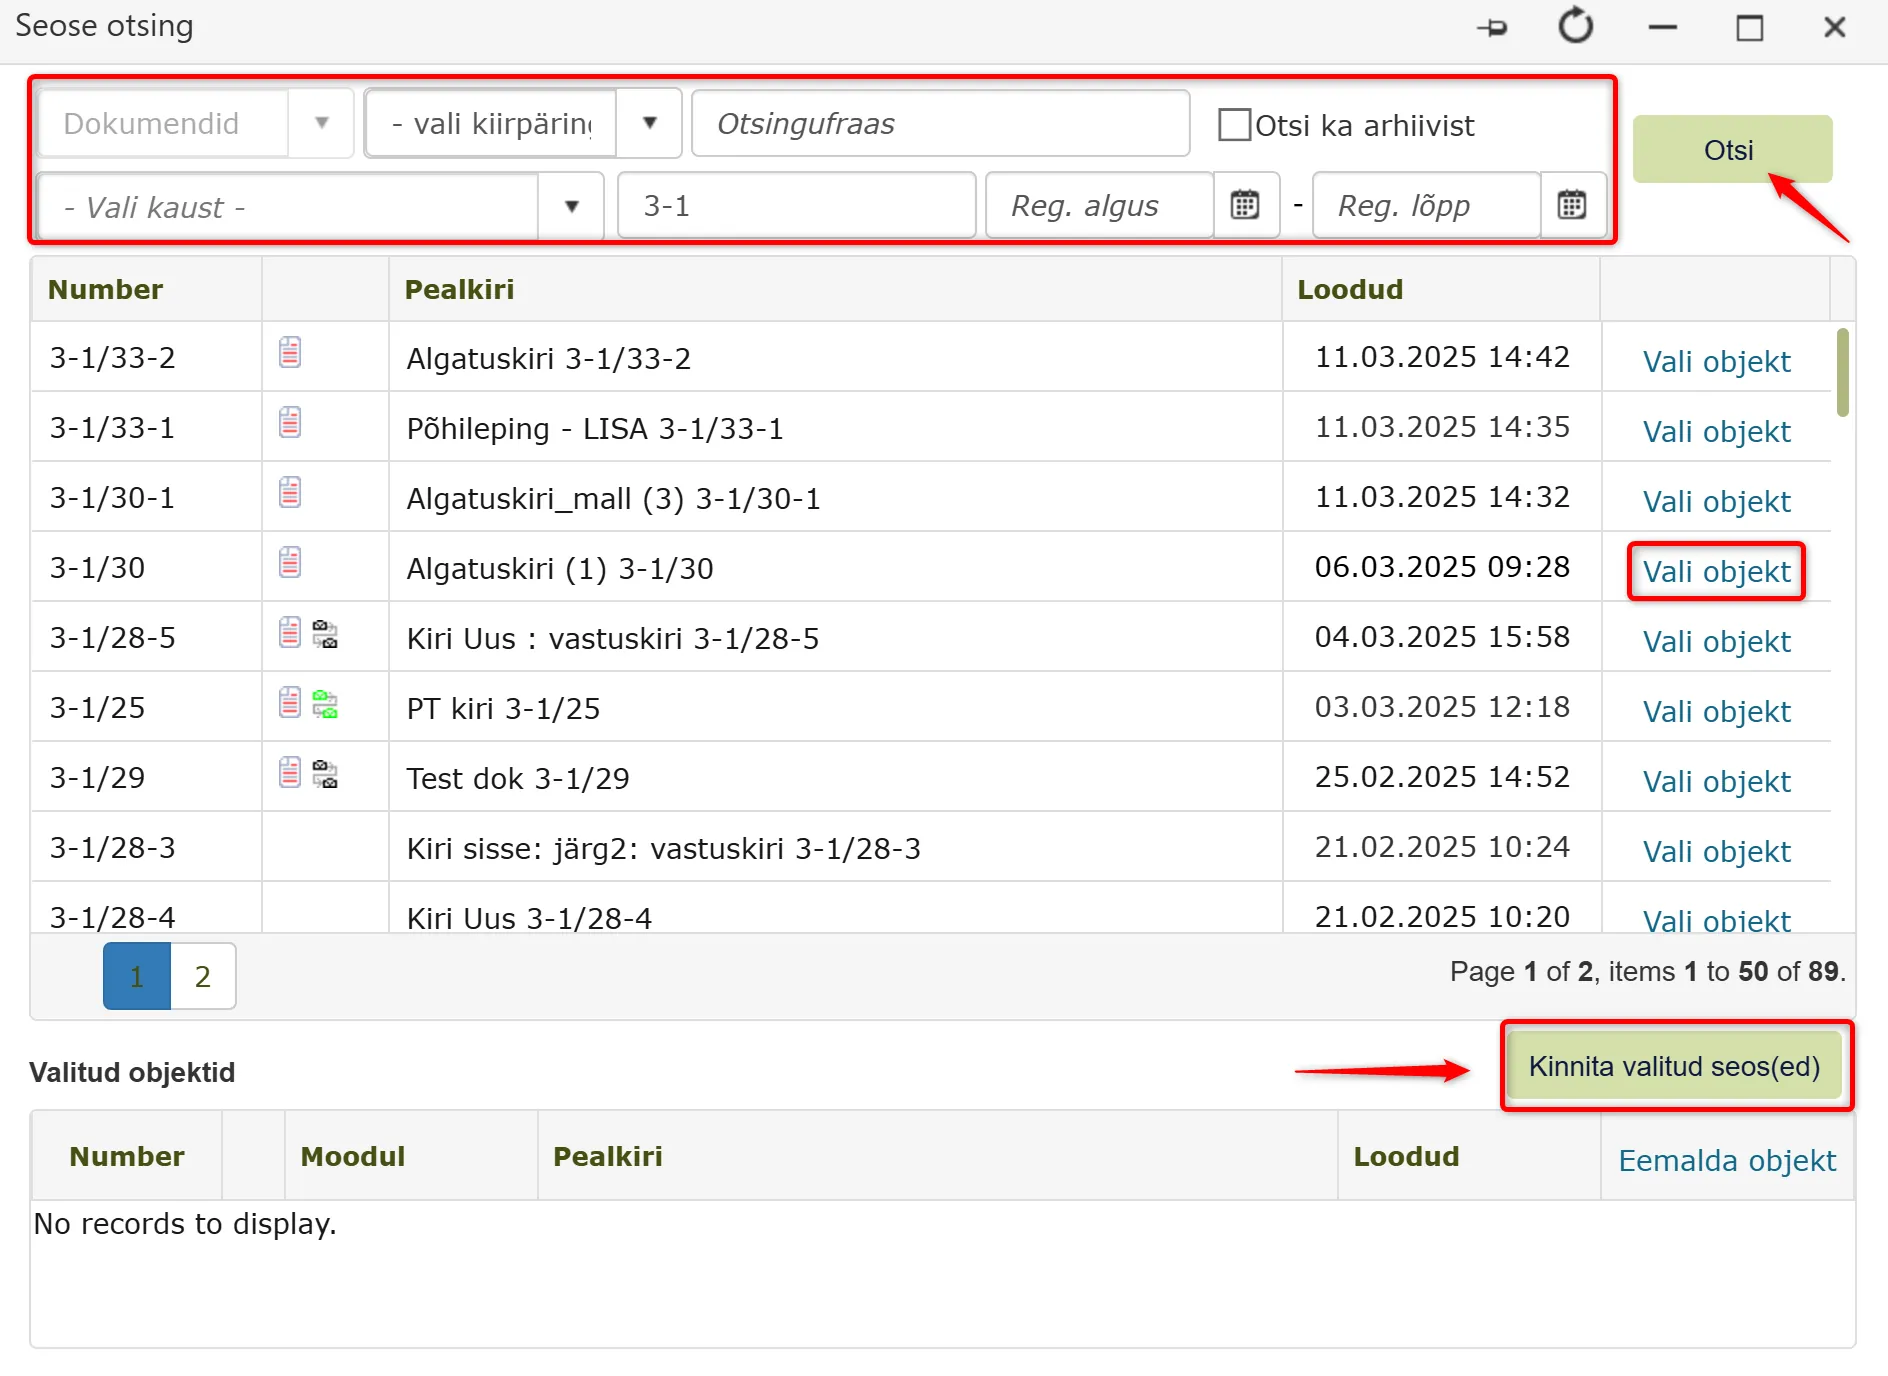
 3. A new window will open where you can search for the main document.
* Fill in the search criteria (series code, document title, etc.) and press the Search button.
3. A new window will open where you can search for the main document.
* Fill in the search criteria (series code, document title, etc.) and press the Search button.
* Find the document from the list under which you want to register the given document as an appendix, press "Select object".
* The selected document moves to the lower Selected objects box. Press the "Confirm selected associations" button.
 4. After saving the document, the document appendix gets the correct number (main document-1).
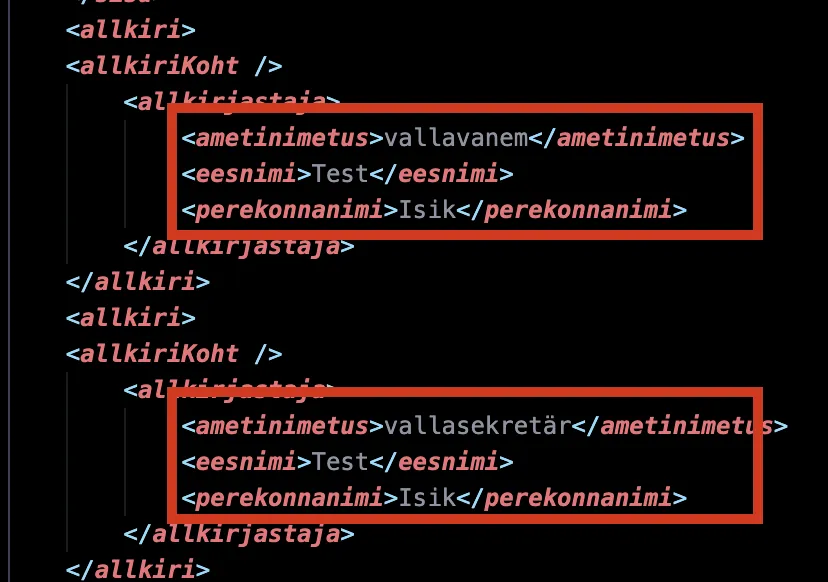
AKT file content editing
AKT files are used as template files in the Legal Acts system. You can read more about this HERE.
AKT template file content (for example, signer data) can be modified by users with main user rights. To do this, navigate to Admin - Templates, open the specific template and download the AKT template file.
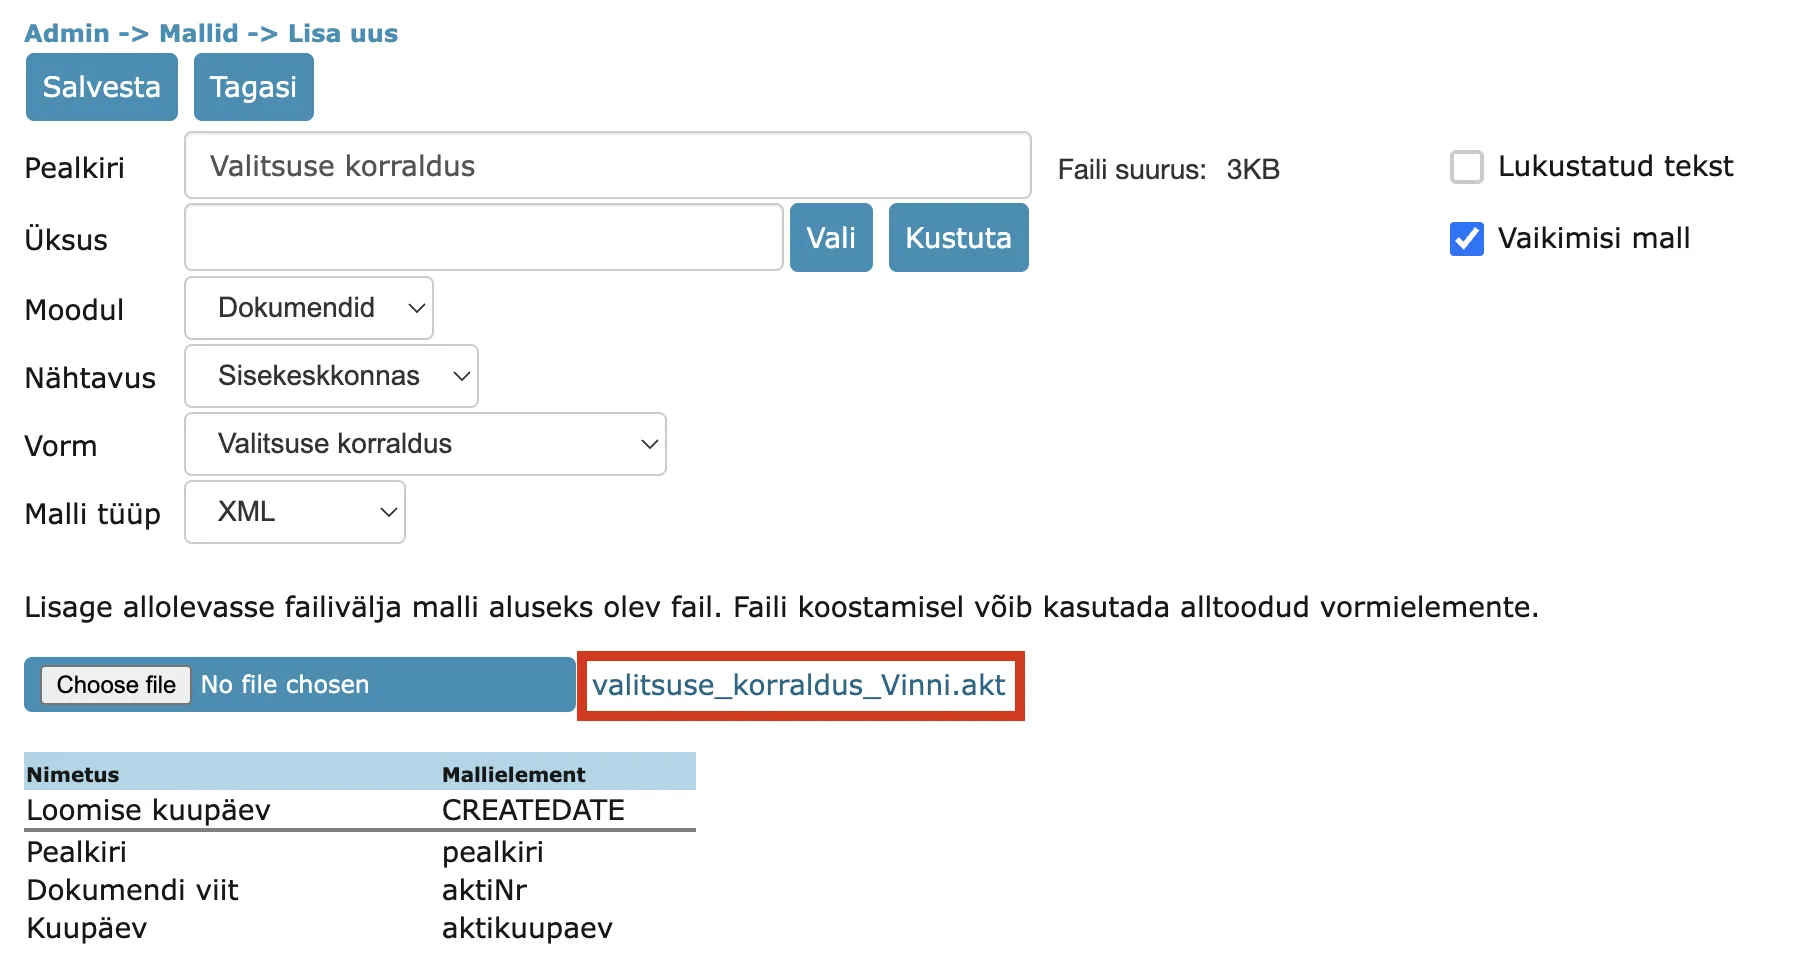
After downloading the AKT template file, open it with a text editor such as Notepad or Notepad++. NB! Definitely do not open with VexPro software.
In the opened text editor, you can make the necessary changes. When the desired changes are made, save them (with the Ctrl + S keyboard shortcut) and upload the modified template file back to the Amphora environment (Admin - Templates - template name).
The image below shows where the government order/regulation signer data is located.
Last modified: 17 October 2026, 11:05:57