Invoices
- Purchase invoices
a. Purchase invoices list view
b. Adding purchase invoices manually
c. Purchase invoice accounting
d. Registering purchase invoice received by email
e. Directly received purchase invoices
f. Purchase invoice processing - Sales invoices
a. Adding organization
b. Export of sales invoices from PMEN to Amphora
c. Sending sales invoices
Purchase invoices
Purchase invoices arrive to Amphora in different ways. If the Amphora client uses Amphora e-invoice functionality, then purchase invoices arrive directly to the Invoices module and these invoices do not need to be added separately.
At the same time, it is possible to add purchase invoices that have come to email (both from Outlook and directly from the E-mails module) as well as to the DHX module. For this, there is a registration profile named invoice. Manual invoice addition is also available.
Purchase invoices list view
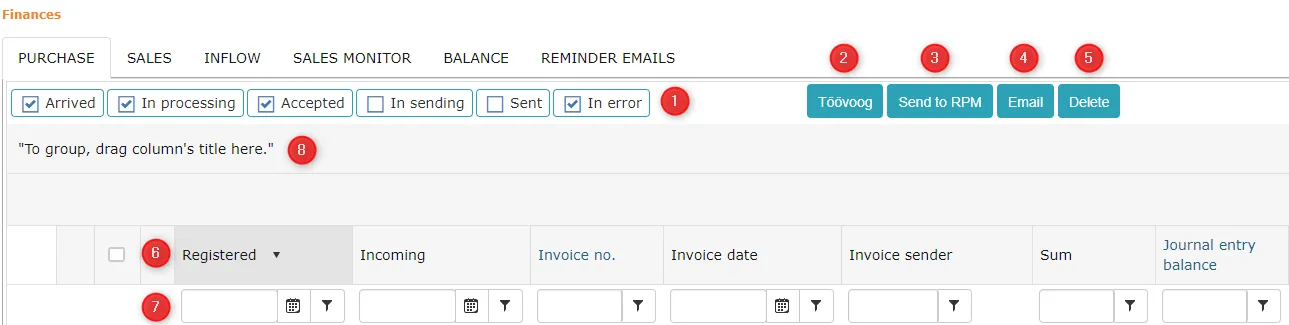 1. Filtering options. Since purchase invoices have different statuses, this can be used to make purchase invoices with specific statuses visible.
2. With the Send to processing button it is possible to send purchase invoices to processing. You need to check the purchase invoice and click this button.
3. With the Send to accounting software button it is possible to send purchase invoices to accounting software. You need to check the purchase invoice and click this button.
4. With the Send object by email button it is possible to send purchase invoices by email. You need to check the purchase invoice and click this button.
5. With the Delete button it is possible to delete purchase invoices. After deletion, the purchase invoice goes to the Trash module and from there it is still possible to restore this purchase invoice.
6. Invoice export options - XLSX and CSV.
1. Filtering options. Since purchase invoices have different statuses, this can be used to make purchase invoices with specific statuses visible.
2. With the Send to processing button it is possible to send purchase invoices to processing. You need to check the purchase invoice and click this button.
3. With the Send to accounting software button it is possible to send purchase invoices to accounting software. You need to check the purchase invoice and click this button.
4. With the Send object by email button it is possible to send purchase invoices by email. You need to check the purchase invoice and click this button.
5. With the Delete button it is possible to delete purchase invoices. After deletion, the purchase invoice goes to the Trash module and from there it is still possible to restore this purchase invoice.
6. Invoice export options - XLSX and CSV. 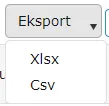 7. Different columns of the list view, including the Catalog column. Here it is possible to sort by columns. The catalog column allows filtering purchase invoices for a specific catalog.
8. There is a search field under each column. Here it is possible to use search.
7. Different columns of the list view, including the Catalog column. Here it is possible to sort by columns. The catalog column allows filtering purchase invoices for a specific catalog.
8. There is a search field under each column. Here it is possible to use search.
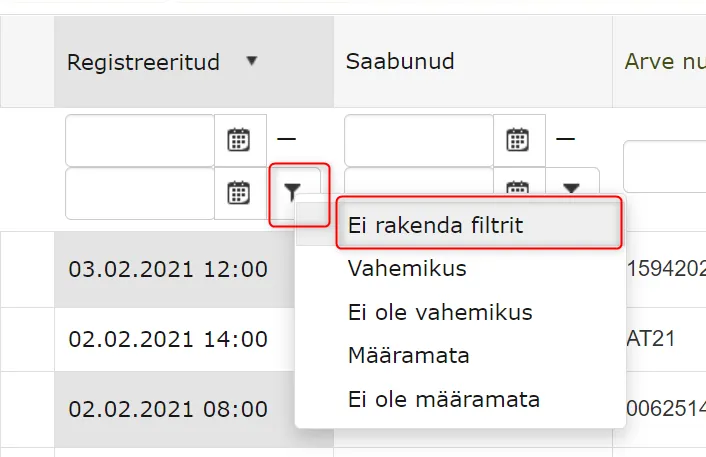
For text search phrase, it is enough to enter the search phrase and press ENTER key.
For date column, you need to enter both start and end date (for example 01.01.2021 - 31.12.2021) and then press ENTER key.
To cancel search/filter, you need to click on the filter icon and select Do not apply filters.
Purchase invoice statuses
The following statuses can be selected for a purchase invoice:
- Paid -- marks the purchase invoice with paid status. This enables better management of purchase invoices in Amphora.
Adding purchase invoices manually
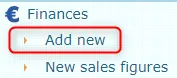
Purchase invoices can be added manually. This is primarily suitable for registering paper-based purchase invoices. For this, you need to use the Add purchase invoice button under the Invoices module.
 The purchase invoice addition view opens:
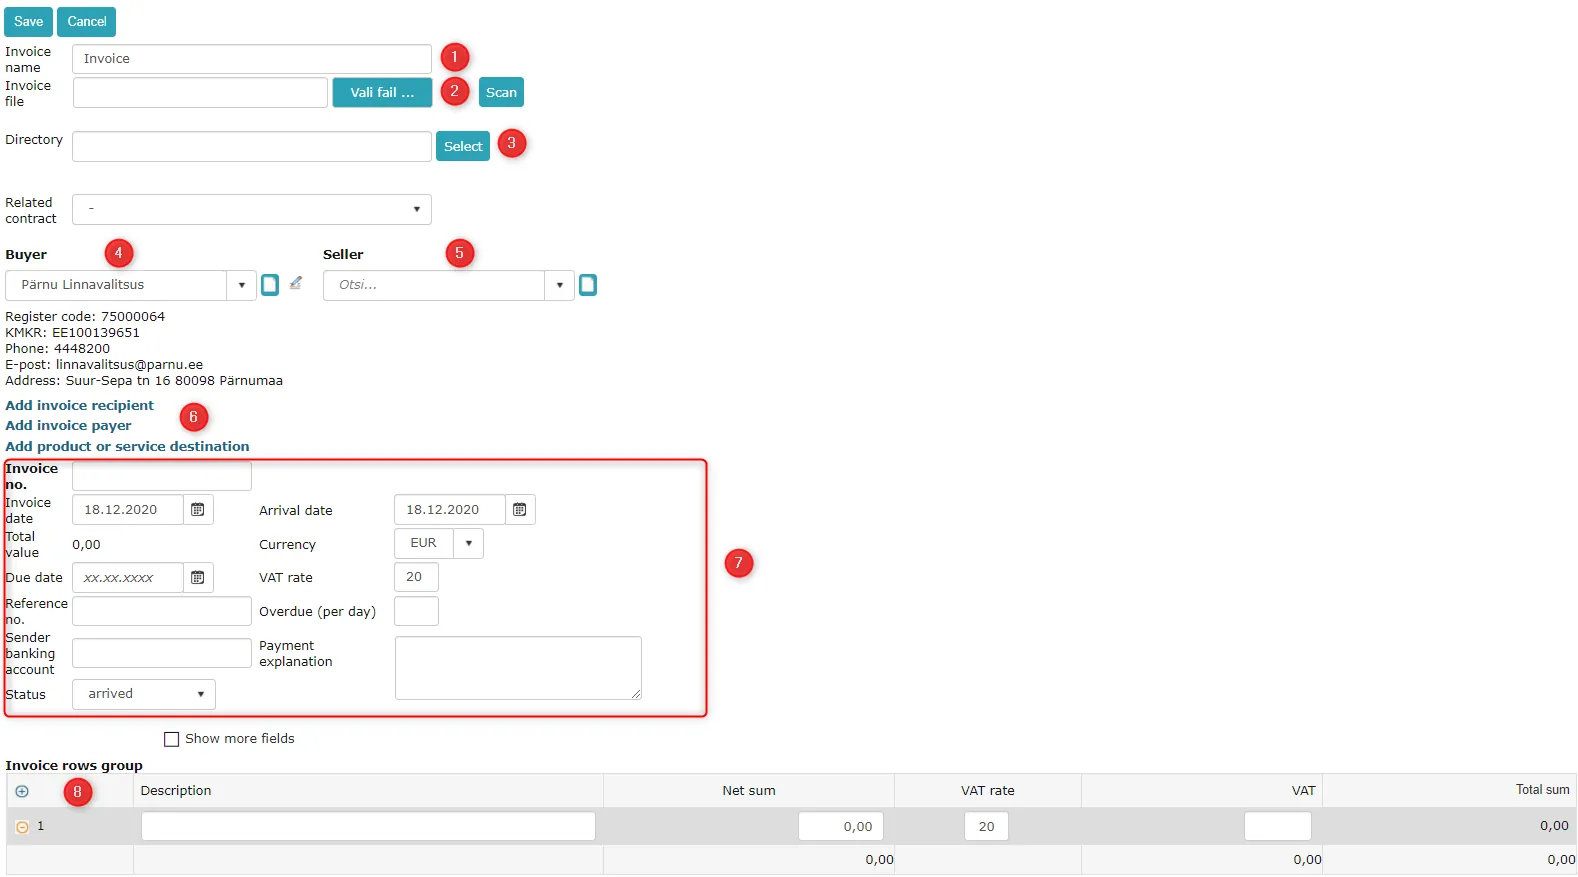 1. Document name. By default, Invoices is written there. Such a name can remain. However, you can also add the invoice number to the Document name field.
2. Purchase invoice file is usually a PDF file. The file can be selected from your computer (if this file exists on the computer) or scanned if the invoice is on paper.
1. Document name. By default, Invoices is written there. Such a name can remain. However, you can also add the invoice number to the Document name field.
2. Purchase invoice file is usually a PDF file. The file can be selected from your computer (if this file exists on the computer) or scanned if the invoice is on paper.
For invoices that come via email or DHX, there is probably an XML file above the main file. If there is no file, then this point can be skipped. The PDF file is immediately visible to the user after adding.
{: loading=lazy }3. Here you can select the folder where this purchase invoice is saved. Although folder trees do not exist in the purchase invoices module, folder selection is still important.
If the organization has many sub-organizations and some employees should not see other organizations' purchase invoices, then different folders should be used (for example, a separate folder for each sub-organization) and restrict the rights of other folders.
4. Buyer is always the purchase invoice recipient, i.e., the environment that received the invoice. From the dropdown menu it is possible to select your organization. This is a mandatory field.
5. Seller is the purchase invoice sender. From the dropdown menu it is possible to select the correct organization. If this organization is not available in the selection, it is possible to add this organization.
For this, you need to click on the white icon located behind the dropdown menu. This is a mandatory field.
{: loading=lazy }If the correct organization exists but necessary data is missing, then this data can be added. For this, you need to click on the pencil icon, which is located similarly behind the dropdown menu.
The pencil icon becomes visible only when some organization is selected from the dropdown menu.
{: loading=lazy }It is also possible to write the organization you are looking for in the dropdown search.
Example:
{: loading=lazy }6. Adding recipient and payer. This is not a mandatory field.
Why is this necessary? For example, a person buys goods for themselves through the municipality, the municipality pays for it and the person receives the goods. In such a case, we put the person as recipient and the municipality as payer.
7. Purchase invoice general data. Invoice number is a mandatory field, other fields are not mandatory. Tax amount cannot be changed, it comes directly from the invoice lines group.
Status cannot be changed. By default, Status is received when adding a purchase invoice for the first time. When a purchase invoice is sent to processing, the Status also changes – in processing.
8. Invoice lines group must include products/services that need to be paid for. Amphora calculates the total amount itself. The picture shows a simplified invoice lines group form with very few different fields.
By checking Show more fields, many new fields are opened.
{: loading=lazy }The next step would be adding accounting entries.
Additionally, it is possible to link the purchase invoice with some other invoice or even document, letter and case. For this, there is a panel called Relations. You need to click the Add button and select the object that this purchase invoice should be linked with.
If the purchase invoice has multiple files attached, then these files can be added to the Additional files panel. For this, you need to use the New button above the Additional files panel.

Purchase invoice accounting
A separate panel has been created for purchase invoice accounting. To add accounting entries, you must first add rows to the invoice lines group. New accounting entries can be added in two ways.
-
Add each entry separately. For this, you need to click on the + icon located in the accounting panel.
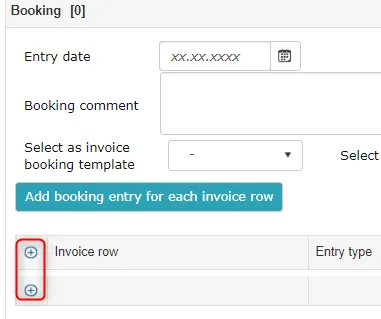 2. Add an entry for each invoice line at once. For this, there is the Add accounting entry for each invoice line button.
 When accounting rows are added, you need to enter the necessary data:
 -
General ledger account
- VAT code (comes from invoice line if such code is available in selection). VAT can also be entered with a comma (two decimal places, e.g., 25.5%).
- Net amount (comes from invoice line)
- Dimensions (expense types, income types, activity areas, etc. with dimension values)
Accounting templates can be saved. This is useful if the same invoice comes every month. In such a case, you don't have to add accounting entries every time.
When accounting entries are created, you need to enter the template name and click the Save template button.
 Existing accounting templates can be selected from the Select accounting template dropdown and deleted if necessary.
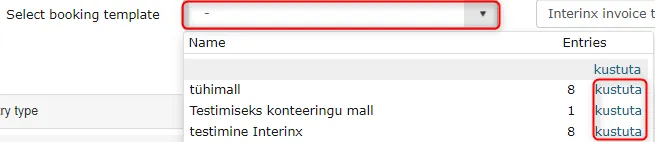 Accounting entries can be selected from another invoice. For this, you need to select an already saved invoice from the Select invoice as accounting template dropdown and the accounting entries of that invoice appear below.

Registering purchase invoice received by email
Purchase invoices received by email can be directly registered to the Invoices module. Direct registration is possible from Amphora E-mails module and Outlook.
E-mails module
To use the Amphora E-mails module, you need to set up an email address where purchase invoices are received.
Important
At this point, you should contact your organization's IT department or Amphora client support.
In the E-mails module, there is a dropdown menu called Register. First, you need to check the desired email that you want to register. By clicking on this dropdown menu, different registration profiles come into selection. You need to select invoice.
If there is an XML file in the email attachment, then most data is immediately filled. You only need to add accounting entries. Amphora can process XML files and get information from there. If there is no XML file, then there is probably a PDF file attached, which goes above the main file. General data needs to be added manually.
Outlook
To be able to register purchase invoices from Outlook, you need Amphora client and Outlook client. If this software is not installed and configured, you need to contact your environment's IT department and read the workplace setup guide.
If the software is correctly installed and configured, then Amphora options appear in the upper ribbon in Outlook (Synchronize with Amphora and Register email).
The email that you want to register to Amphora needs to be opened and from the Register email dropdown select Purchase invoice. Then all the information in the email is sent to the purchase invoice form.
If there is an XML file in the email attachment, then most data is immediately filled. You only need to add accounting entries. Amphora can process XML files and get information from there.
If there is no XML file, then there is probably a PDF file attached, which goes above the main file. The rest of the data needs to be added manually. See purchase invoice addition chapter.
It is possible to register an email directly from the All list in Outlook. For this, you need to right-click on the email, then Register in Amphora -> Purchase invoice.
 Registering purchase invoice from DHX module
If a purchase invoice has arrived in the DHX module, then it needs to be registered. In the DHX module under Received messages, you need to find the purchase invoice and click on the  icon and select invoice from there.
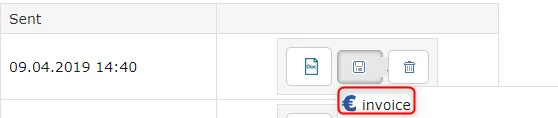 Further purchase invoice addition works exactly the same as adding purchase invoices received by email.
If XML file exists, then you need to add accounting entries.
If there is no XML file but PDF file exists, then you need to add general data and accounting entries.
Directly received purchase invoices
If the environment is configured correctly, then most invoices will start coming directly to the purchase invoices list. Therefore, employees do not have to register them themselves.
Directly received invoices usually have an XML file, so general information is immediately filled and you only need to add accounting entries.
New received invoices are in bold. When the user opens the letter, the bold becomes normal.

Purchase invoice processing
Purchase invoices can be processed almost the same way as documents or letters. The difference is that you cannot select For signing, For information and For completion as task type.
There is no task type selection at all, all tasks are For coordination.
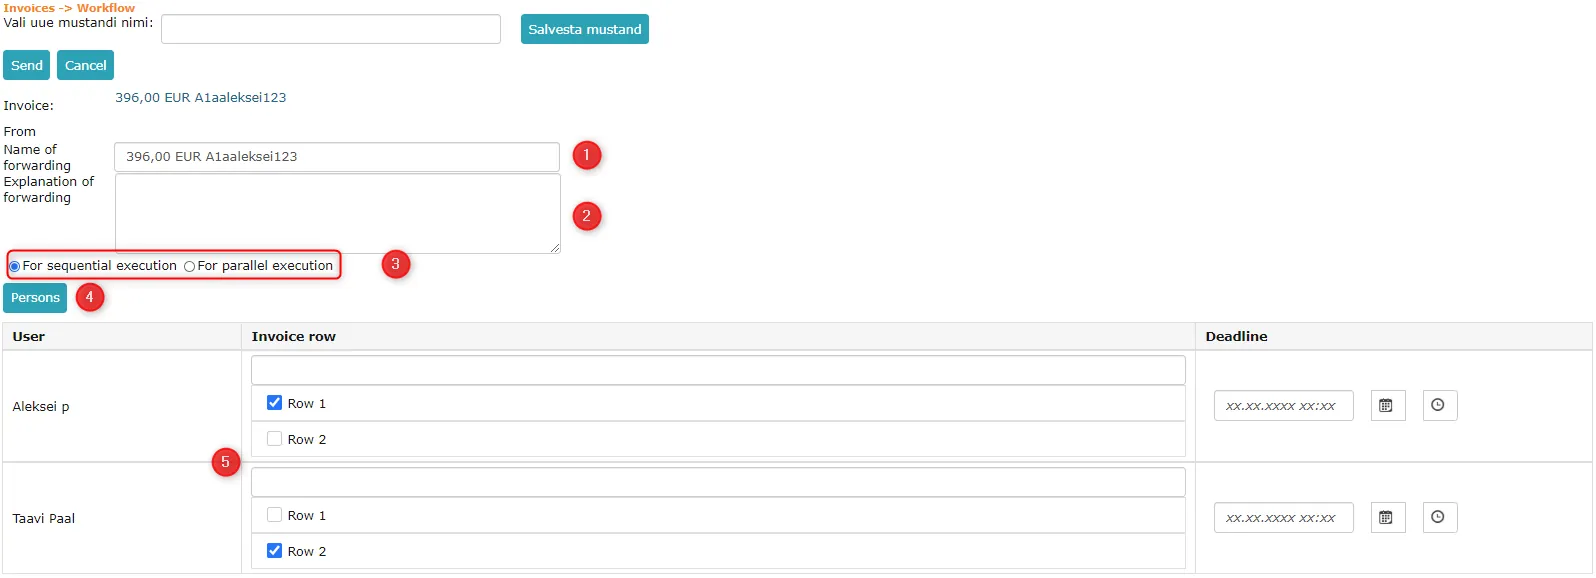 1. Forwarding title is composed by Amphora itself and consists of the purchase invoice total amount and the sender organization. However, the forwarding title can be changed if such need arises.
2. In the Forwarding description field, you can add the description of this forwarding, along with various useful information.
3. Here you can select the processing type. For purchase invoices, the default processing type is Sequential execution. You can also select Parallel execution.
1. Forwarding title is composed by Amphora itself and consists of the purchase invoice total amount and the sender organization. However, the forwarding title can be changed if such need arises.
2. In the Forwarding description field, you can add the description of this forwarding, along with various useful information.
3. Here you can select the processing type. For purchase invoices, the default processing type is Sequential execution. You can also select Parallel execution.
Sequential execution – the first person gets the task and the second gets it only after the first person marks the task as done.
Parallel execution – all persons get the task simultaneously.
4. With the Persons button, you can select persons to whom this task needs to be sent.
5. When person(s) are selected, you can personally add comments about the task, mark which invoice lines they coordinate and add task deadline. Comment and deadline are not mandatory.
Important
Deadline must be added with time. When selecting date, the default time is 00:00.
When all these points are done, you need to click the Send button and the processing is created.
Sales invoices
Adding organization
You need to make sure that the organization to which you need to send a sales invoice exists in Amphora. The organization can be imported directly from the PMEN program as well as added manually in Amphora.
Importing from PMEN program
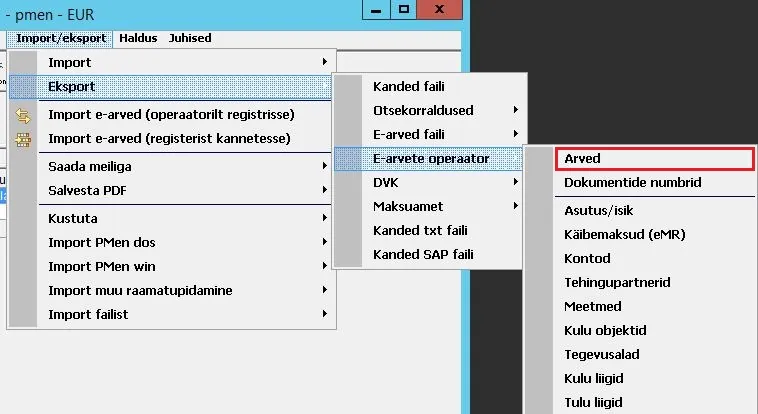
To add an organization directly from PMEN, you need to open the Billing window in the PMEN program. Then you need to go to Import/export -> Export -> E-invoice operator -> Organization/person.
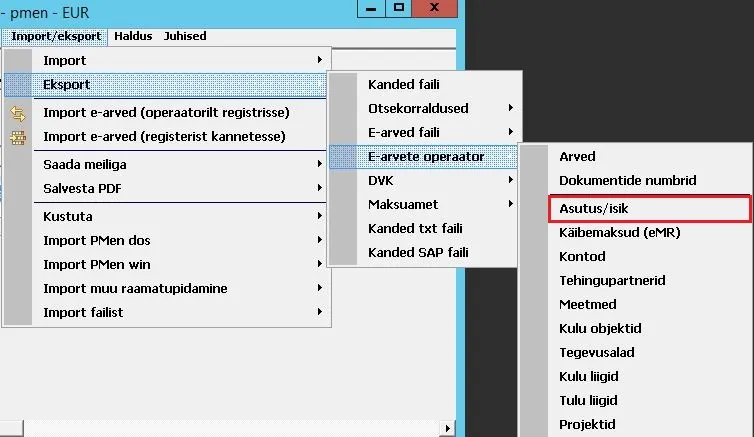 In the authentication code window, you need to select the environment where the organization(s) should be added. If PMEN is connected to only one environment, then there is only one environment in that selection.
In the next window, you need to select the organization. You can also import multiple organizations at once. For this, you need to hold down the CTRL key and mark the organizations with the mouse that should be imported.
By clicking the OK button, the organization(s) are imported to the Amphora environment.
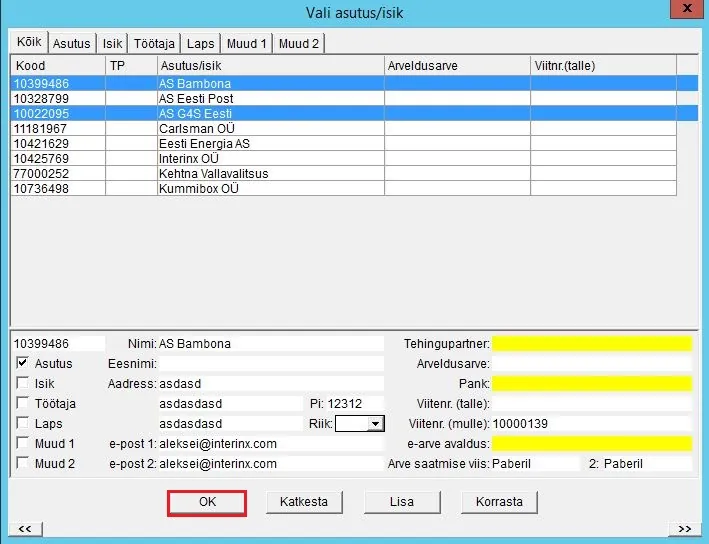
Important
Currently, importing does not include the organization's address and email address to Amphora.
Therefore, the email address must be added manually. We can do this directly at the invoice or in the organizations module.
At the invoice, you need to click the "pencil" button on the Buyer organization line.
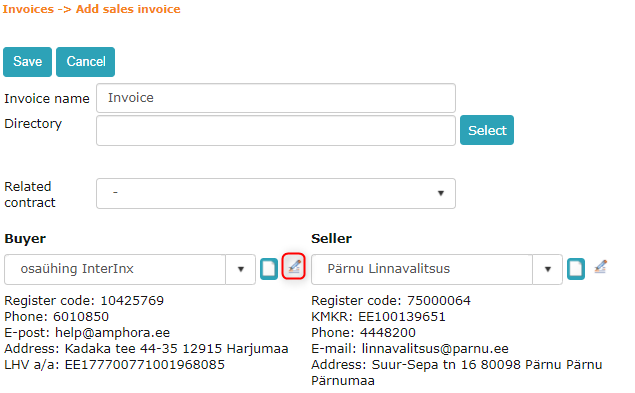 This button takes you to the organization edit view.
To add an email address, enter the email address in the Address field and click the Add button.
 To add an address, enter all data (county, city/municipality, street, number, postal code). If the city or municipality is missing from the selection, it should be added to the street line. The Add button adds the organization.
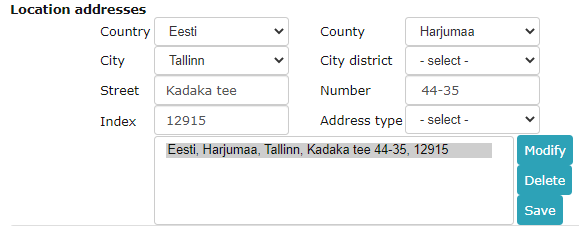 When email address and location address are added, you need to click the Save button and Amphora takes you back to the sales invoice.
Adding organization directly to Amphora environment
Another option would be to add the organization directly in the Amphora environment. For this, you need to select the Organizations module and Add new.
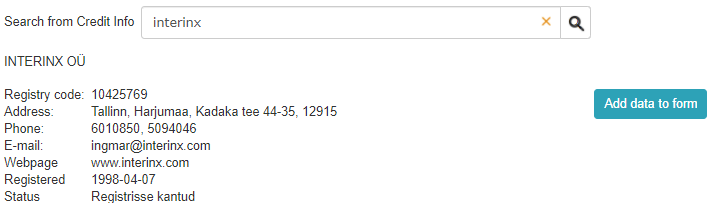
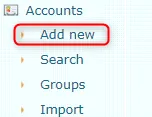 In the Business Registry search field, you need to write the organization name (or part of the name). If the organization you want to add exists in the search results, you need to click on that organization.
 Amphora displays the organization data, but they are not yet added to the organization form. For this, you need to click the Add data to form button.
Export of sales invoices from PMEN to Amphora
Sending sales invoice from PMEN program to Amphora:
- Open the Billing window.
-
Import/export -> E-invoice operator -> Invoices.
 3. In the Authentication code window, select the environment where sales invoices should be exported.
4. In the Invoice printing combination window, you should select the corresponding invoice combination.
5. In the Invoice register window, you need to mark the sales invoice(s) that you want to export to the Amphora environment. You can also select multiple sales invoices at once.
3. In the Authentication code window, select the environment where sales invoices should be exported.
4. In the Invoice printing combination window, you should select the corresponding invoice combination.
5. In the Invoice register window, you need to mark the sales invoice(s) that you want to export to the Amphora environment. You can also select multiple sales invoices at once.
For this, you need to hold down the CTRL key and select sales invoices with the mouse. By clicking the OK button, PMEN exports the selected invoices to Amphora.
Sending sales invoices
All sales invoices that come from accounting software have the status Imported.
For a sales invoice to successfully reach the addressee, the following conditions must be met:
- Buyer organization must have a registration code. This comes with PMEN import.
- Buyer organization must have an e-invoice operator. When exporting from PMEN or manually adding an organization in Amphora, the e-invoice operator automatically comes along if the organization's registration code is valid.
- Buyer organization must have an email address. If the email address is entered in the PMEN program, then the buyer organization's email address exists on the sales invoice.
- Buyer organization must have a location address. If the location address is correctly entered in the PMEN program, then the buyer organization's address exists on the sales invoice.
- Buyer organization must have a bank account. If the bank account is missing, Amphora displays a corresponding notification when sending and the sales invoice is not sent.
- Sender (seller) organization must have a bank account. If the sender organization is missing bank account data, Amphora displays a corresponding notification when sending.
Sales invoice can be sent both from the sales invoices list view and from the sales invoice edit view.
List view – you need to check the sales invoice and click the Send button.
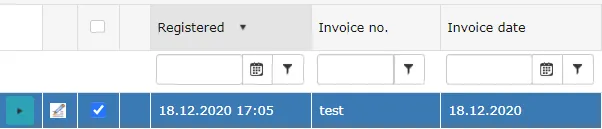 Edit view – you need to click the Send button.
 The sales invoice PDF footer displays the organization's email address and phone number, if available for the organization.
Purchase and sales invoice organization filter
In the Purchase invoices tab, there is a buyer organization filter. The dropdown selection contains all environment organizations that are linked to the unit. This allows filtering purchase invoices for a specific organization.
In the Sales invoices tab, there is similarly a seller organization filter. This allows filtering by seller organization.
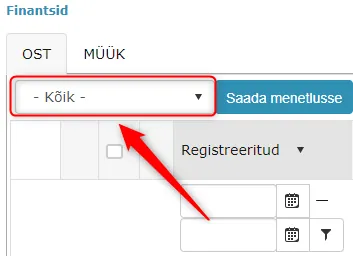
Invoice line description check
When saving purchase and sales invoices, Amphora checks whether each invoice line has a description. If a description is missing, Amphora displays an error message and the invoice cannot be saved.
Last modified: 17 October 2026, 11:05:57