KOVMEN
- Creating Forms
a. Adding New Form
b. Adding Amphora Field Name
c. Form Panels - Default Settings
- Notifications
- Registration Profiles
- Reports
To configure Kovmen forms in Amphora, the following steps need to be performed:
- Configure a new document form in Amphora – the form should contain at least those data fields that you want to bring from the Kovmen form to Amphora.
- Set default settings (counter, restrictions, publishing) – a default directory must be specified where documents with this form are saved. The created form must be added to an existing counter composition or a new counter must be configured if necessary. If needed, set directory publishing and applicable restrictions. Add the new form to the search profile so it can be used in Amphora search. Check notification settings.
- Registration profile configuration – correspondences between Kovmen and Amphora forms and assignment of responsible person along with automatic processing task creation. The profile name must be identical to the content of the title field in the Kovmen XML file. Based on this, Amphora finds the correct profile.
- Activate automatic registration – contact Amphora user support, who will activate automatic registration.
Creating Forms
Adding New Form
To add a new form, press the Admin module in the left menu. From the opened submenu, press Form Settings (Admin -> Form Settings). Then press the Add new button (it doesn't matter whether you press the upper or lower button, the action is exactly the same).
 In the opening view, you initially need to fill in the fields under Form Configuration. Our task is to create a document form.
- Module – Documents.
- Loading method - to add a new loading method, press the
 button. In the opening window, select Documents as the module, type either Uploaded document category (a main file location appears on the form and this form can be used in the document module only under "Load new") or Written document category (instead of the main file there is a text editor and can be used in the document module only under "Write new"). Additionally, you need to enter the loading method name (only the Estonian name is sufficient). Later it is possible to change the loading method name or add it in other languages by pressing the
  button. When the required fields are filled, press Save.
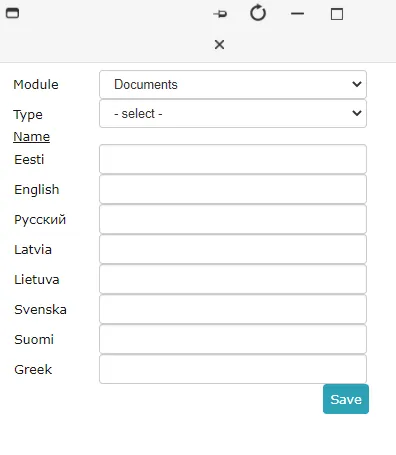 After these actions, the form must be saved. This can be done by pressing the Save button.
Next, we start creating new form fields. If Uploaded document category was selected as the loading method, then when opening the form, a main file and directory location immediately appears.
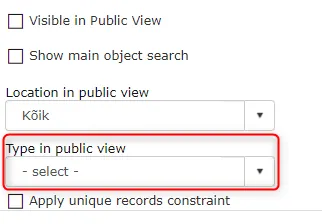 You also need to select Type in public view. This determines under which type a document with this form is in the public view.
To configure the default directory, press the  icon.
icon.
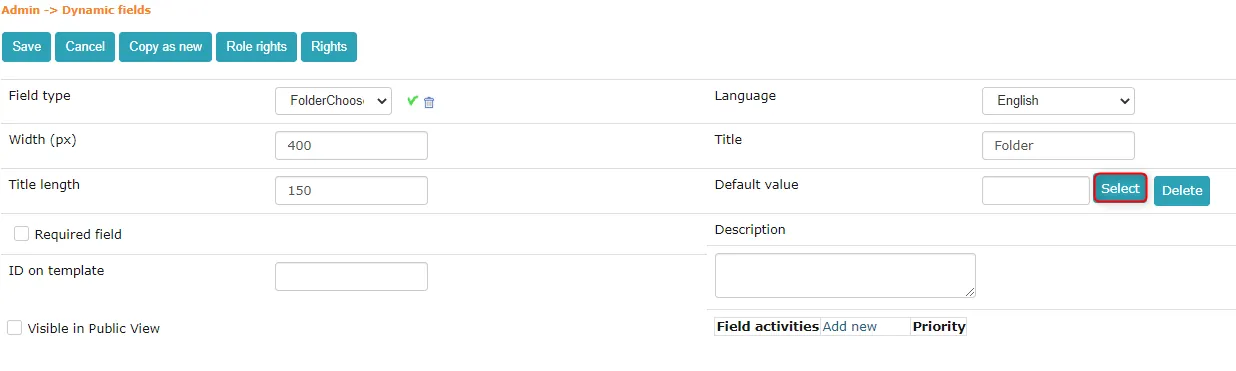 Next, press the Select button and select a folder. After that, press the
  icon to save this field.
New form fields can be added using the arrows  located on the right side of the previous field. Arrow to the right means that a new field is added to the same row. Arrow down means that a new field is added to the next row (below).
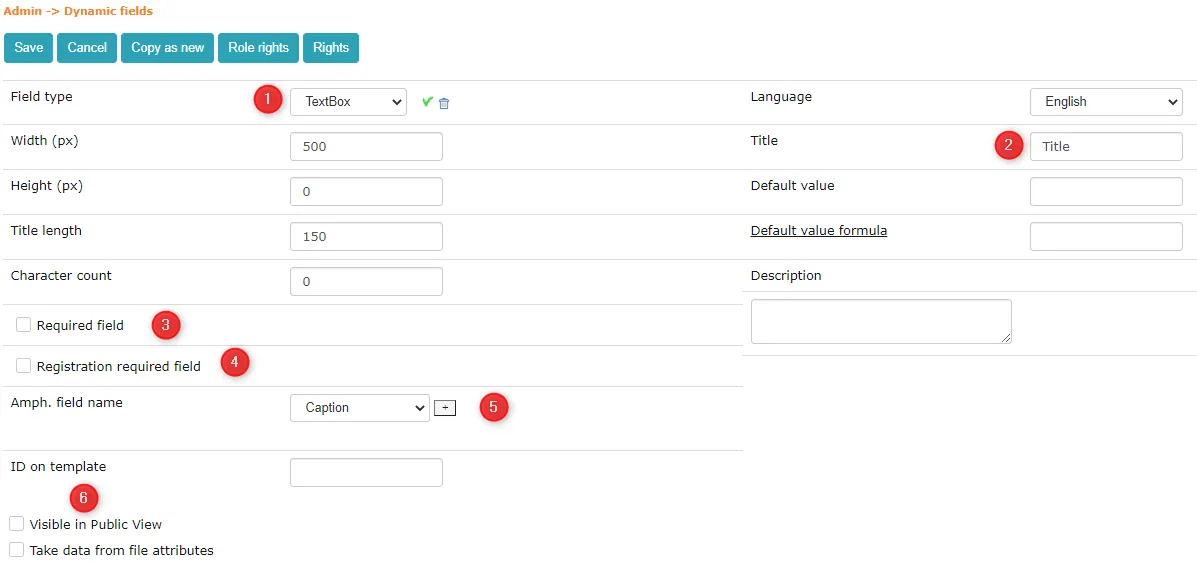 1. The field type dropdown has quite a few options. They should be selected according to the XML data field type. If the XML data field type is text
  – select TextBox, if it is checkbox
  – select CheckBox.
-
The title should have the same name as the XML data field, then it is easier to configure registration profiles later.
-
Mandatory field means that if a checkmark is placed there, it is not possible to save the document with an empty field.
-
Mandatory field during registration – applies when drafts are allowed in the folder. For drafts, the Save button saves the draft and the Register button saves the actual document with a number. You can save if such a field is empty, but you cannot register.
-
Amphora field name – there are system field names. For title, number, and date, system field names should be used. Title – Caption, Number – Number, Registration time – RegisterTime. For other fields, you should create new ones or select from existing Amphora field names if they already exist.
-
Visible in public view – you can mark whether this field is visible in the public view or not. Provided that the document is public.
Additionally, it is possible to change the field width and height (Width (px) and Height (px)).
Amphora field name answer_date (Date field type) allows adding a response deadline to the form if this field is on the form and the necessary configuration has been made in the profile.
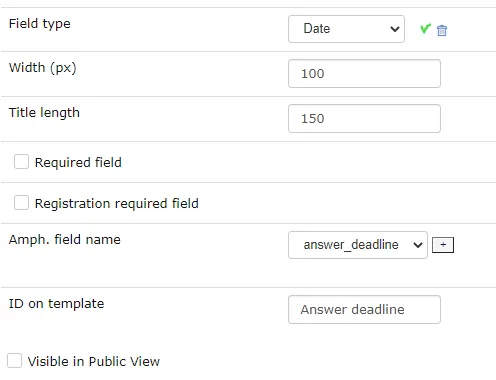
Adding Amphora Field Name
We press the + button next to the Amp. field name.
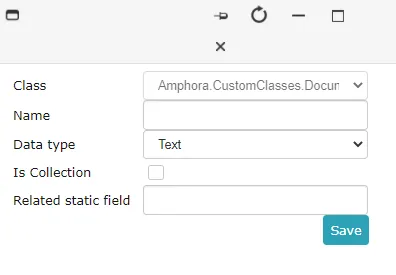
 In the opening window, 2 fields must be correctly configured: Name and Data type.
-
Name – Amphora field name.
-
Data type – Very important field. This selection determines which field type the given Amphora field name falls under. Below are the data types and which field types they are related to.
Data type – Field type
-
Text – TextBox and URL.
-
Number – RadioButtonList, PersonChooser, HtmlEditor, Editabledropdown, DropDownList.
-
Decimal – Number.
-
Yes/No – CheckBox.
-
Date – Date, DateTime.
-
Array - PersonChooserList, ListBox, DropDownListMulti, Classificator, ClassificatorList, CheckBoxList.
Form Panels
When the form is created, form panels must also be configured. This can be done by going to Admin -> Form Settings. We open our created form and below is the panel configuration area.
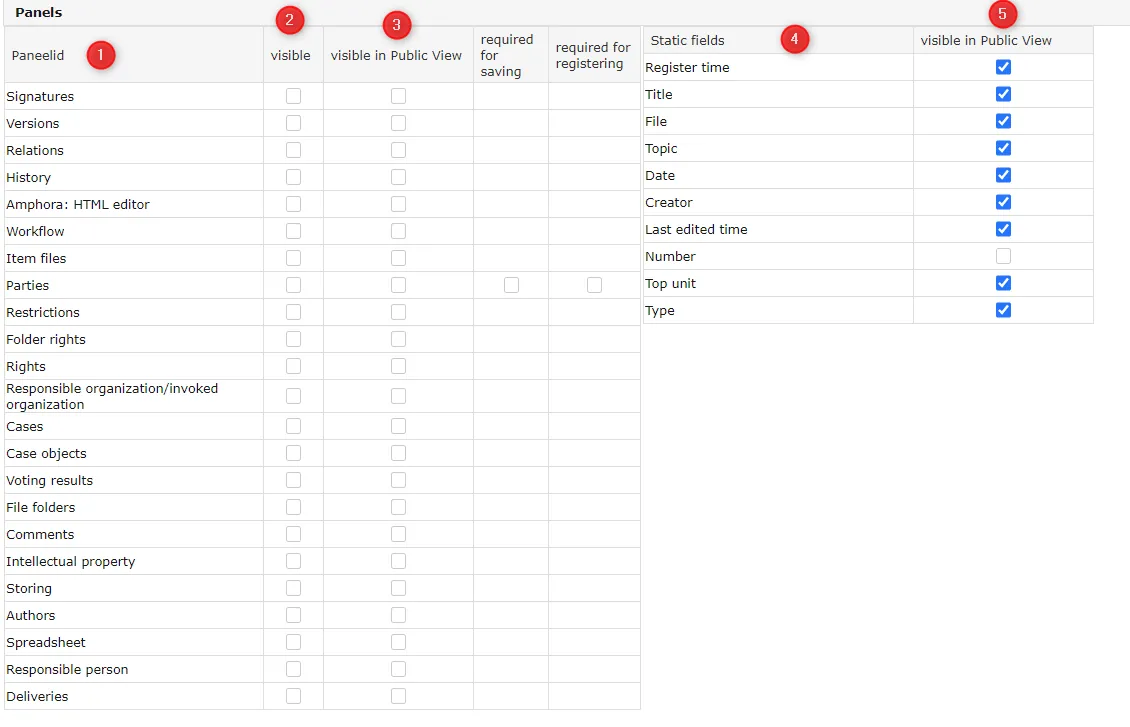 1. List of panels.
2. In this column, you can mark which panels are visible in Amphora for this form.
3. In this column, you can mark which panels are visible in the public view.
4. List of static fields.
5. In this column, you can mark which fields are visible in the public view.
1. List of panels.
2. In this column, you can mark which panels are visible in Amphora for this form.
3. In this column, you can mark which panels are visible in the public view.
4. List of static fields.
5. In this column, you can mark which fields are visible in the public view.
Default Settings
For the document to get a number, default restriction (if needed), and to always be public, the corresponding configuration must be made for the specific folder. Admin -> Directories, select the desired folder and press the Edit button.
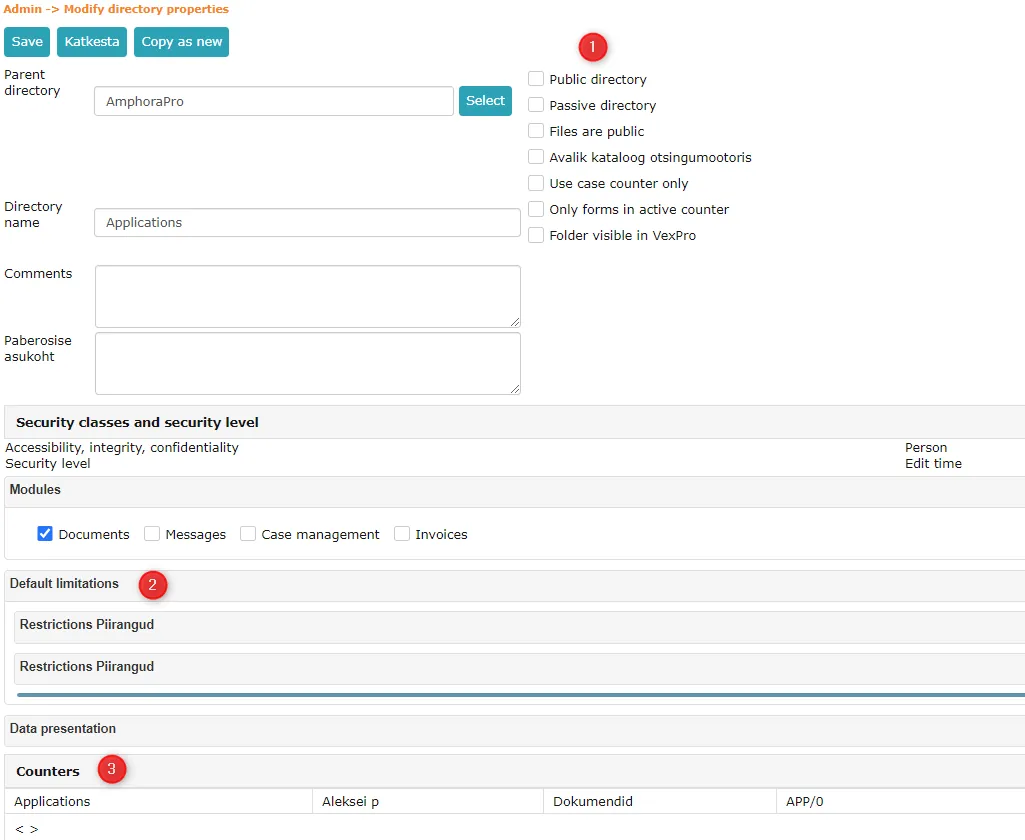 1. Public series – by default, document metadata is public when saving.
Files public – by default, the main file is public when saving.
-
You can configure default restrictions for the folder. Activate default restriction addition (Documents) must be checked and an access restriction basis must be selected.
-
With a counter, the document can automatically get a number in the given folder. Press the Add button. In the opening view, select forms with which documents in this folder will get numbers.
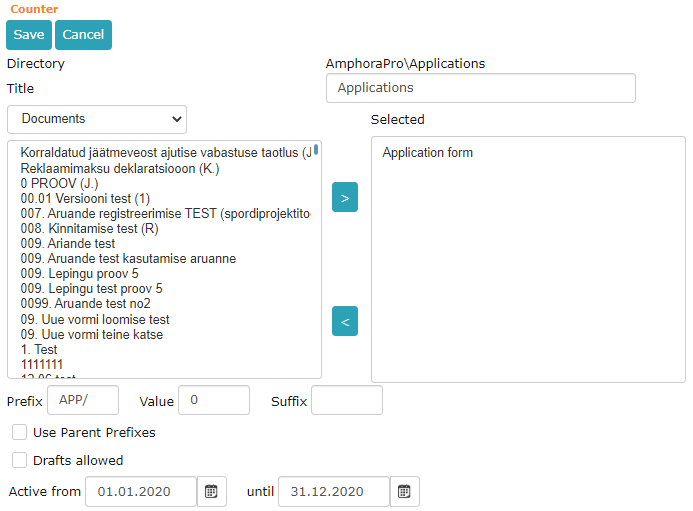 * Prefix – abbreviation characterizing the counter, never changes.
* Value – value starts from 0 and increases with each document save.
* Suffix – usually means the year.
* Prefix – abbreviation characterizing the counter, never changes.
* Value – value starts from 0 and increases with each document save.
* Suffix – usually means the year.
Notifications
To ensure that notifications have the correct URL (link), you need to make sure that the Admin -> Translations configuration is correct. Under translations, enter Task_ProcessTaskAdded in the search. Press the  icon and make sure the link is in this format:
 The number can be used to determine which link is sent with the notification. You don't need to add the environment URL before the number.
Registration Profiles
After creating the form, a registration profile needs to be configured for this form. To do this, go to Admin -> Profiles.
To add a new profile, press the Add new button.

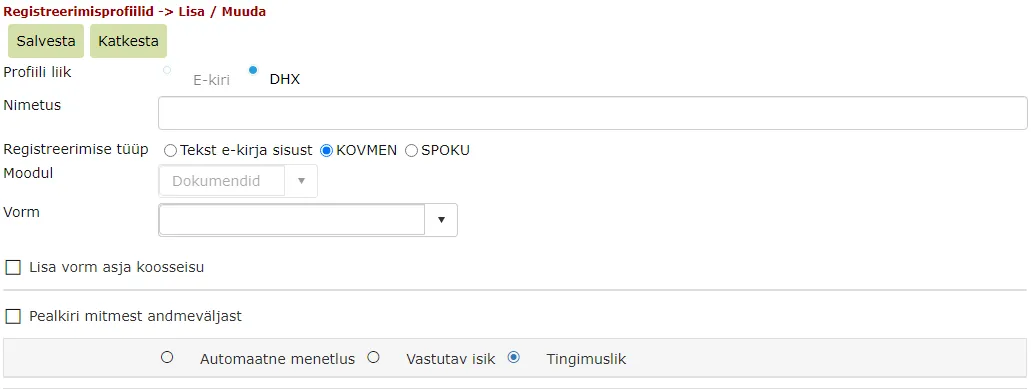 * Profile type – if we select KOVMEN as the registration type, then DHX is selected by default.
-
Name – comes from the XML file content. The user must not write this themselves.
-
Registration type – here you need to select KOVMEN.
-
Form – we select the form that we associate with this registration profile.
Detailed instructions for making additional configurations are available at this link.
The next step would be to bind XML data fields with Amphora form fields. When loading an XML file, only the XML structure is loaded (data is not read). Therefore, any XML document created with the corresponding Kovmen form is suitable.
Example of XML file loading (Logging permit application):
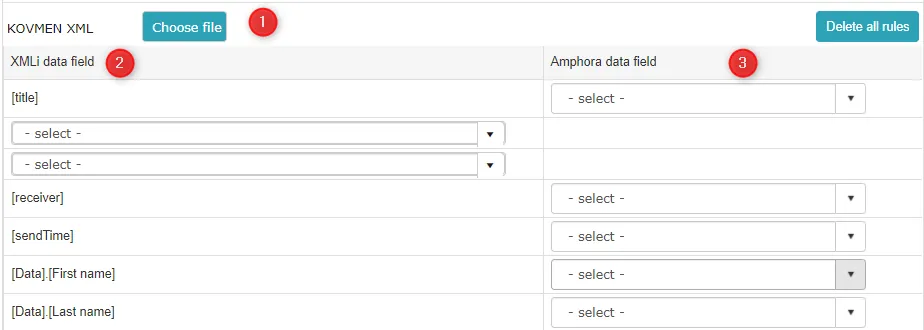 1. You need to load the XML file using the Select file... button.
-
After loading the XML file, associations are automatically created for all XML data fields. If the XML element name is the same as the Amphora form field title, then the association is created automatically. By default, the title is the title field on the form.
-
Selected form fields. In each row, you need to select an Amphora form field that is associated with the given XML data field. If you don't want to use a field, then leave the association uncreated.
Additionally, it is possible to associate the title with two other fields in addition to the title data field. If you don't want to use the form name in the title, then remove the association from the [title] field.
Reports
Kovmen documents received and registered via DHX can be viewed in the report Kovtp registered DHX documents and this report is located in Admin -> Reports.
 This report can be made visible to other users by pressing the Add button.
Last modified: 17 October 2026, 11:05:57