SPOKU
- General
- Setting up SPOKU user
- First-time document sending from SPOKU
a. Automatic form generation
b. Registration profile and automatic processes
c. Folder "Incoming documents for registration"
d. Adding new form to counter composition
e. Publishing new form - After first submission
- Form versioning
- Using HTML and DOCX templates with SPOKU forms
a. HTML templates
b. DOCX templates - Additional registration profile settings
a. Conditional automatic process or responsible person selection
b. Automatic registration to case composition
c. Adding predetermined case composition
d. Adding automatically found case composition
e. Title formation from multiple data fields
f. Adding responsible person to automatic process
g. Conditions for adding access restrictions - AddDocument service output enhancement
- SPOKU setup guide
The integration between Amphora and SPOKU allows document registration directly in the Documents module. Below we introduce the settings necessary for the integration to work and the document flow process.
General
The Amphora and SPOKU integration uses the KOVMEN form structure. Forms are first created and approved in the SPOKU environment, after which they are forwarded to Amphora.
When a document is sent for the first time, the system automatically generates a new form in Amphora, an associated registration profile, and an automatic process. The system also creates a folder "Incoming documents for registration" and a role "Chancellery", which is linked to the automatic process. When saving the document, the process is automatically initiated.
SPOKU user setup
For automatic registration of SPOKU documents, a special user and user group has been created in Amphora. Ensure that this user group has the following policies enabled:
1) Document process/delegation creation
2) Document metadata modification
3) Document metadata viewing
4) Document restriction modification
5) Document restriction viewing
6) Document registration allowed
7) Relation adding
8) Version adding
9) Version deletion
10) Template usage
11) Folder adding
12) Role creation
13) Document publication
14) Main file publication
Important
SPOKU user and user group setup is performed by Amphora client support.
First-time document sending from SPOKU
Automatic form generation
When an application is sent from SPOKU to Amphora for the first time, the system automatically creates a corresponding form for the SPOKU document and a registration profile, which is named after the SPOKU document title.
- Form field width is 750px (except for date fields).
- The system-created SPOKU form can be viewed and modified by going to Admin -> Form Configuration.
- The created registration profile can be found in Admin -> Profiles.
Registration profile and automatic processes
Important
SPOKU form registration profiles must not be deleted!
In the registration profile, you can assign a responsible person (user). If a previously added user has become passive, Amphora displays that user's name with a PASSIVE mark. This allows the main user to quickly identify a problematic configuration.
In the registration profile settings, there is a Register sender to Persons module checkbox. When enabled, Amphora attempts to add the sender of a document received via SPOKU or E-service to the Persons module. Amphora checks whether a person with that personal identification code already exists. If the person is missing, Amphora adds them automatically. If a person with the same personal identification code is missing an email address, Amphora adds it. This is useful because a person added to the Persons module can receive documents through the Self-Service Portal via processes.
A process "Incoming documents for registration" and role "Chancellery" are automatically created for the registration profile, which can be found in the menu Admin -> Roles. The created automatic process is directed to the Chancellery role.
If desired, the automatic process can be removed from the registration profile or replaced with another automatic process by going to Admin -> Automatic Processes. When creating an automatic process, you don't necessarily have to use roles but can also choose regular users. Setup instructions can be found here.
Important
If the Roles menu link is not visible under Admin, you need to enable the policies Role creation and Role, substitute and responsible person administration.
Role "Chancellery" is created so that the institution can assign users who handle incoming documents as a priority.
Folder "Incoming documents for registration"
When the first document is sent from SPOKU, the system creates a folder "Incoming documents for registration". This is set as the default folder for the form, where all documents created with this form are automatically saved.
Important
SPOKU form must have a default folder!
You can change the default folder in Admin -> Form Configuration. Find the SPOKU form whose folder you want to change and click on it.
Then in the form configuration view, you will see a panel below with the SPOKU form name (1), where there is a Folder field. Click the wrench key (2) to change the default folder.
 The form field modification view will open. Here you can change the default folder by clicking the Select button (3) after the Default value field. A window with the classification scheme will open, select the appropriate folder and save by clicking the checkmark next to the trash can icon (4).
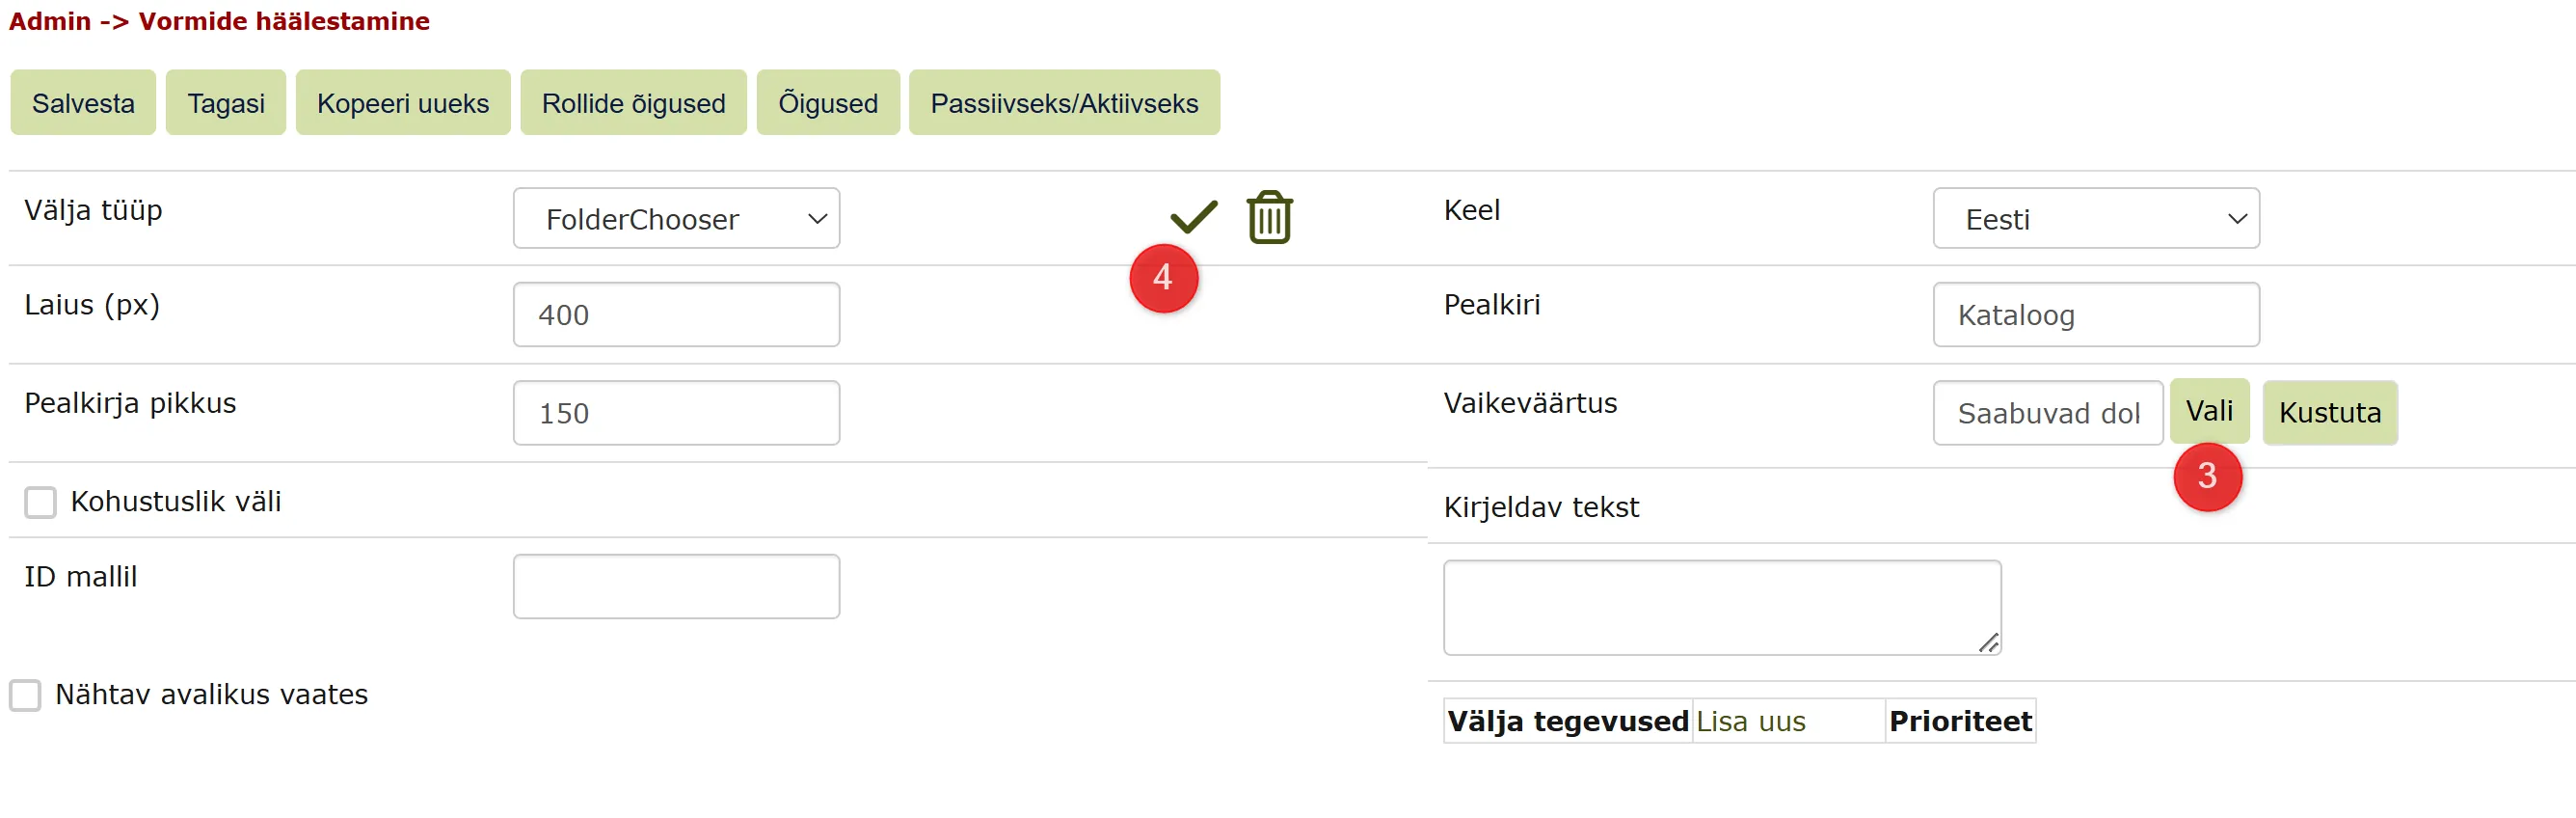 Also save the form updates.
Adding new form to counter composition
If a counter is configured for the SPOKU documents default folder, the new form must be added to the folder's counter composition so that documents from SPOKU automatically get numbers. If the folder uses a general correspondence counter (counter with house icon under the unit), the form must also be added to the general correspondence counter composition.
Instructions for changing the folder counter are here.
Publishing new form
The new SPOKU form is made public (Visible in public view checkbox is enabled by default), but all fields and panels on the form are non-public by default.
You can make form fields or panels public by going to Admin -> Form Configuration and opening the respective SPOKU form.
In the "Panels" section below, you can determine which static fields (e.g., "Title", "Number") and panels (e.g., "Cases", "Relations") are visible in public view. To make data public, check the "visible in public view" checkbox for the desired field or panel row. You can read more here.
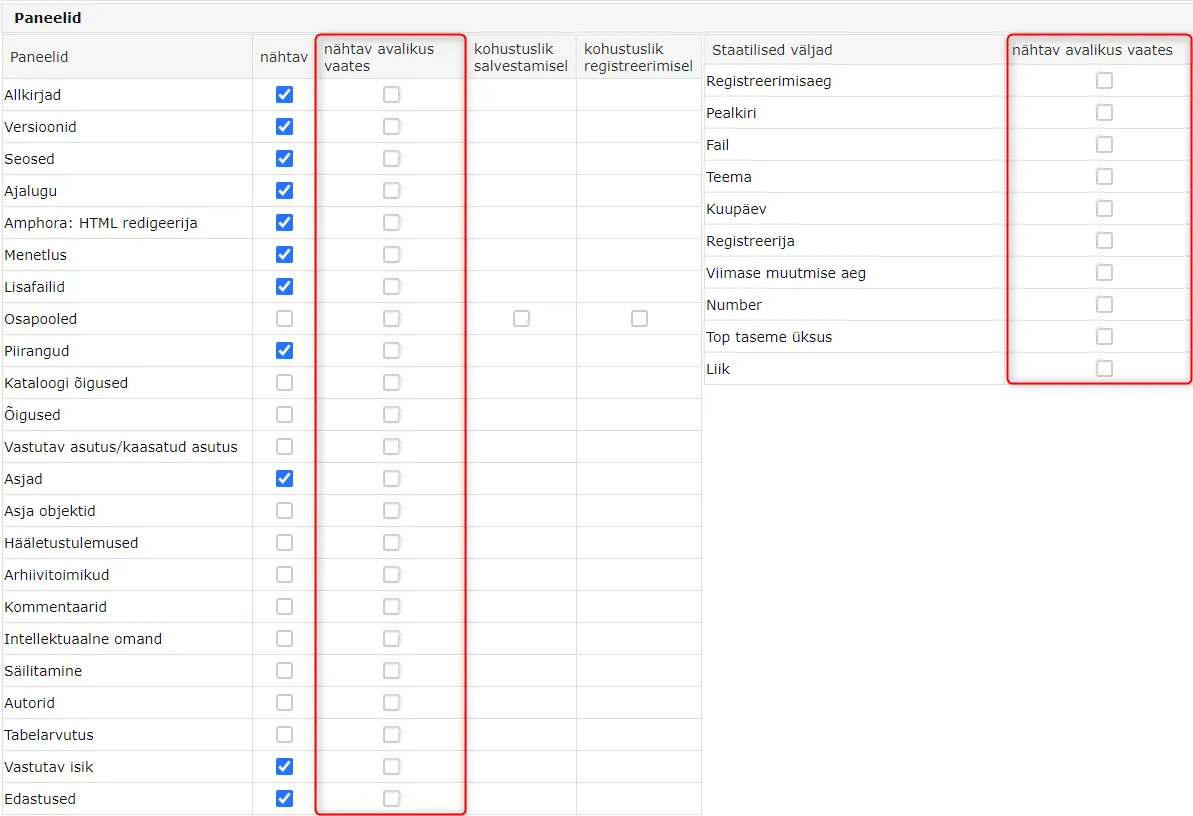 When all necessary checkboxes are added, the form must be Saved.
After first submission
After configuring the Amphora form, check in SPOKU whether the correct Amphora form ID has been added to the form. Although the ID should be added automatically, verification is necessary to avoid duplicate forms. The Amphora form ID can be found in Admin -> Form Configuration in the forms list.
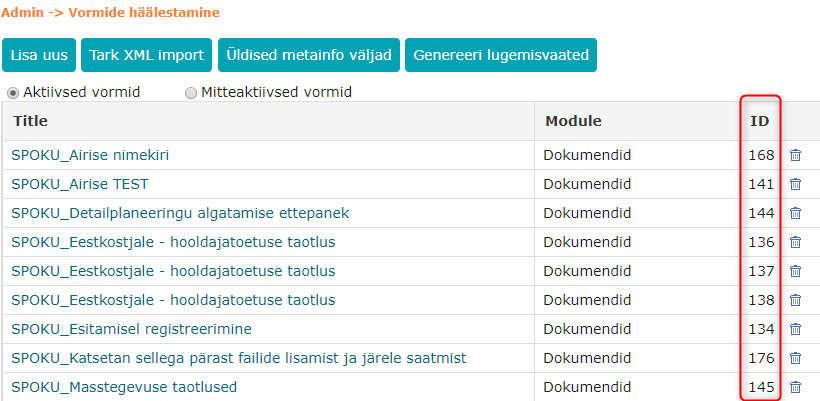 ***
***
Form versioning
Form changes made in SPOKU (adding/deleting data fields, changing identifiers or titles) are automatically transferred to Amphora with the next application submission. The system automatically updates both form and registration profile fields. User intervention is not required.
When a form is updated, Amphora automatically transfers all existing SPOKU form rights and settings to the new version. This includes user group and unit rights to see the form and all settings (default addition and response forms, panel markings).
Important
It is not possible to change forms in the opposite direction, i.e., form changes made in Amphora are not transferred to SPOKU. It is recommended not to modify SPOKU forms in Amphora. Modifying forms in Amphora may cause unwanted side effects, so forms should only be modified in SPOKU when necessary.
After a form update, new documents can only be registered with the latest version of the form. Editing documents created with older versions remains possible.
When a form is updated, ID in parentheses is added to the previous version's name to easily distinguish it from the current version.
Current form:
 Archived form:
 You can see all form versions in the menu Admin -> Form Configuration. Clicking on a form opens the form modification view. For multi-version forms, a dropdown menu is displayed where you can view (but not modify) previous versions with their creation dates. For single-version forms, no dropdown menu is displayed.
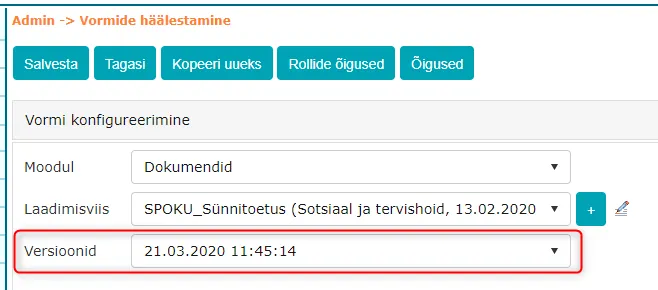 ***
***
Using HTML and DOCX templates with SPOKU forms
Both HTML and DOCX format templates can be used with SPOKU forms. Both types of templates can be configured as default templates.
HTML templates
A Use default template (text editor) checkbox has been added to the registration profile view (Admin -> Profiles). This checkbox must be enabled if you want to use this functionality.
You can configure default HTML templates for SPOKU applications, which work as follows:
- Add "ID on template" attributes to SPOKU form fields (detailed instructions HERE)
- Insert form field template elements into the template
- When the application is registered in Amphora, template elements are automatically replaced with field values and displayed in the text editor. When responding to the application, you can transfer this data to the response document.
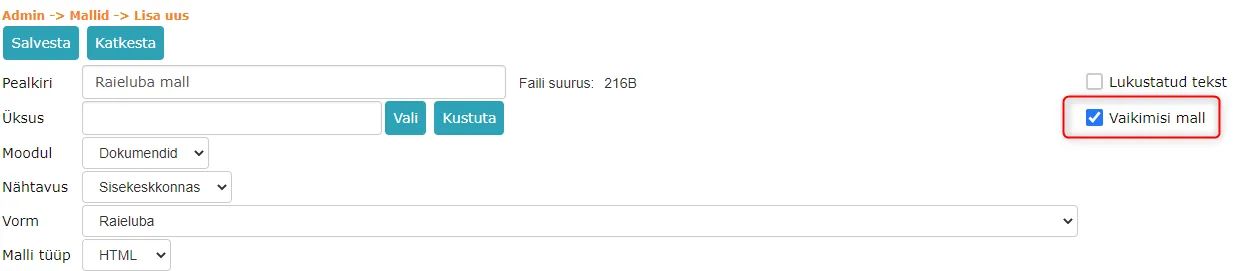
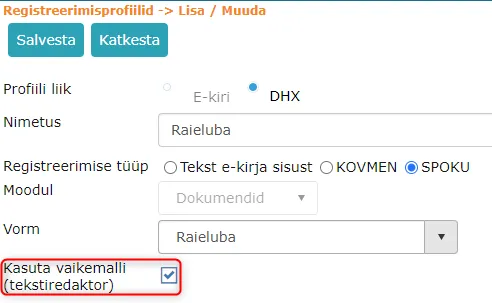 To set a template as the default template, check the "Default template" checkbox in the template settings view.
DOCX templates
Creating and uploading DOCX templates for SPOKU forms to Amphora is no different from creating and uploading DOCX templates for regular forms. There is a separate guide for creating DOCX templates. You can familiarize yourself with this guide HERE.
Additional registration profile settings
Conditional automatic process or responsible person selection
The system initiates an automatic process or assigns a responsible person based on the form field content. For example, it is possible on a School admission application to direct processing to officials based on which school the applicant wants to attend.
The conditional process selection can be found in the respective panel:
 A new registration profile does not yet have any rules configured. To add a new rule, click the Add new rule button. After that, a new row is added to the rules table.
 1. Add new rule button – can add a new rule when the previous rule is configured.
2. XML data field from which the value is searched. The XML data field title (label) is displayed.
3. Value – exact value that the XML data field must have for this conditional process rule to apply.
4. Automatic process (A) or responsible person (V) selection.
5. Depending on the selection, the dropdown menu displays either all existing automatic processes or all institution users.
6. Delete button to remove the rule from the registration profile.
1. Add new rule button – can add a new rule when the previous rule is configured.
2. XML data field from which the value is searched. The XML data field title (label) is displayed.
3. Value – exact value that the XML data field must have for this conditional process rule to apply.
4. Automatic process (A) or responsible person (V) selection.
5. Depending on the selection, the dropdown menu displays either all existing automatic processes or all institution users.
6. Delete button to remove the rule from the registration profile.
If a responsible person is selected as the process, an additional options menu opens where you can determine whether a responsible person task is initiated and task deadlines.
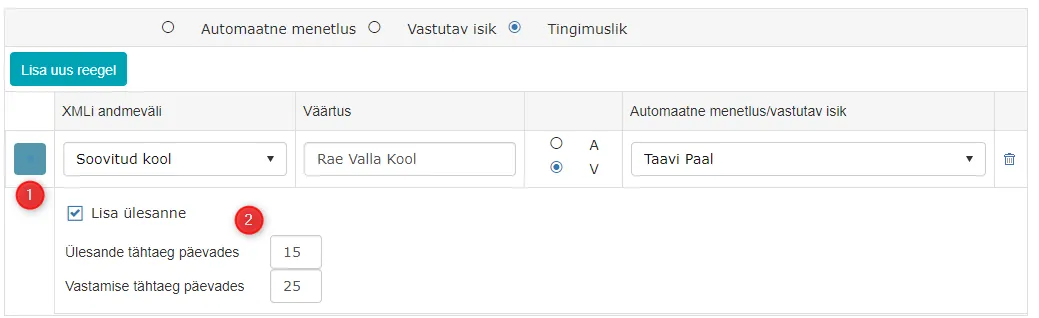 1. For responsible person, a button appears that allows opening/closing responsible person additional options.
2. Responsible person additional options. Add task activates a task for the responsible person (adds a checkmark Create work task before the responsible person in the document's responsible person panel). Deadlines can be entered in the deadline boxes in days.
1. For responsible person, a button appears that allows opening/closing responsible person additional options.
2. Responsible person additional options. Add task activates a task for the responsible person (adds a checkmark Create work task before the responsible person in the document's responsible person panel). Deadlines can be entered in the deadline boxes in days.
Automatic registration to case composition
In the registration profile, it is possible to configure rule(s) about which case the application should automatically register to. To activate case composition registration, check the corresponding checkbox.
There are two types of automatic case composition registration: adding predetermined case composition or adding automatically found case composition.
Adding predetermined case composition
A predetermined case is one specific case to which all applications registered with the given form are added.
 1. Folder from which the case is searched.
2. Case located in the folder selected in point 1 and to whose composition applications will be added.
1. Folder from which the case is searched.
2. Case located in the folder selected in point 1 and to whose composition applications will be added.
All other settings resulting from case registration (e.g., document number through case) must be done outside the registration profile.
Adding automatically found case composition
When adding automatically found case composition, a rule system similar to conditional process is used. This option allows registering a document to a specific case composition based on specific data field content.
Important
All rule fields must be filled.
 1. Button that adds a new case composition addition rule.
2. Folder where the desired case is located.
3. Case to whose composition the document should be registered.
4. XML data field from which the value is taken for case composition registration.
5. Exact XML data field value based on which case composition registration occurs.
6. Button that deletes this rule.
1. Button that adds a new case composition addition rule.
2. Folder where the desired case is located.
3. Case to whose composition the document should be registered.
4. XML data field from which the value is taken for case composition registration.
5. Exact XML data field value based on which case composition registration occurs.
6. Button that deletes this rule.
For example, this picture illustrates an example where an application is registered to the School admission applications case only if Desired school data field contains Rae Municipality School.
Rules can be added as many as needed.
Important
Empty rules (which don't have all fields filled) don't need to be deleted from the rules list, they are not saved.
Title formation from multiple data fields
When registering an application, it is possible to configure a title and web title consisting of multiple form data fields and free text. For example, it is possible to compose a title School admission application (Rae Municipality) Kati Karu 6003948394.
Titles configured from multiple data fields start working when the corresponding checkbox is enabled. Only two title text fields are added to the database, XML data field dropdown menus are only to help find the right fields.
 1. Title (internal environment). Only free text, only information from XML data field, or a combination of the above can be written in the title box. XML data fields are marked with square brackets and must not be changed.
2. Web title (public view). Same requirements apply as for regular title.
3. XML data field selection dropdown menu. It is possible to select a field from the dropdown that you want to add to the title.
4. Add button that transfers the selected XML data field to the title box.
1. Title (internal environment). Only free text, only information from XML data field, or a combination of the above can be written in the title box. XML data fields are marked with square brackets and must not be changed.
2. Web title (public view). Same requirements apply as for regular title.
3. XML data field selection dropdown menu. It is possible to select a field from the dropdown that you want to add to the title.
4. Add button that transfers the selected XML data field to the title box.
When Title from multiple data fields option is enabled, both title and web title text fields must not remain empty.
Adding responsible person to automatic process
It is possible to configure an additional responsible person for an automatic process. This ensures that every application form has a responsible person.
To add a responsible person to an automatic process, select Automatic process and first select the desired automatic process from the dropdown menu. After that, responsible person addition settings become visible.
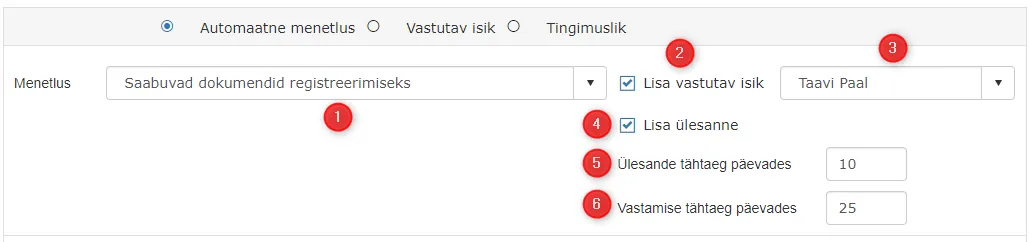 1. Automatic process selection dropdown menu. The selection includes all automatic processes configured under Admin -> Automatic Processes.
2. Add responsible person option. This must be enabled if you want to add a responsible person to the application in addition to the automatic process.
3. Responsible person selection dropdown menu. The selection includes all users from the unit of the user who is currently configuring the registration profile.
4. Add task option. Adds a process task to the responsible person (creates a checkmark Create work task before the responsible person in the document's responsible person panel).
5. Task deadline in days.
6. Response deadline in days.
1. Automatic process selection dropdown menu. The selection includes all automatic processes configured under Admin -> Automatic Processes.
2. Add responsible person option. This must be enabled if you want to add a responsible person to the application in addition to the automatic process.
3. Responsible person selection dropdown menu. The selection includes all users from the unit of the user who is currently configuring the registration profile.
4. Add task option. Adds a process task to the responsible person (creates a checkmark Create work task before the responsible person in the document's responsible person panel).
5. Task deadline in days.
6. Response deadline in days.
When such a configuration is made, when an application arrives in Amphora, an automatic process is initiated and a task is added to the responsible person.
Conditions for adding access restrictions
In the registration profile settings, there is an "Actions" panel where it is possible to add certain conditions based on which Amphora can decide whether to add the folder's default access restriction to the incoming document or not.
This functionality is advisable to use primarily for applications and requests whose submitters can be either individuals or legal entities. So for individuals, an access restriction needs to be added to the incoming application, but not for legal entities. Since usually both individual and legal entity applications are registered in the same folder, this possibility was not previously available in Amphora.
"Actions" panel:
 1. XML data field from which the value is searched.
2. Rule type selection dropdown menu. There are six options in total - Equal, Not equal, Beginning contains, End contains, Contains, and Does not contain. Equal rule type is selected by default.
3. Field value – exact value that Amphora compares when a new document arrives using the selected rule type.
4. Action selection. There are two options in total - Activate and Deactivate.
1. XML data field from which the value is searched.
2. Rule type selection dropdown menu. There are six options in total - Equal, Not equal, Beginning contains, End contains, Contains, and Does not contain. Equal rule type is selected by default.
3. Field value – exact value that Amphora compares when a new document arrives using the selected rule type.
4. Action selection. There are two options in total - Activate and Deactivate.
If the condition is true and the action is Activate, then Amphora adds a restriction to the incoming document. Example: XML field is "applicant", rule type is Equal and the field value field contains "individual". If the incoming document has value "individual" in the "applicant" field, then the condition is true and the Activate action is triggered, which adds an access restriction.
If the condition is true and the action is Deactivate, then Amphora does not add a restriction to the incoming document. Example: XML field is "applicant", rule type is Equal and the field value field contains "institution". If the incoming document has value "institution" in the "applicant" field, then the condition is true and the Deactivate action is triggered, which means Amphora does not add a restriction to this document, even though the folder has a default restriction.
If the condition is not true, then Amphora ignores the selected action and adds the default folder restriction.
NB!
The access restriction basis and other information are taken from the folder settings. Therefore, it is important that the folder has a default access restriction configured.
File name check
When adding a main file or additional file via SPOKU or E-service, Amphora checks the file name. If the name contains characters that are prohibited for the file system (e.g., < > : " / \ | ? *), Amphora removes them automatically.
AddDocument service output enhancement
The AddDocument service is used to register documents arriving from SPOKU and other systems in Amphora. After registration, a response is sent back in XML format. The output now also includes the case/file ID if Amphora added the document to a case composition or created a new case during registration. The case ID is added in the following format:
<AddDocumentResponse>
    <AddDocumentResult>
        <CaseId>95788</CaseId>
    </AddDocumentResult>
</AddDocumentResponse>
SPOKU setup guide
The SPOKU-side setup guide can be found at this address.
Last modified: 17 October 2026, 11:05:57