Documents
- Loading documents
- Writing documents
- Linking documents
- Document save notification
- Copying documents as new
- Adding additional files
- Deleting additional files
- Converting additional files to PDF
- Editing additional files with WebDav
- Locking a document
- Replying to multiple documents at once
- Document forwarding, coordination a. Encrypting delivery attachments b. Assigning a responsible person and creating a task c. Forwarding a task d. Conditional sequential processes and delegations
- Displaying validation errors
- Sending a document draft
- Document search a. Creating quick queries b. Correspondence search options in Document module search
- Document quick query examples a. My unanswered documents b. My overdue unanswered documents
- Renaming the main file a. Swapping the main file and an attachment
- Document actions
- Document ID (identifier) a. Creating a new version b. Returning to an earlier version
- Letters in the Documents module
- Setting up conditional task for responsible person
- Document history panel a. Reply info in the history panel
- Parties panel a. Contract party search b. Additional rules for the Parties panel
- Delivery group selection a. Delivery import
- Options for rejecting a coordination task
- Full folder path in document and case edit view
- Signing outside of a task
- Making delivery content public
- Delivery content non-public by default
- Creating a document sequence
- Process and delegation deletion log
- History event for sending files as temporary link
- Sharing a document link
- Editing a document in several windows
- Document access restriction
The Documents module covers the full document lifecycle in the broadest sense — from creating a document, formatting and approving it, registering, processing and using it, all the way to preservation, archiving, and destruction. The module ensures easy document storage and retrieval through a folder tree (document list) and enables maintaining an electronic document register within the software.
Documents can be entered into Amphora in four ways:
- by loading
- by writing
- by scanning
- via an MS Office client application
Loading documents
Adding existing documents to the system.
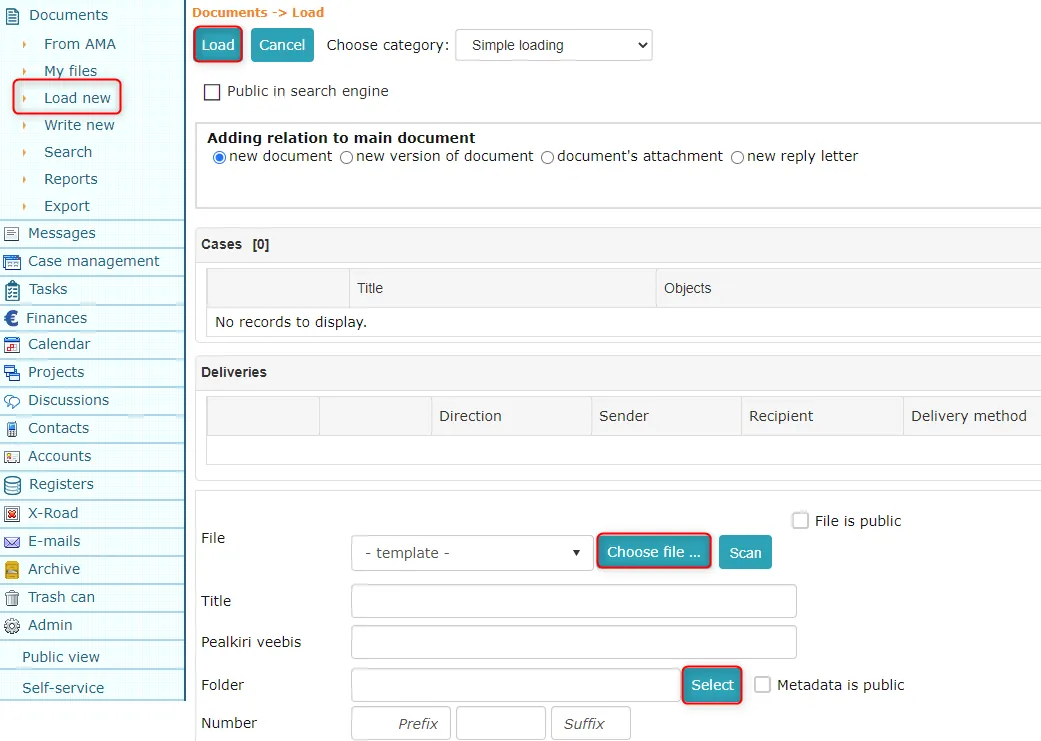
To load a document into the Amphora environment, select Load new from the left-hand side menu. The system displays the default document loading form.
Oluline
Make sure to change the default loading form to match the appropriate document type.
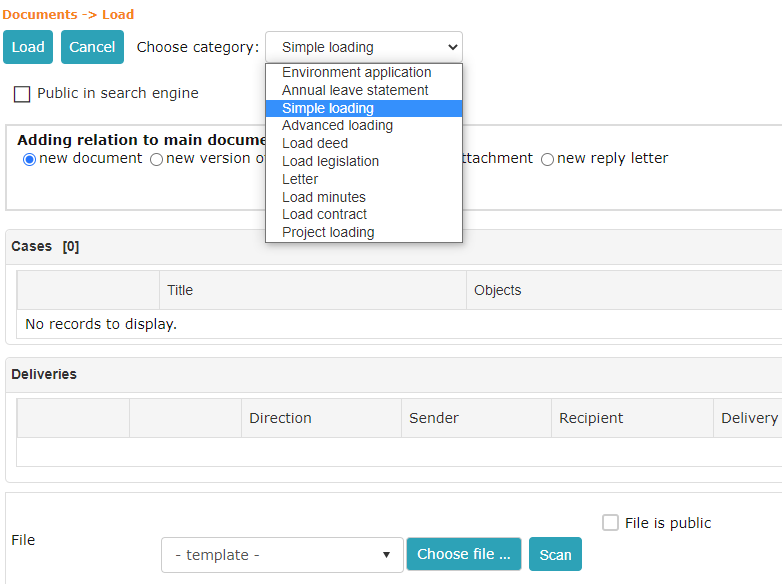 Once the document form has been selected, choose a folder (if not already selected by default), select a file, and fill in the required metadata. After filling in the required metadata, click the Load button.
 ***
***
Writing documents
Allows you to compose documents directly in the system.
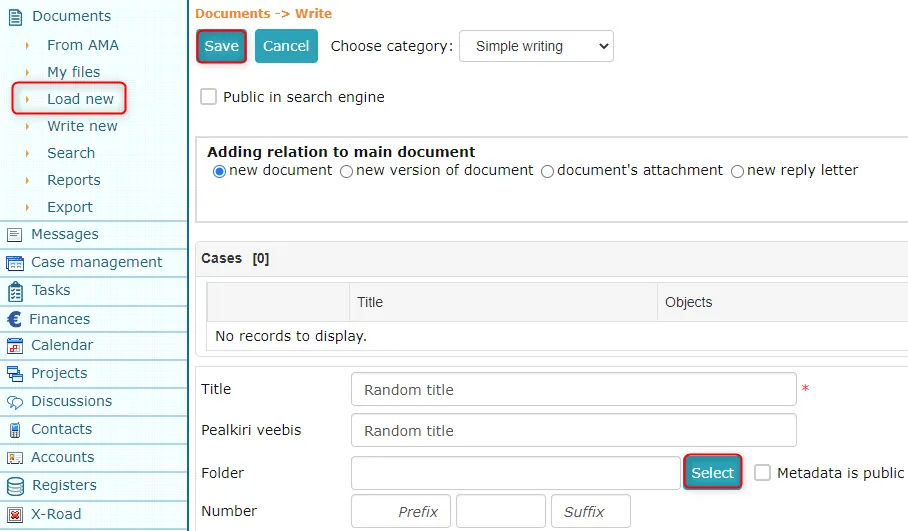
To write a document in the Amphora environment, select Write new from the left-hand side menu. The system displays the default document writing form.
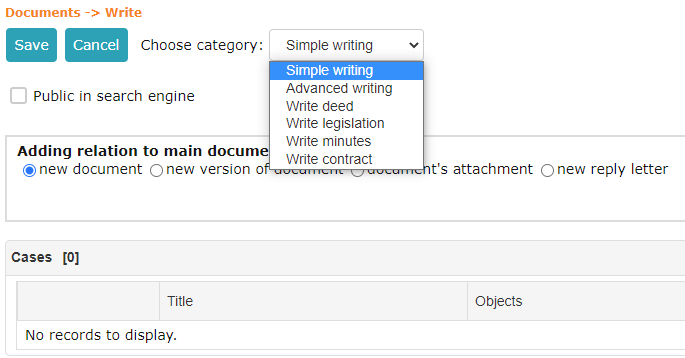 Once the document form has been selected, choose a folder (if not already selected by default) and fill in the required metadata. After filling in the required metadata, click the Save button.
Oluline
Make sure to change the default writing form to match the appropriate document type.
 Various templates can be configured in Amphora (for example, leave applications, travel orders, minutes, and other templates).
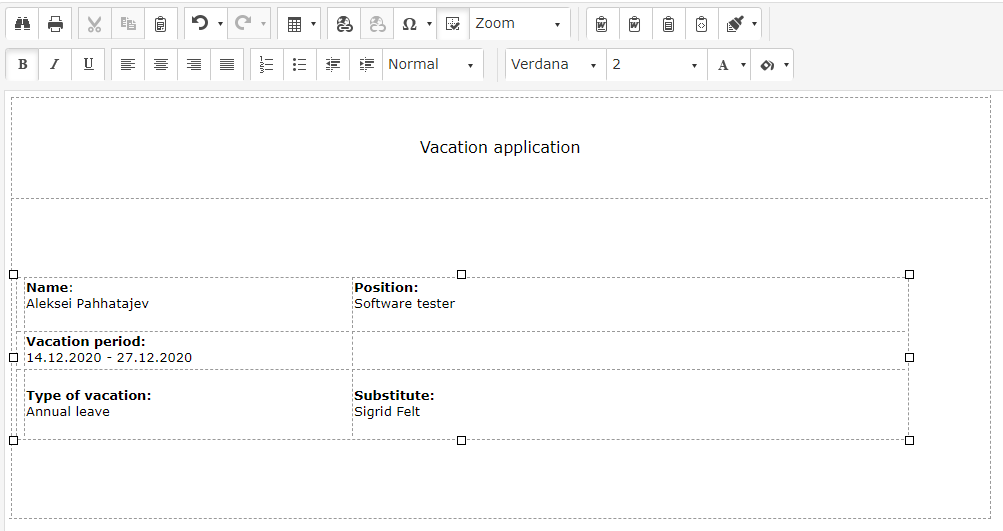
The user fills in the metadata (data on the form). After filling in the metadata, the user clicks Change and the system generates the template automatically — the system carries over the data to the form on its own.
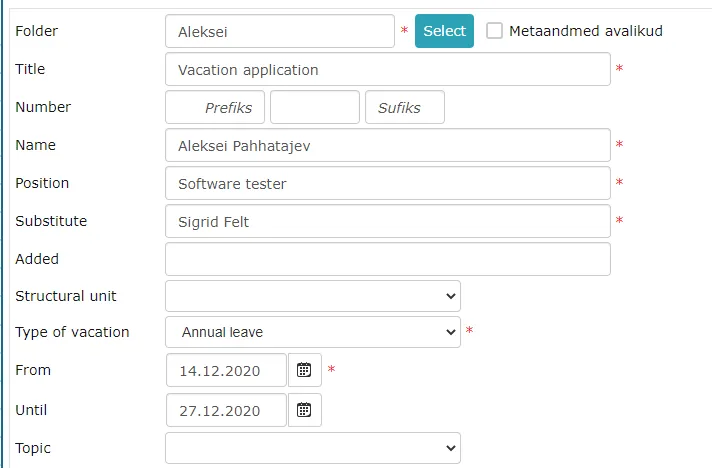 A leave application generated by the system:
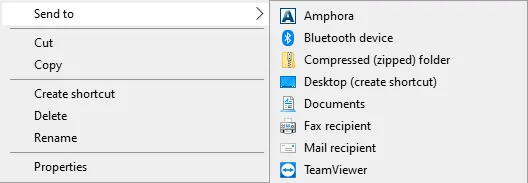
 Documents can also be saved directly from Word into Amphora after downloading and installing the client application on your computer. Two buttons are added to Word: Save as New and Save New Version. To send a new file to Amphora, click the Save as New button. After adding or saving, the files are visible on the Amphora front page under Files sent from elsewhere.

 ***
***
Linking documents
All objects in Amphora (documents, cases, letters, events) can be linked to each other. Creating a link binds two different objects together as related content, which later also allows navigating from one object to another with a single click (links to related objects appear on the objects).
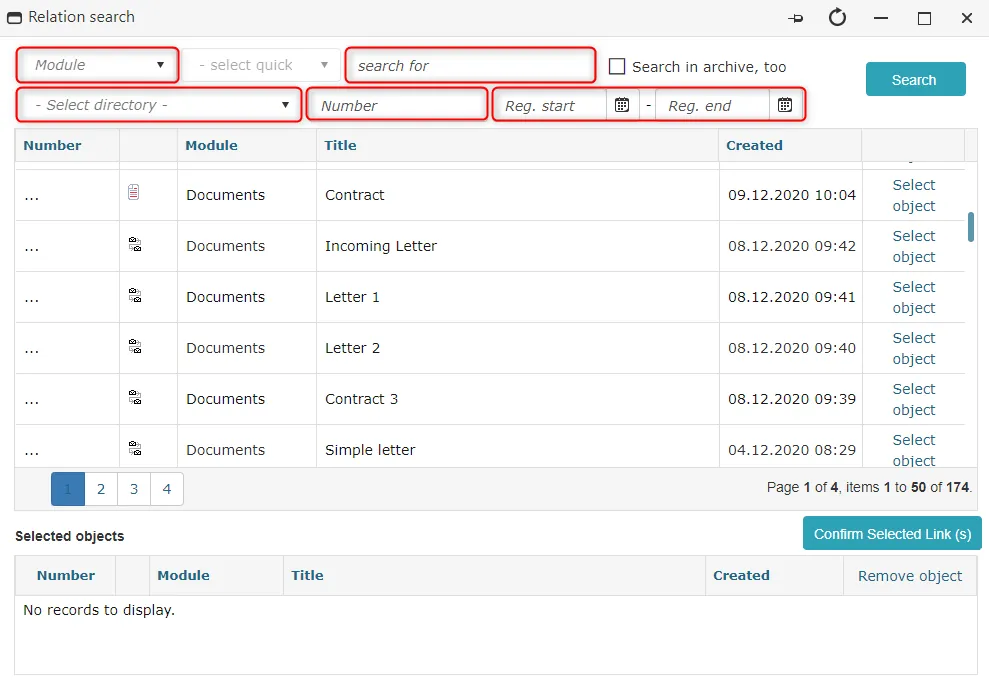
To add a link to a document, click the Add button on the Links panel. In the window that opens, you can search for objects by module, number, folder, registration date, and title.
 You can select objects using the Select object button located on the same row as the object. To confirm your selection, click the Confirm Selected Link (s) button.
 ***
***
Displaying validation errors
If a mandatory field is left empty when saving/registering a document or case, Amphora displays a notification at the top of the page. The user can immediately see which mandatory fields have not been filled in.
Sending a document draft
When sending a document saved as a draft via the Deliveries panel, Amphora saves the document. Amphora does not register the document automatically — the user must click the Register button themselves so the document receives its final number.
Document save notification
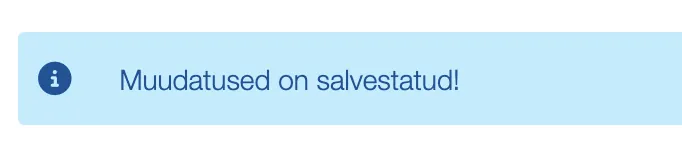
When loading or saving a document, an informational notification is displayed if the user remains in the document edit view. This helps the user understand whether the document has been saved.
NB!
For the notification to appear, the setting Show document/case editing form when saving document/case! must be enabled. This setting is located in the Admin - Organization settings - General settings panel.
Copying documents as new
Existing documents can be copied as new. To do this, click the "Copy as new" button in the document edit or view mode. You can also copy a document as new from the Documents module list view by clicking the  icon.
icon.
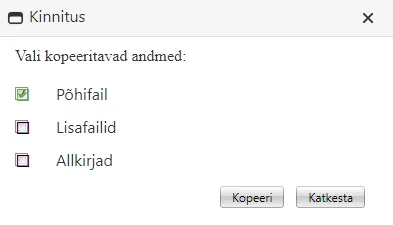
When copying a document, a confirmation dialog opens where you can choose which data to copy to the new document. The options are Main file, Additional files, and Signatures.
 If the newly copied document is added to a folder where an automatic process is configured, Amphora will trigger the automatic process creation when the document is saved.
Adding additional files
Files can be added to documents in Amphora. To do this, click the Add/select files button on the Additional files panel. Then select a file from your computer and click the Open button. To finalize the addition, click the Ready button. There is also a Scan button that allows you to scan a file directly into Amphora. The scanned file will be in .PDF format.
 ***
***
Deleting additional files
Document additional files can be deleted one at a time or several at once. There are checkboxes in front of the additional files where you can add a checkmark to select the files you want to delete. You can also check all additional files at once (1). To delete the selected additional files, click the "Delete" button (2).
You can also delete additional files one by one using the "Delete" link (3).

Converting additional files to PDF
In the Additional files panel, files in various formats (e.g., .docx, .rtf) can be converted to PDF. Before converting, the additional files must be loaded and the document saved. A Convert to PDF link appears on each additional file row (except for PDF files).
Clicking the Convert to PDF link creates a new document version in Amphora. This event is also visible in the history panel along with the name of the converted additional file. After conversion, there is no need to save the document separately.
NB!
If the document has an existing signature container that contains the additional file in its original format, the signature container will remain after conversion. If files in a different format were sent for signing through a process, Amphora will not add the converted files into the signature container after PDF conversion.
Editing additional files with WebDav
In the Additional files panel, there is an Edit link next to each saved additional file. Clicking it opens the additional file for editing using WebDav software. You can edit Word and Text files. After making changes, the document must be saved again.
NB!
The Edit link is only visible for additional files that have already been saved.
Locking a document
When editing the main file or an additional file, Amphora automatically locks the document so that another user cannot edit it at the same time. If the Locking document policy is enabled in the user group, a Locked checkbox is visible in the document edit view and the user can manually lock and unlock the document.
If a user has the Locking document policy disabled but locked the document themselves (for example, through file editing), the Locked checkbox is still visible to that user and they can remove the lock themselves.
The lock stops a user who has the modify right on the document. A user with the Administration right on the document can still change and save a locked document; the lock stays.
Replying to multiple documents at once
In Amphora, you can reply to multiple received documents at once. If there are multiple received documents in a reply document chain, you can reply to them all within a single document.
When adding a new reply document (Incoming - Outgoing direction), the Deliveries panel has a document selection dropdown (1). The dropdown displays data for documents that have an "Incoming" direction delivery:
- number
- title
- registration date
- delivery method
- email address (if available)
- status (Replied or Unanswered)
In the dropdown, you can select specific documents or all documents at once (2). To confirm the selected documents, click the OK button (3). By default, an "unanswered" checkbox is selected, which shows only those documents that have not yet been replied to (4). Removing the checkbox also displays already replied documents.
The selection is not mandatory — you can still add a reply document the same way as before.

Deliveries of selected documents can be edited and deleted. When deleting a delivery, Amphora does not remove the "Reply date" from the original document, so the document status remains as replied.
When replying to multiple documents at once, you can choose different delivery methods and sending is done using the Send button.
Document forwarding, coordination
After entering a document, you can forward it to other users for coordination (or to others for completion).
For coordination, open the document and click the Process button. On the form that opens, fill in the Persons to whom the document will be sent, the Task description explaining what needs to be done with the document, and the Deadline for completing the task. The process deadline cannot be changed in Amphora later.
A process can be set for Sequential execution (the first person receives the task, and the second receives it only after the first task is marked as completed) or Parallel execution (everyone receives the task simultaneously).
There is also a feature that makes the document public after a successful process.
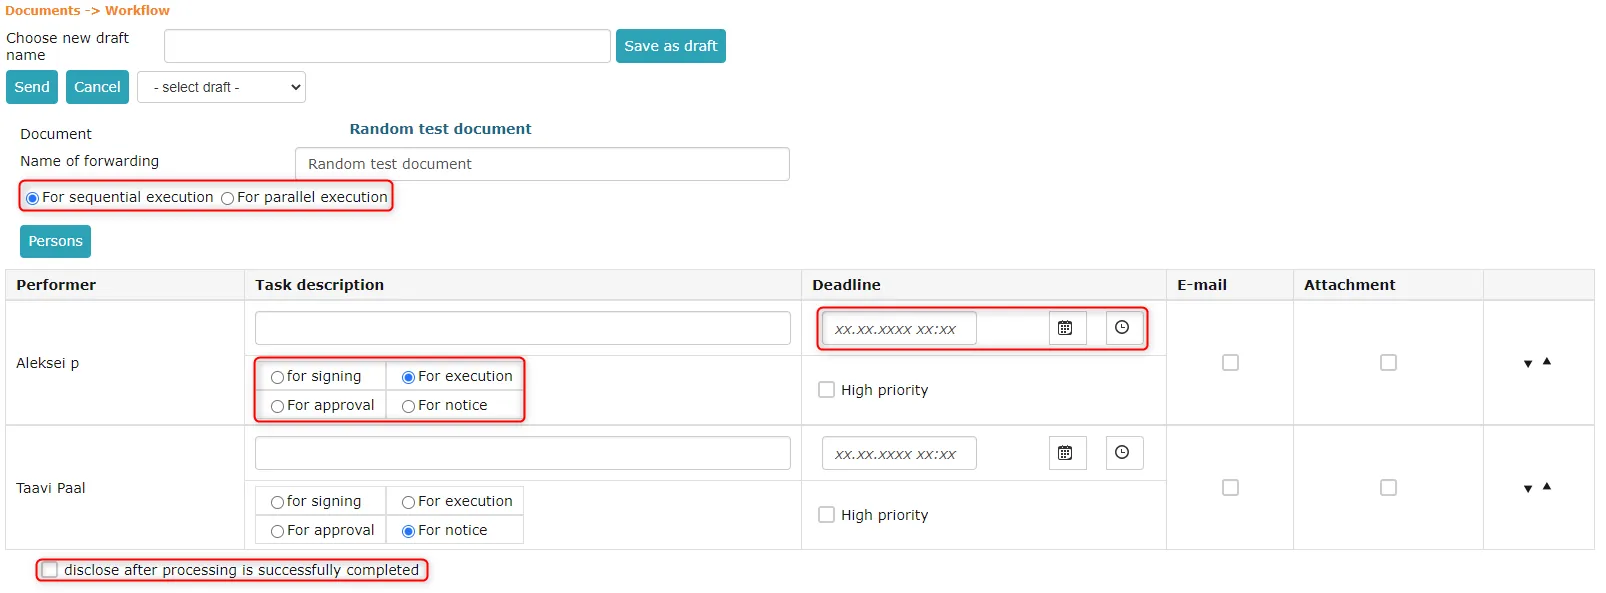 If the "make public after successful process completion" checkbox is selected, the document will be made public after a successful process. Amphora adds a checkmark to "Metadata public" and the document becomes visible in the public view. If during the process a user rejects a task, selects "No" for coordination, votes with a dissenting opinion, or clicks the "Do not sign" button, the document will not become public.
If the document was already public before the process was created, the "make public after successful process completion" option will make the document non-public (Amphora removes the checkmark from "Metadata public"). The document becomes public again after the process is successfully completed.
Forwarding a task
When forwarding a task, you can choose the task type — delegation or process. With a process, different task types can be sent to different users (e.g., For completion, For information). Additionally, a process has a sequential execution option.
Amphora remembers the user's choice (delegation/process) and the next time the previous selection is the default.
When switching between delegation and process types, Amphora carries over the entered data:
- Delegation -> Process — Amphora carries the data over.
- Process -> Delegation — Amphora takes the first added user's task type, description, deadline, and mail/attachment checkboxes.
Conditional sequential processes and delegations
In Amphora, you can create conditional sequential processes and delegations. The added process/delegation depends on the result of the original process/delegation and becomes active only when the original process/delegation is successfully completed.
NB!
To use this feature, the Process sequence creation policy must be enabled in the user group.
To add a sequential process/delegation, the document must have at least one process/delegation with an incomplete status. When adding a new process/delegation, a dropdown appears from which you can select the original process/delegation.
The added sequential process/delegation is immediately visible on the document, but the Start date shows Pending and the process/delegation is not yet active. It becomes active when the original process/delegation status changes to completed.
This feature allows you to create task stages. Each stage is a separate process/delegation, which in the case of a process can be either sequential or parallel.
Delivery group selection
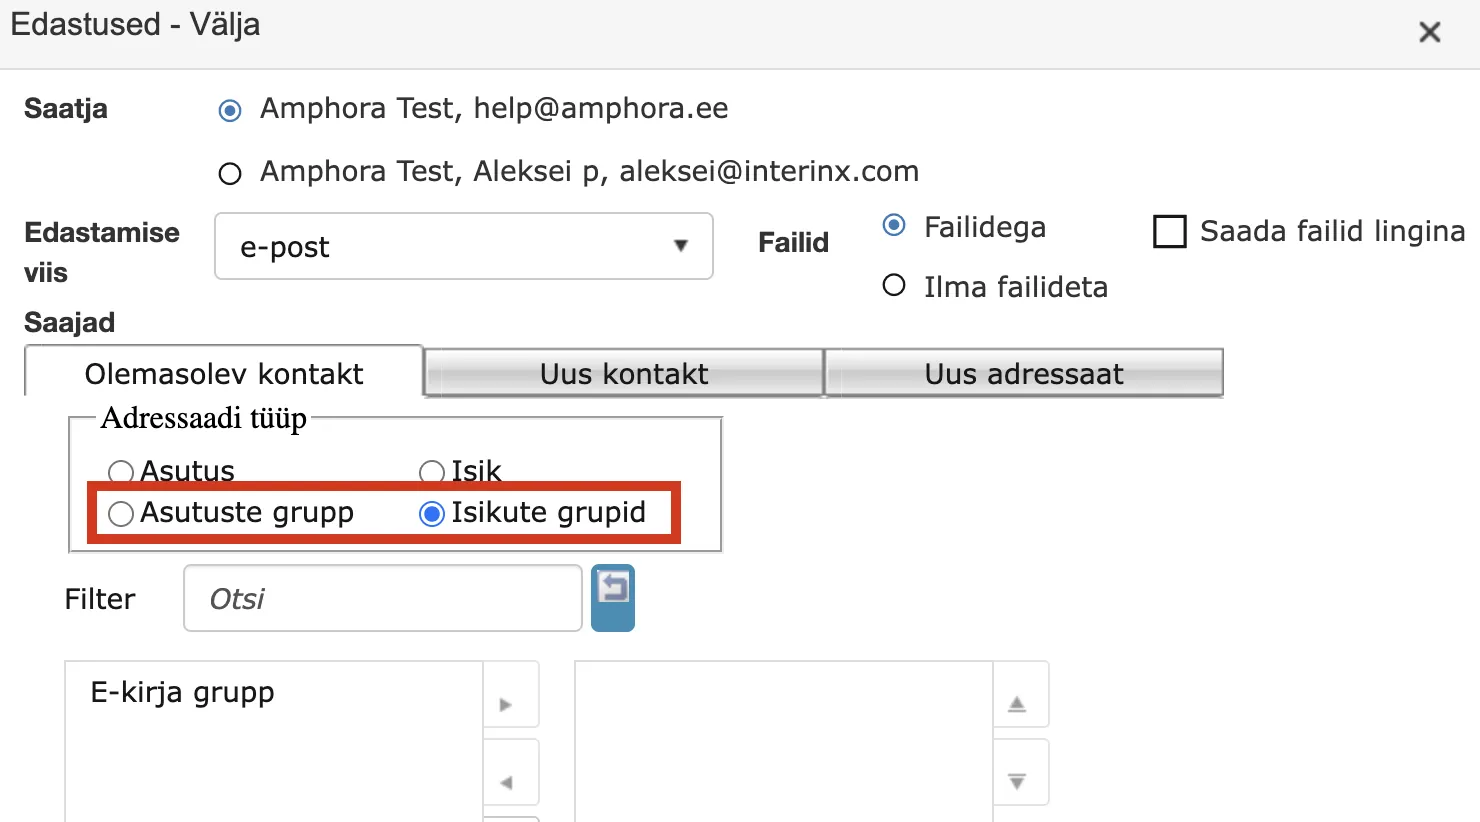
When adding an outgoing delivery (Add sending), you can select a group of persons or institutions as the recipient. Institution groups can be added and edited in the Institutions module — Groups view, and person groups in the Persons module — Groups view.
For the "Email" delivery method, you can also select groups where persons or institutions do not have personal ID codes/registration codes. For email sending, only the presence of an email address matters.
Delivery import
When there are many recipients, they can be brought into the deliveries window from Excel or by pasting - up to 1000 rows at a time.
- On the letter's Edastused (Deliveries) panel, press Edastuste import (Delivery import).
- Choose the Saatja (Sender), the recipient type (Isik / person, Asutus / organization or Tuvasta automaatselt / detect automatically - the type follows from the personal or registry code), which Failid (Files) to send (for example Saada ainult praegu valitud failid / send only the files selected now; Saada failid lingina sends the files as a link), and the e-mail Teema (Subject) and content.
- Paste the recipients into the table (Kleebi Excelist, kuni 1000 rida / paste from Excel, up to 1000 rows): Nimi (Name) and E-post (E-mail) are required, plus Isikukood / Registrikood, Kontaktisik (Contact person) and Adressaadi tüüp (Addressee type). The Tuvasta automaatselt, Isik and Asutus buttons set the recipient type, Kustuta read deletes rows.
- Press Import.
The recipient list can also be copied and pasted onto another document's deliveries panel: click the deliveries panel and press Ctrl+V.
With a large number of recipients the deliveries are sent in batches. Each delivery is claimed before it is sent, so two windows open at the same time do not send the same delivery twice. The Lähtesta vigased (Reset failed) button also releases an e-mail that has been stuck in sending for more than 15 minutes.
Encrypting delivery attachments
When sending an email via the Deliveries panel, attachments can be encrypted. When creating an outgoing delivery, there is a Encrypt attachments checkbox. Encrypted documents (.cdoc) can only be opened with their ID card by persons who have been granted permission.
Encryption can be selective — for example, you can choose the main file and specific additional files. Sending encrypted containers works only with the "email" delivery method and only in the Deliveries panel. The recipient must have a valid personal ID code.
This is a paid service. It can be ordered and activated on the Additional services page.
Assigning a responsible person and creating a task
In Amphora, you can assign a responsible person when registering a document. When you assign a responsible person, you can also automatically create a task for them.
- Select the desired person on the Responsible person panel.
- After assigning the responsible person, the option "Create task" appears.
- Check the checkbox next to "Create task".
 The system automatically creates:
- A task for the assigned responsible person. The process type for the task created for the responsible person is always "For completion".
- The task is displayed on the Forwarding panel.
- The task deadline is automatically set to the Document completion deadline from the document metadata.
Task creation can also be configured so that the user can choose whether it is created Immediately or On condition. If the user selects On condition, Amphora creates the task later, when a certain condition is met (e.g., when a contract expires). To configure this, please contact customer support.
 Example: For a contract, you can create an automatic task 11 days before the contract expires.
Document search
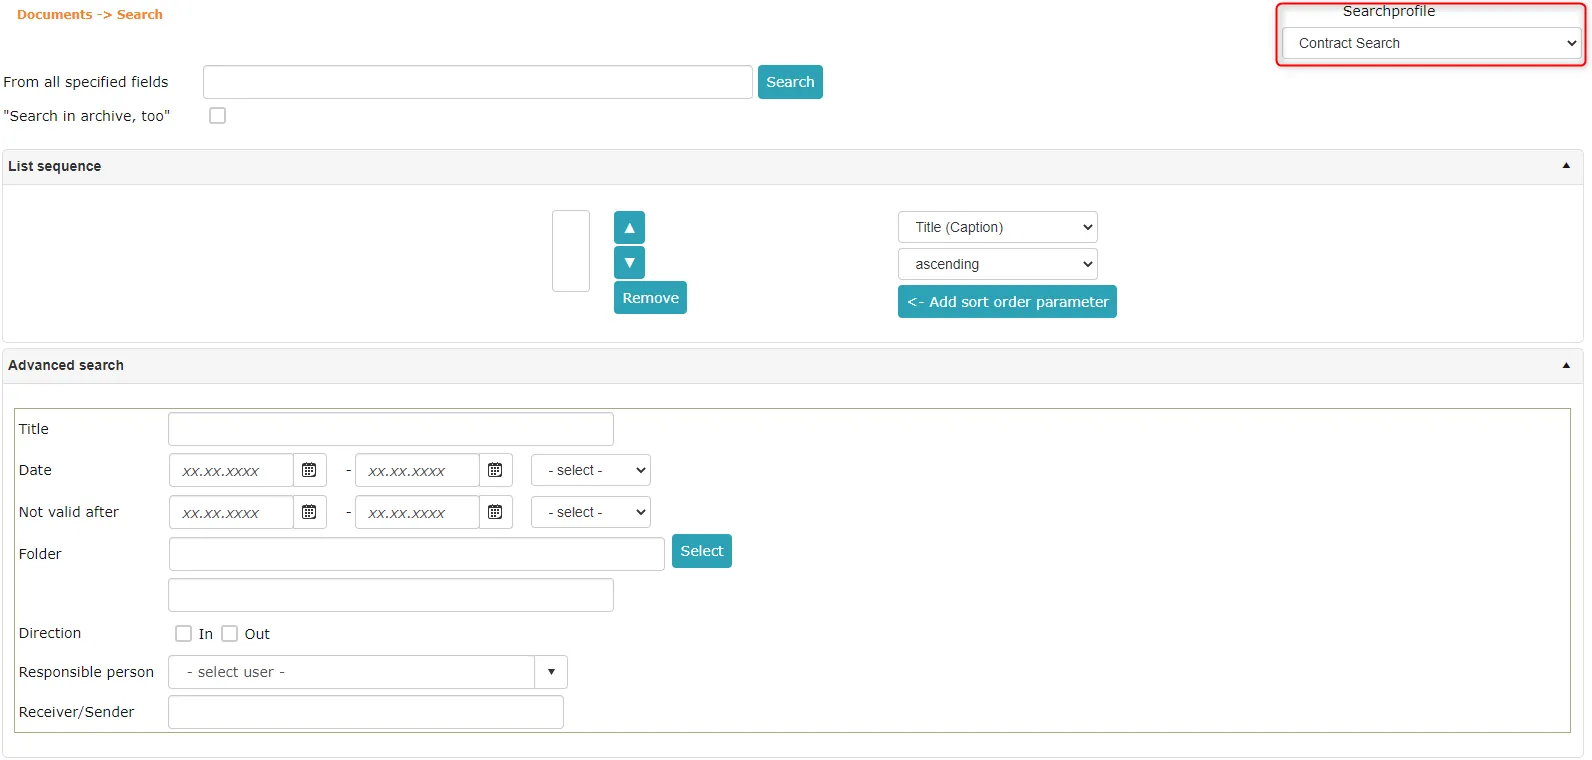
Search allows you to find documents when you only know partial information about them. To search for a document, click the Search link in the Documents module menu. After entering the criteria, click the Search button.
You can create different search profiles, for example Contract search. When creating a new profile, you can choose which fields to display on the search form. You can also select which forms to search. To create a new search profile, contact your Amphora environment administrator.
Creating quick queries
A quick query can be added from the Document module search form. Quick queries allow users to run specific searches directly from the Document module list view.
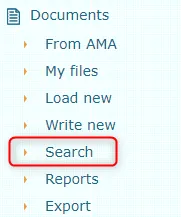
To add quick queries, go to Documents module -> Search.
NB!
Before saving a quick query, it is recommended to run the search first and check whether the search results are correct and whether the search works with the given criteria.
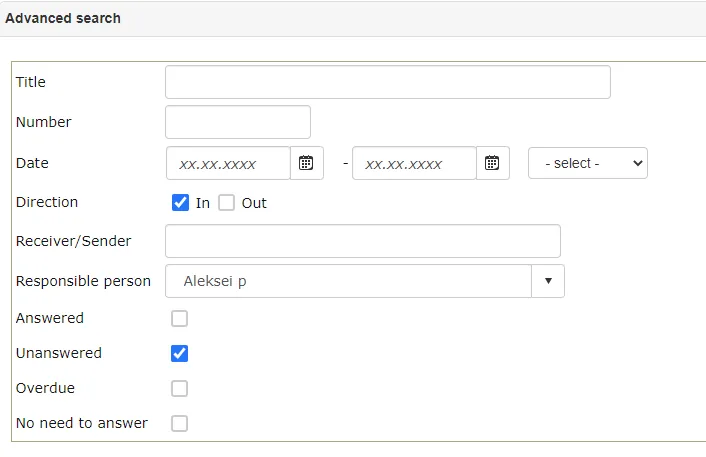
Then make the desired selections on the search form. For example, if the user wants to create a My unanswered documents quick query, they need to add the Unanswered checkbox, select their own name in the Responsible person dropdown, and set the Direction to incoming.
 Once the selections are made on the search form, enter the quick query name in the New quick query name field on the Quick queries panel. In the next dropdown, you can choose whether the quick query is personal (only the user who added it can use it), general (visible to everyone), or visible to the entire user group. The - select quick query - dropdown does not need to be used when adding a new quick query.
 Then click the Save button.
To use the created quick query, select the desired quick query from the - select quick query - dropdown in the document module list view.

Correspondence search options in Document module search
In the Document module search, you can use correspondence module search criteria:
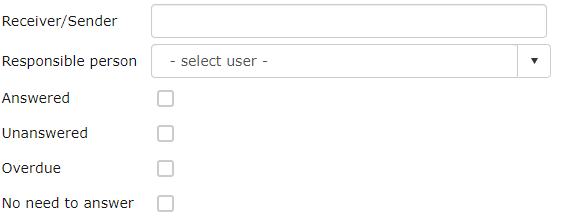
Responsible person (ResponsiblePerson) — adds a dropdown to the search form listing users. This option allows you to search for documents by responsible person.
Recipient/Sender (DeliverySenderRecipient) — a plain text field. Searches by the Deliveries panel sender and recipient data. You can enter either an email address or a person or institution name.
Unanswered (IsUnanswered) — a checkbox. Finds all documents where a reply/completion deadline has been entered but the reply/completion date is empty.
Replied (IsAnswered) — a checkbox. Finds all documents where the reply/completion date has been filled in.
Overdue (IsOverDeadline) — a checkbox. Finds all documents where the reply/completion deadline has passed, including documents that have already been replied to.
No reply needed (IsNoNeedAnswer) — a checkbox. Finds all documents that have no reply/completion deadline.
These checkboxes can be combined. For example, the Overdue and Unanswered checkboxes together return only unanswered overdue documents.
NB!
These search criteria may not be present on the document search form. The environment administrator can add them. The guide is located HERE.
Document quick query examples
This guide describes how a user can create quick queries themselves, which can later be used in the document list view.
My unanswered documents
To add a quick query, go to Document module -> Search.
Then select the Letters search profile. The search profile selection is in the upper right.
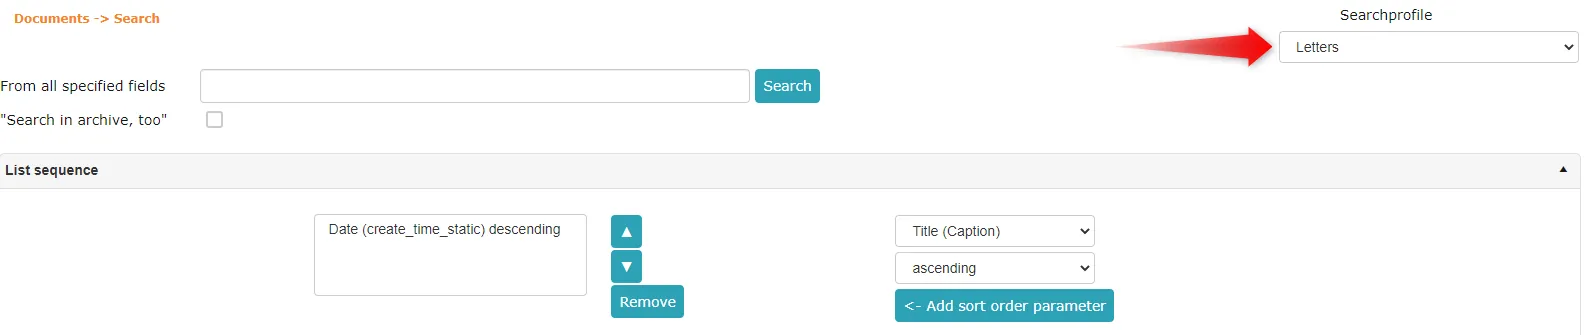 In the list ordering, check whether the default sorting criterion is suitable.
 The sorting criterion determines which data field is used to sort the quick query results. By default, Date (create_time_static) descending is selected, which means the quick query results are sorted by the document's latest version date in descending order.
If you want to change this, the existing sorting criterion should be removed. To do this, click on the sorting criterion and click the Remove button.
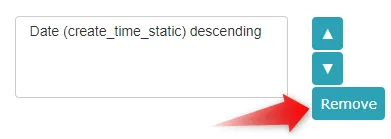 Once done, add a new sorting criterion.
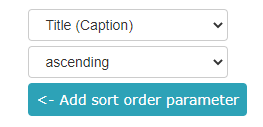
Select the appropriate data field and the result order (descending or ascending).
Once the selections are made, click the <- Add sorting criterion button.
 Next, select your own name from the Responsible person dropdown, select the Unanswered option, and set the Direction to incoming.
Once the selections are made on the search form, enter the quick query name in the New quick query name field on the Quick queries panel. In the next dropdown, you can choose whether the quick query is personal (only the user who added it can use it), general (visible to everyone), or visible to the entire user group. The - select quick query - dropdown does not need to be used when adding a new quick query.
 Then click the Save button.
My overdue unanswered documents
This guide describes how a user can create a My overdue unanswered documents quick query, which can later be used in the document list view.
To add a quick query, go to Document module -> Search.
Then select the Letters search profile. The search profile selection is in the upper right.
In the list ordering, check whether the default sorting criterion is suitable.
The sorting criterion determines which data field is used to sort the quick query results. By default, Date (create_time_static) descending is selected, which means the quick query results are sorted by the document's latest version date in descending order.
If you want to change this, the existing sorting criterion should be removed. To do this, click on the sorting criterion and click the Remove button.
Once done, add a new sorting criterion.
Select the appropriate data field and the result order (descending or ascending).
Once the selections are made, click the <- Add sorting criterion button.
Next, set the Direction to incoming, select your own name from the Responsible person dropdown, and select the Overdue and Unanswered options.
NB!
If you select only the Overdue option, the quick query will also return documents that have already been replied to. That is why you also need to select Unanswered.
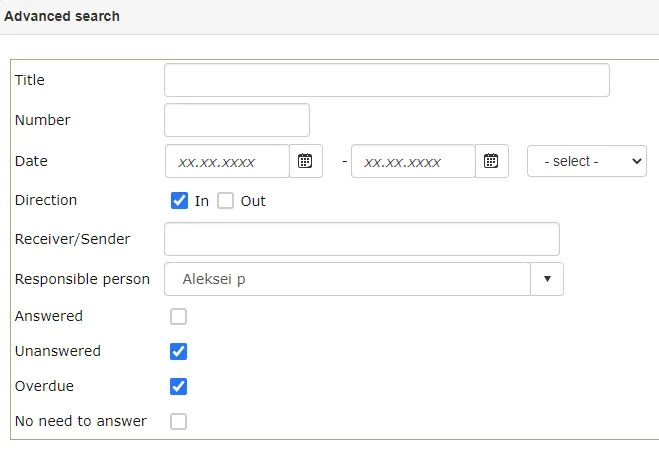 Once the selections are made on the search form, enter the quick query name in the New quick query name field on the Quick queries panel. In the next dropdown, you can choose whether the quick query is personal (only the user who added it can use it), general (visible to everyone), or visible to the entire user group. The - select quick query - dropdown does not need to be used when adding a new quick query.
 Then click the Save button.
Renaming the main file
Next to the main file there is a link Change Name. Clicking it opens a window where you can change the main file name.
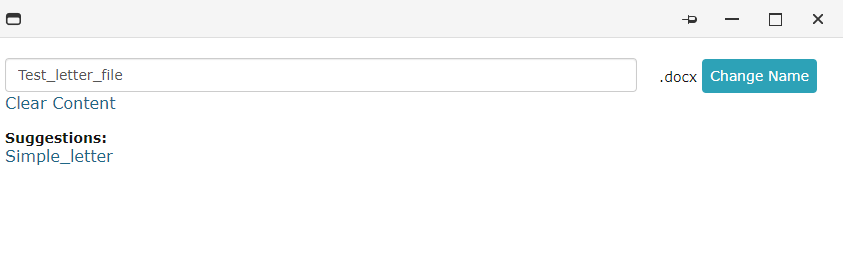 * Clear button — deletes the current file name from the field.
- Suggestions — names that Amphora composes from the title and the folder number and folder name.
Enter the desired name in the field and click the Change Name button. The opened window (Rad window) is not a popup, so there should be no issues opening it in the browser.
Spaces stay in the name (no underscores are added). Letters with diacritics are replaced (e.g. õ becomes o) and special characters such as colon and slash are removed. For example, "T nimi: õun/pirn" becomes "T nimi ounpirn.txt".
Swapping the main file and an attachment
The main file row has the option Make it an additional file and each attachment row has Convert to main file. Both ask for confirmation first.
- Convert to main file swaps the files: the attachment becomes the main file and the former main file becomes an attachment.
- Make it an additional file moves the main file to the attachments. If the document form requires a main file, the document cannot be saved without one and Amphora shows "Fail on valimata!". In that case use Convert to main file on an attachment row.
Document actions
 User can create a new case; the current document is already included in the case.
 User can send the document to a process circuit. Each person added can be assigned a different task type (for completion, for information, for coordination, or for signing).
 User can add a task — the same task for all persons.
 The document can be sent out from Amphora via email.
 Displays the object link to the user (internal environment and public view address) for sending to other users.
- Copies the document metadata to start registering a new document.
 User can digitally sign the document in the register view.
 Documents can be linked to each other.
 The document can be added to an archive volume.
 Information subscription about the selected object.
 If there is integration with VOLIS, allows sending drafts to VOLIS. The VOLIS service closed on 1 July 2026 (www.volis.ee). Sending from Amphora to VOLIS no longer works.
 User can add the document to favorites, displayed on the front page.
 User can print the document metadata. Delivery panel data is also displayed.
 User can delete the document. Later it is possible to restore the document from the trash.
 User can export the document list by folder. Available exports: Excel, CSV, Word.
 User can download the selected document's .xml file.
Document ID (identifier)
Each document has a GUID: a unique identifier that does not change when a new version is created or a version is deleted. Each document version also has its own version ID.
To see the document link, open the document, scroll to the top of the page and click the "globe" icon.

The Address of link window has the line In internal environment: with the GUID-based link and, for a published document, a line with the public view link. The GUID-based link looks like: environmentaddress/index.aspx?guid=03eba7b1-8b95-4e8e-a66e-2e6aac6c8280. It is the same in every version, so it always keeps working.
The window does not show the version ID.
Creating a new version
There is no separate button for a new version. A new row appears in the versions panel when you press Save after one of these changes:
- changing metadata (e.g. the title), when the organization setting for metadata versioning is on (it is on by default);
- replacing the main file: Choose file ... on the main file row, then Save;
- ticking For in-house use.
Pressing Save without a change does not create a new version.
Returning to an earlier version
In the document's versions panel you can open an earlier version and choose Return to this version.
NB!
Return to this version permanently deletes every newer version. For example, returning from three versions to the first one leaves only the first version.
Letters in the Documents module
In Amphora version 12.7, correspondence functionality was developed into the Documents module. This means that from now on, letters will be registered in the Documents module. Unlike the Correspondence module, in the Documents module there is only one letter form Letter and this should be used for every letter registration.
The letters in Documents module guide is located at this link.
Setting up conditional task for responsible person
It is possible to add a conditional task to the responsible person. This works so that a specific date field is taken from the document form and X days before that date arrives, Amphora creates a task for the responsible person.
It looks like this:
 Configuration
Setting up conditional tasks is done in the Registries module. If this module is not visible, then this module needs to be activated in the user group.
In the Registries module, you need to open Form panel settings. To add a new setting, click the New button.
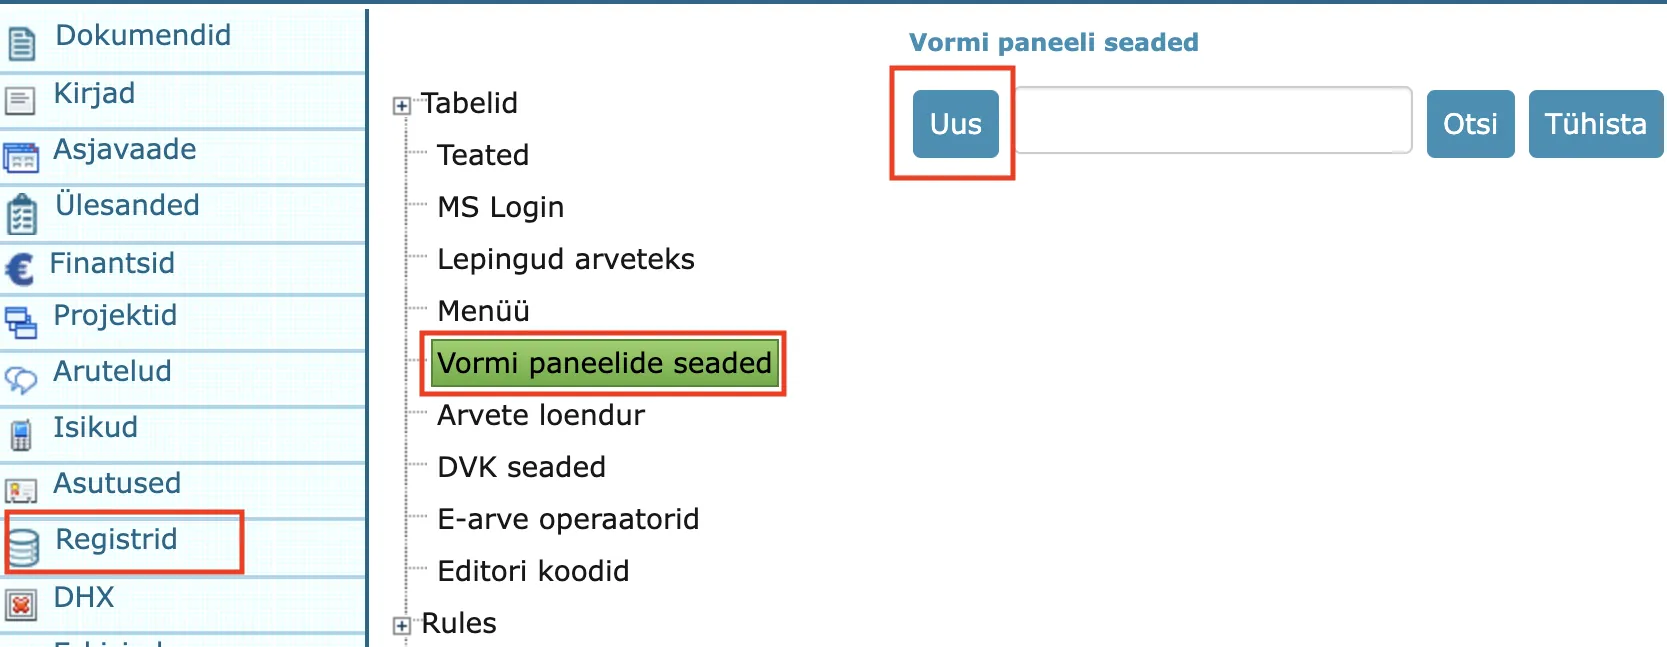 For each form, you need to add two settings. With the first setting, we mark which date field Amphora will use when creating the task, and with the second setting, we add the number of days.
Field configuration:
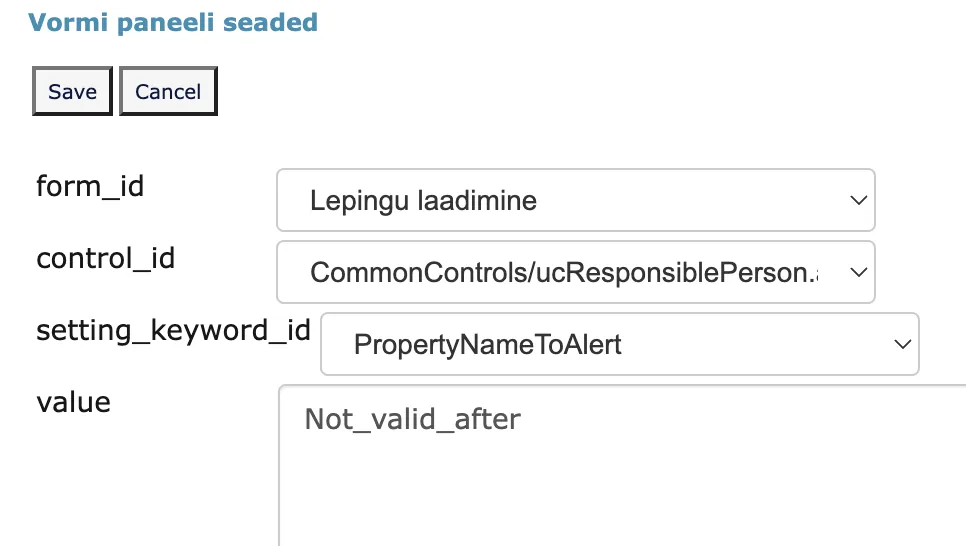 value - form field Amp. field name. This can be viewed/checked in Admin - Form configuration.
Here it is important that setting_keyword_id is PropertyNameToAlert.
Days configuration:
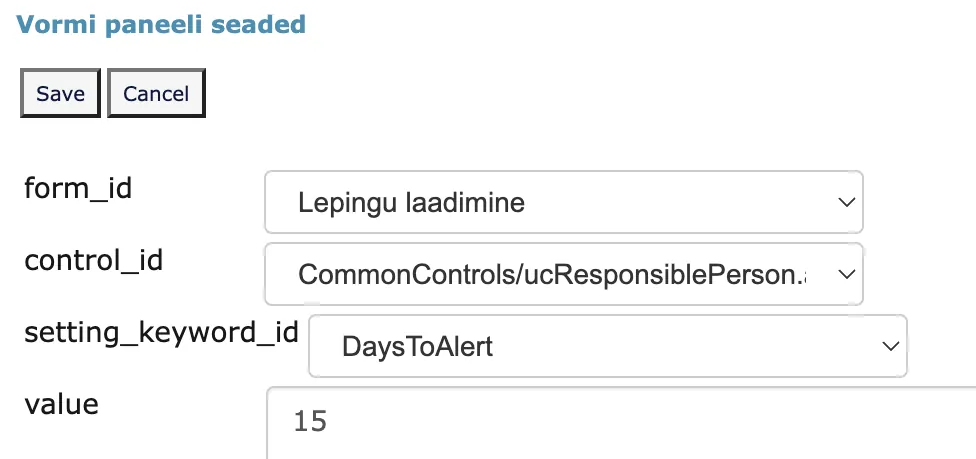 Here it is important that setting_keyword_id is DaysToAlert.
Document history panel
The history panel shows who did what with the document, and when.
In document form settings (Admin - Form configuration), it is possible to make the history panel visible, where Amphora displays document logs.
 The history panel has four columns in total - Person, Event, Time of occurrence, and Additional info.
Person - Name of the person who performed some action with the document. Event - Action performed with the document. For example, Document processing or Adding signature. Time of occurrence - Date with time when the specific action was performed. Additional info - Amphora adds additional info to some actions. For example, when adding a process/delegation, the additional info column displays people who were selected for the process/delegation composition and the process/delegation ID. When signing, Amphora also adds the signer's name with personal ID code. The additional info column is visible in both document edit and read views.
If an administrator logs in as another user and modifies a document, Amphora adds info to the history panel in the format — Logged-in user: FirstName LastName.
Reply info in the history panel
When a document is replied to, Amphora adds reply info to the history panel.
- On the originating document, a "Message reply" history event is created with additional info containing the text "Reply" along with the reply document number and document ID.
- On the reply document, a "Document loading" history event is created with additional info containing the text "Replied" along with the originating document number and document ID.

Parties panel
The Parties panel allows adding parties to documents (e.g., contracts) — both institutions and individuals.
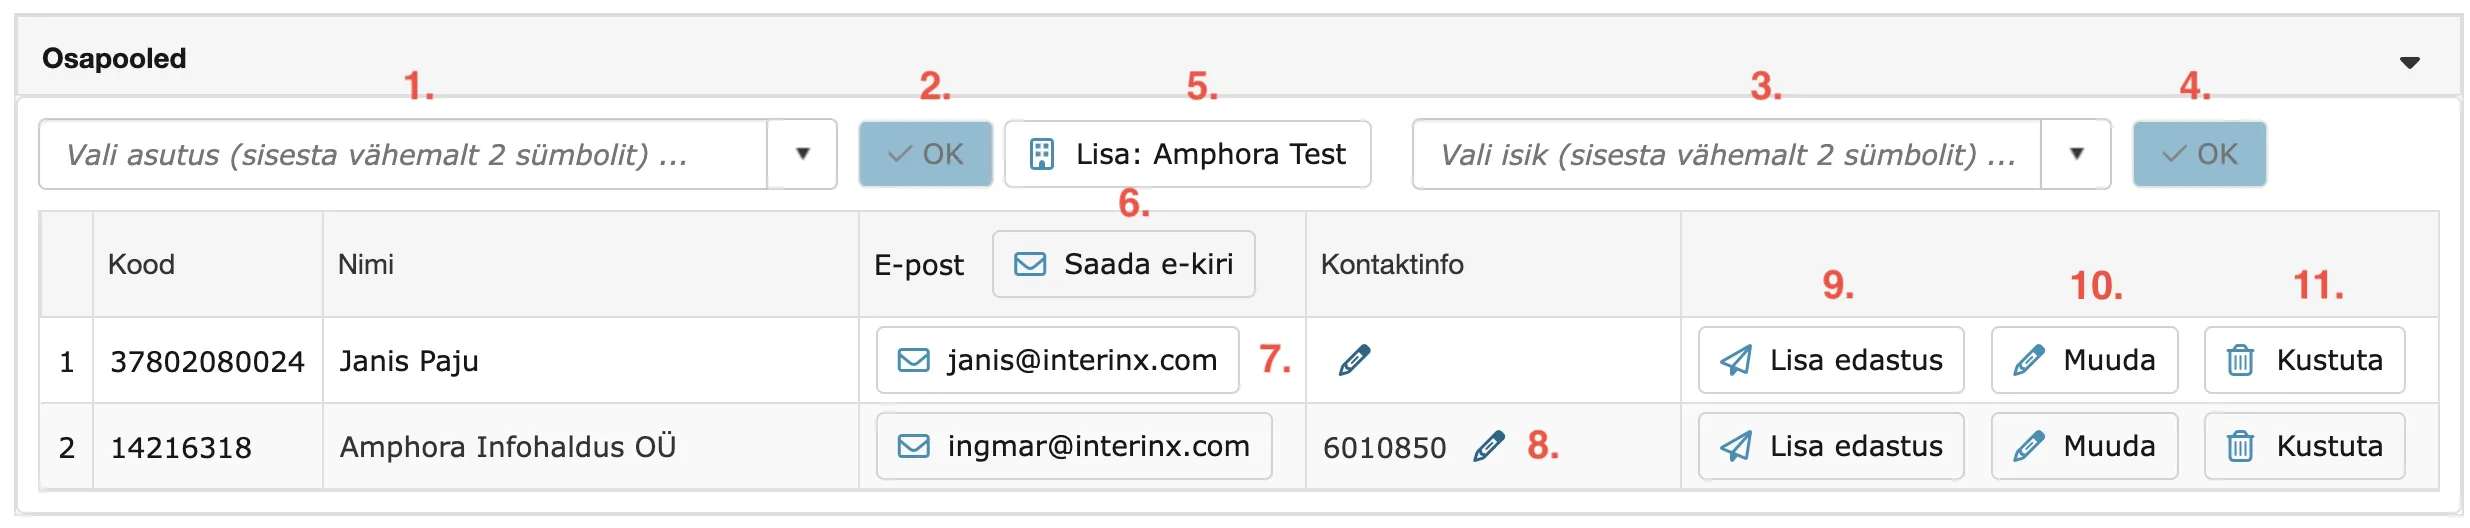
Adding parties
Adding an institution:
- Enter at least 2 characters in the left search field "Select institution" (1)
- Select the appropriate institution from the dropdown
- Click the checkmark button (or press ENTER) to add the institution (2)
Adding a person:
- Enter at least 2 characters in the right search field "Select person" (3)
- Select the appropriate person from the dropdown
- Click the checkmark button (or press ENTER) to add the person (4)
You can also immediately add the main institution. To do this, click the "Add: Institution name" button (5).
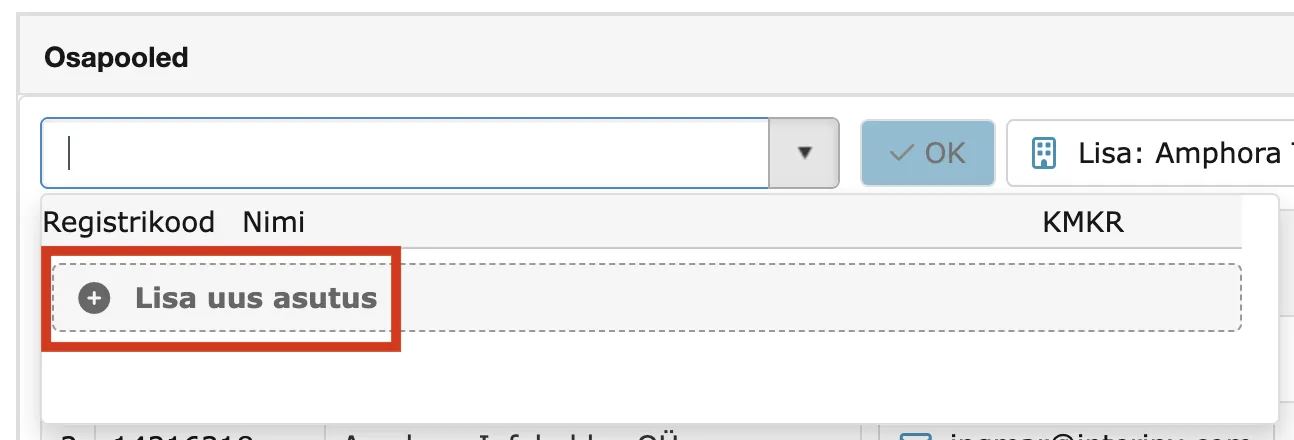
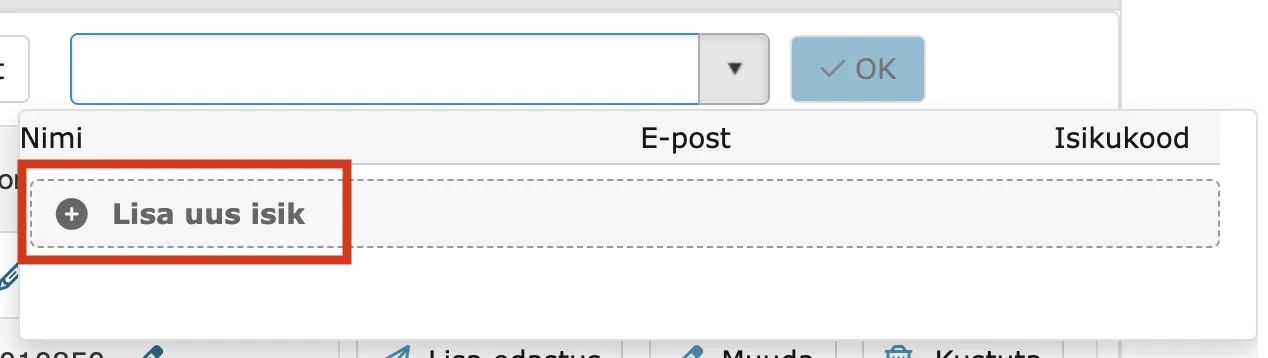
If the required person or institution is not available, you can add it. "+ Add new" takes you to the institution/person addition view.
Institution (you can use the Business Register when adding an institution):
Person:
NB!
After adding a person or institution, Amphora saves the added person or institution to the corresponding module (Persons or Institutions module). They can be selected from the list going forward.
Parties table
Added parties are displayed in a table with the following columns:
- Code — Institution registration code or person's ID code
- Name — Institution business name or person's name
- Email — Email address (if added)
- Contact data — Phone number
A party row keeps the name the party had when it was picked. If the organization is later renamed in the Organizations module, documents already saved keep the old name; a new pick shows the new name.
Actions with parties
Each party row has the following action buttons:
- Envelope icon with email address — option to send an email to the party (7). Sent via the @-icon functionality.
- Pencil next to contact details — edit the phone number directly in the Parties panel (8).
- Add delivery button — adds a new "Outgoing" direction delivery with the party's data (9).
- Pencil Edit icon — opens the party edit view (10).
- Trash can icon — remove the party from the document (11).
To compose and send an email to all parties at once, click the "Send email" button (6).
Contract party search
In the contract parties view, you can search for both institutions and persons. This significantly simplifies loading contracts into Amphora, especially in environments with many institutions and persons.
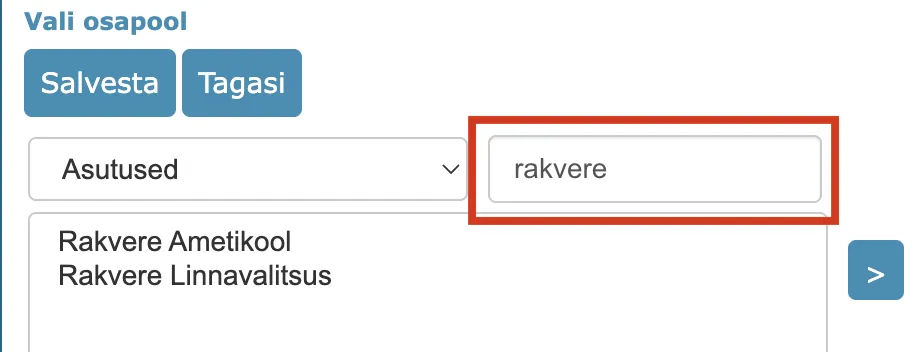
Additional rules for the Parties panel
Person selection: In the Parties panel, you can select from all persons in the system. The selection is not tied to user permissions.

Adding persons and institutions without module access: A user can add and edit persons and institutions through the Parties panel even if the Persons or Institutions module is not activated in the user group.
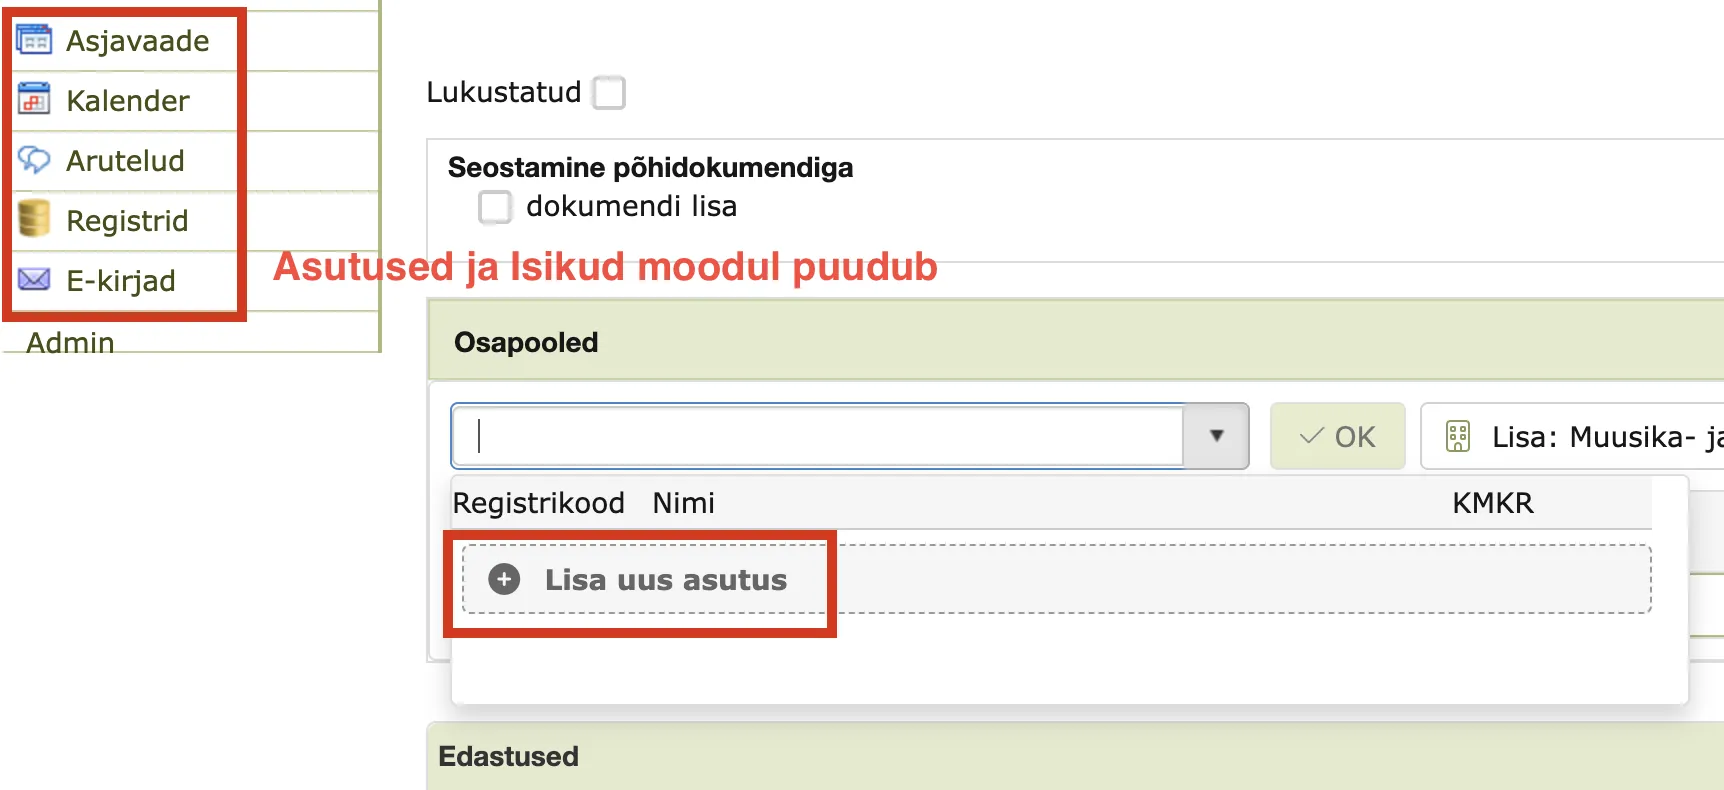
Adding a delivery to a party:
- If the delivery added to a party has a "Not sent" status, a new delivery cannot be added.
- If the delivery added to a party has a "Sent" status, a new delivery can be added.
Options for rejecting a coordination task
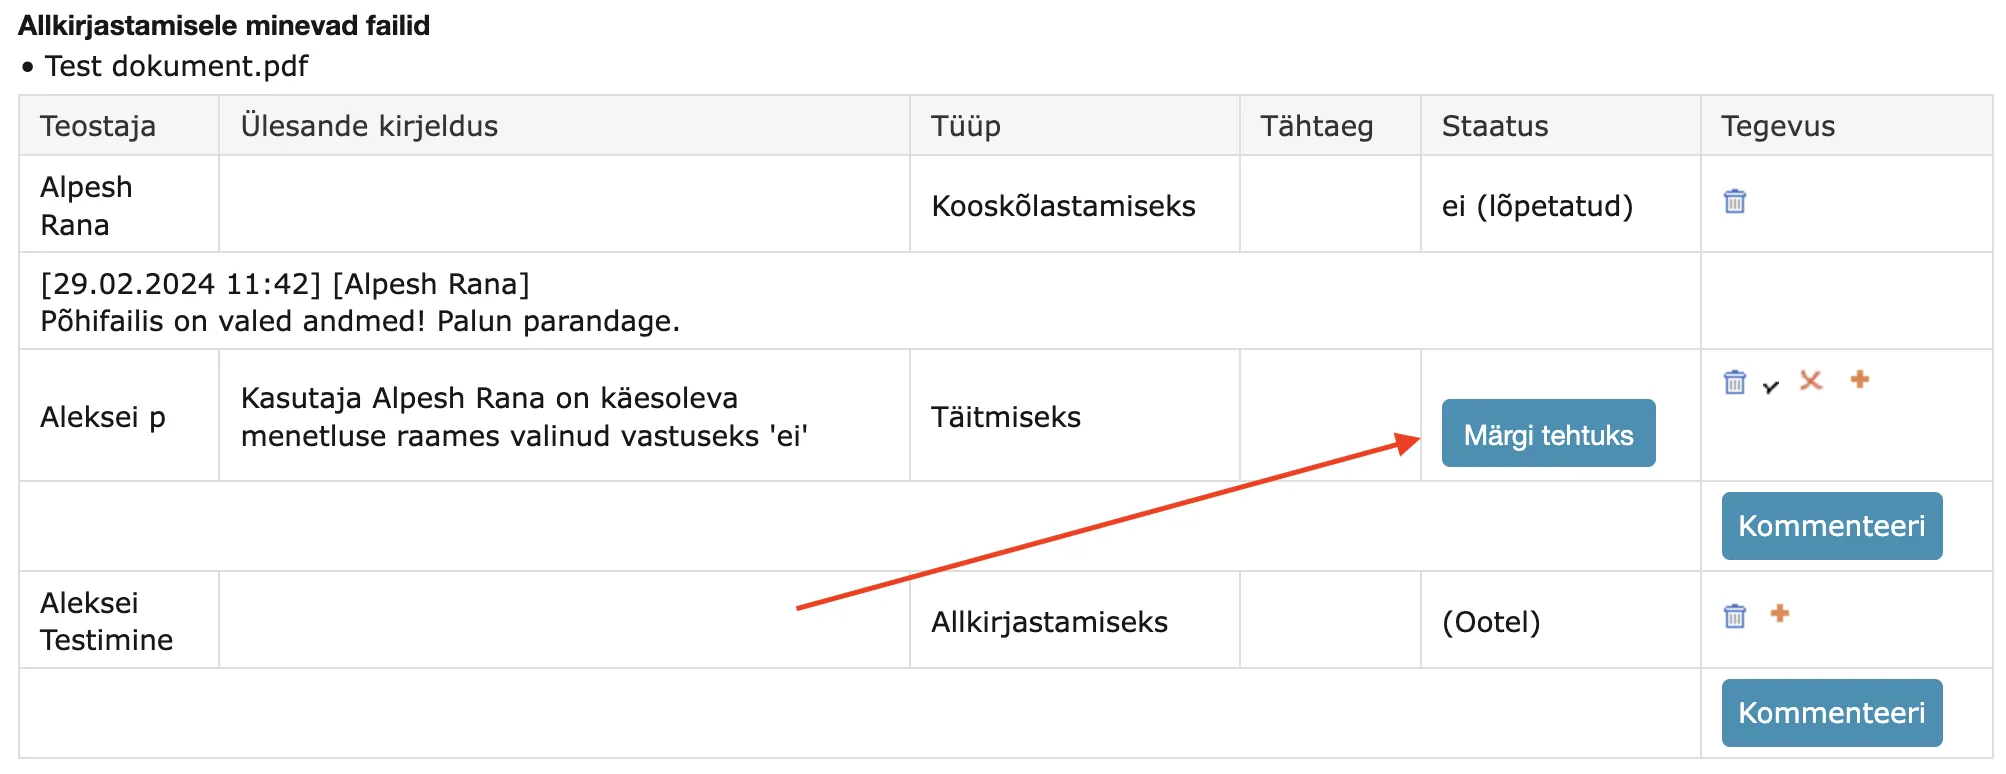
When a coordination task recipient selects No or Dissenting opinion as their position, Amphora creates a For completion task for the process creator. The process creator can choose how to proceed.
Sequential execution process options:
- Start a new process with the same persons — Amphora ends the current process and creates a new one with the same persons.
- Continue process from the person who answered NO/DISSENTING OPINION — Amphora adds the rejecting person back to the process composition.
- End process and cancel pending/incomplete tasks — Amphora ends the process and deletes all incomplete tasks.
For Parallel execution processes and Delegations, there is a fourth option in addition to the above:
- Continue process unchanged — the process continues in its original form.
In the process/delegation detail view, there is a separate Mark as done button for completing the For completion task.
NB!
This functionality works in the Documents, Case view, and Invoices modules.
Full folder path in document and case edit view
In the document and case edit view, the selected folder is displayed in the folder field. To view the full folder path, hover the mouse cursor over the folder name field. Amphora displays the entire folder path, which helps distinguish similar document trees across different sub-institutions.

Signing outside of a task
If a user has one signing task and adds a signature from the document edit or list view, Amphora automatically completes that signing task as well. In the signing window, the user already has the files selected that were chosen when the process was created.
Making delivery content public
Each delivery row has a Content public checkbox. When this checkbox is selected, the delivery content (email body, comment to recipient/cover letter) is made public in the public view. In the public view, a + icon is displayed next to each delivery, and clicking it opens the delivery content.
The Content public checkbox is added automatically when the text editor content is public. Otherwise, it can be added manually.
Delivery content can also be made public for deliveries where the delivery method is DHX, mail, phone call, etc. For these delivery methods, the comment to recipient/cover letter is made public.
NB!
In the form settings (Admin -> Form configuration), the Deliveries panel must be set to public for deliveries to be visible in the public view.
For outgoing deliveries, the sender in the public view is always marked as the institution (the institution is selected based on the folder unit).
Delivery content non-public by default
When adding a delivery, the Content public checkbox in the column is unchecked by default. Delivery content is non-public by default. The user can make the delivery content public as needed by checking the Content public checkbox.

Creating a document sequence
When creating a document sequence, the outgoing delivery content mode is set to Text editor and the All files option is activated. This prevents a situation where incorrect options are selected for the sequence document delivery.
Process and delegation deletion log
When deleting a process or delegation, Amphora adds a Process / delegation deletion event to the document history panel. This provides a better overview of who has deleted processes/delegations.

History event for sending files as temporary link
When files are sent as a temporary link with an email, Amphora adds a corresponding history event to the history panel. The additional info displays the sender's email addresses and the Token.

Sharing a document link
A document link can be shared with other users from the "globe" icon in the Actions panel. The link opens in a small window in the same view - there is no need to open a separate page - and each link has a copy button next to it.
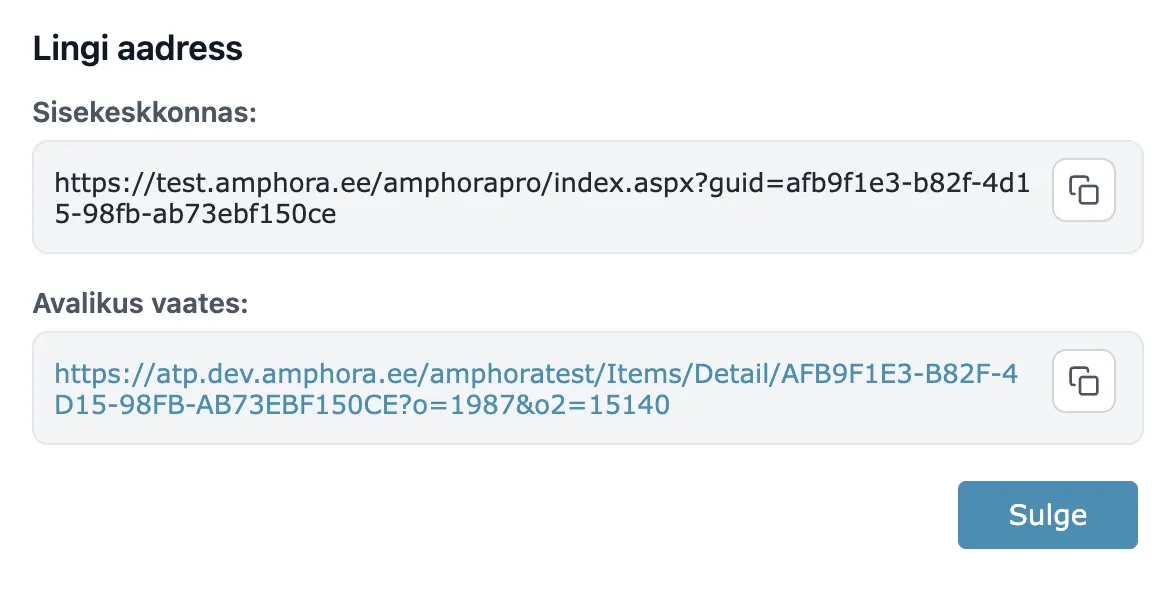
The window contains both the document's internal environment link and the public view link (the latter when the document has been published). The public sharing link is short and permanent.
You can read more about the structure of the link and about the version-based ID and the GUID in Document ID (identifier).
Editing a document in several windows
When a user has several Amphora windows or tabs open at once and opens another document in one of them, the session's active document changes. On saving, Amphora checks whether the document open in that window is still the same document the user started editing. If the user has opened another document in another window in the meantime, saving is not allowed and a notice is displayed.
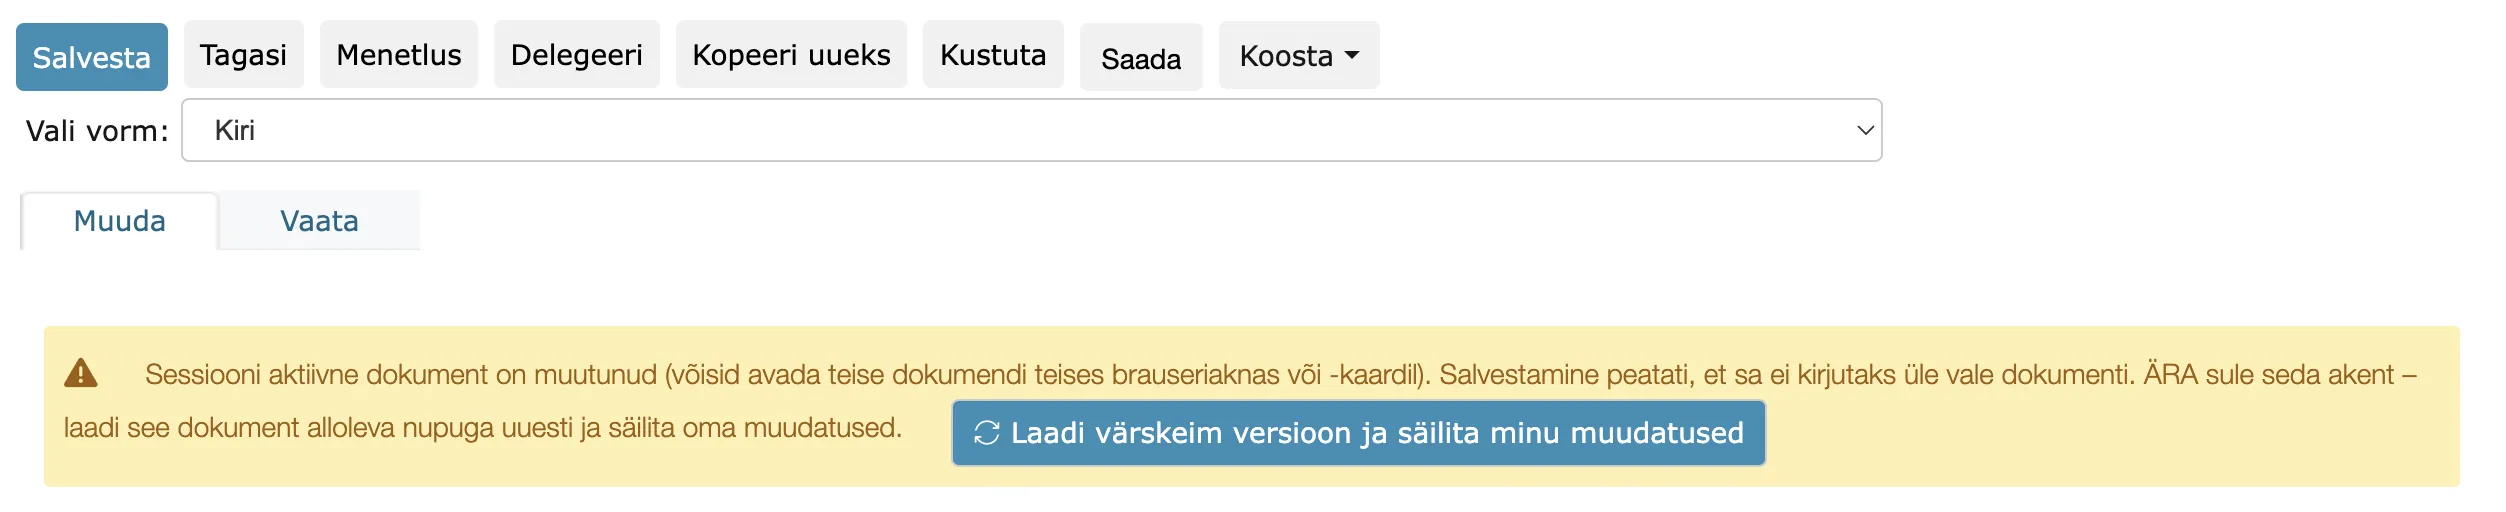
The same check also applies when opening, modifying or adding a delivery.
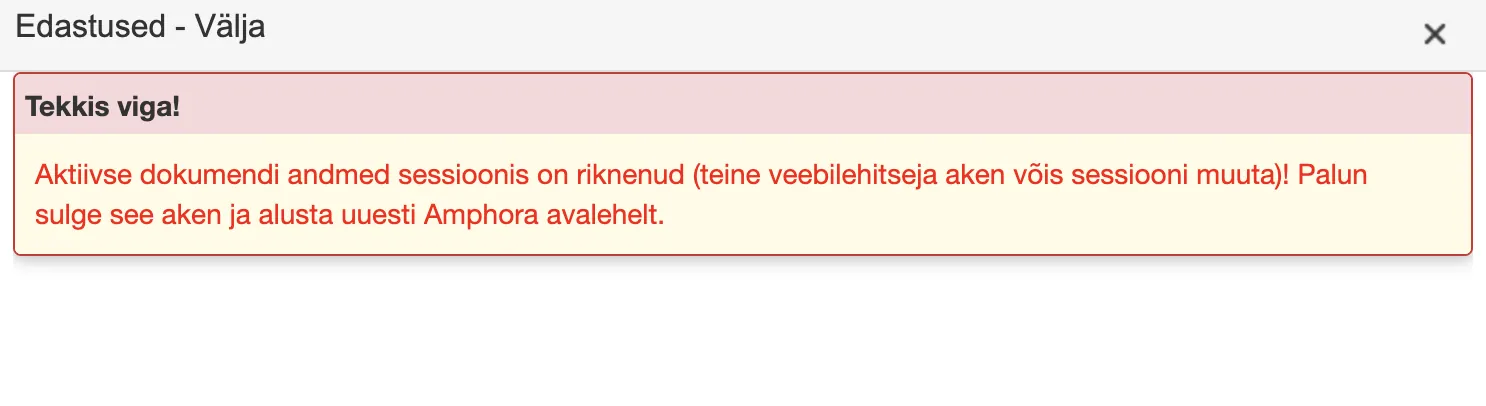
This way one document's changes are not accidentally carried over to another document. When the message appears, close the window and start the action again.
Document access restriction
A document's own access restriction is set on the document card in the Restrictions panel:
- For in-house use – the AK mark. Ticking it fills Marked with today's date.
- Reason for access restriction – a choice from the reasons your organization has set up (an administrator adds them, see FAQ). The text of the chosen reason is added to the reason text on a new line.
- Restriction in force till – the end date. Choosing 5 years or 75 years next to it calculates the end date from the start date.
- Information owner and Restriction identifier – text fields.
No field in the panel is required: the AK mark saves with only the marking date. If a document has several restrictions, they are shown in a table below the fields.
If the catalog has a default restriction, a new document opens with the AK mark, reason, start date, end date and information owner already filled in. The organization setting for the default AK duration (Admin -> Organization settings) fills Restriction in force till when the mark is ticked.
The restriction of an archived document is changed in the archive, see Changing access for archived documents.
Last modified: 24 October 2026, 11:09:12