Templates
- Template introduction a. Template size b. Adding templates c. Modifying existing templates d. Reply letter template condition e. Deleting templates
- HTML templates a. Creating HTML templates b. How data is transferred from form to template c. Static template elements d. Agenda protocol template elements e. Response document ::SOURCE.EDITOR:: template
- Auto-reply templates a. Configuring auto-reply template
- RTF templates OLD CORRESPONDENCE MODULE TEMPLATES a. Adding RTF templates b. Template elements c. Adding template element to RTF file
- DOCX templates a. Colon template elements 1a. Response document template elements 2a. Case template elements b. Word Quick Parts template elements c. Attachment files template element d. Loading DOCX template to Amphora e. Destruction act template elements
- PDF templates
It is possible to configure various document templates in Amphora, which users can use in their daily work.
Templates can be created for both Documents and Correspondence modules, each created template must be linked to a specific form. (See also form configuration)
A form can have one to multiple templates. Templates can be in html, rtf, pdf or docx format.
Template introduction
Templates are located under Admin -> Templates.
 1. Can create a new template.
2. Not working currently!
3. Can delete a template.
1. Can create a new template.
2. Not working currently!
3. Can delete a template.
Filters can be used to search for a specific template.
By clicking the  button, the filtering options become visible:
a. NoFilter - removes filtering
b. Contains - search by words (NB! word must match exactly what is being searched)
c. EqualTo - exact date in date selection
d. GreaterThan - later than given date in date selection (exclusive)
e. LessThan - earlier than given date in date selection (exclusive)
Additionally, sorting works by clicking on the column header.
Template size
File size is made red if it is larger than 200 kb. This does not mean that the template file needs to be redone immediately. Critical size starts from 8-9 mb, as such large files cannot always be sent by email.
File size is also available in template detail view. It is located on the same row as the title.
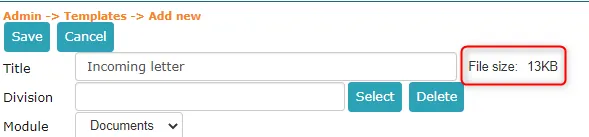
Adding templates
Open the Templates form from the Admin module submenu. To add a new template, click the Add new button. The form Templates -> Add new opens.
Write a title for the template to be created and select the module by clicking the arrow button in the Module field, which opens a dropdown menu.
In the Visibility dropdown menu, Internal environment must be selected.
When module and Visibility are selected, a new field Form is displayed, from which you need to select the form to add the template to.
Important
For options to be displayed in the Field content, each form field on the desired form must have ID in template configured beforehand!
You need to select the form to add the template to, then select the template type, and depending on the template type, the configuration is different. We will talk about this later.
To save the template, click the Save button.
The template being created can be set as default by checking the Default template box. This means that in the given module, on the given form, this template will be displayed first.
If you check the Locked text box (applies only to HTML templates!), the system locks the text written on the template, meaning the user cannot change this text.
Modifying existing templates
Open the Templates form from the Admin module submenu.
To modify an existing template, click on the template title to be modified.
Make the necessary changes on the opening form (add or delete data fields in the text editor, etc.) and click the Save button.
If you need to change the RTF file underlying the template, download this file to your computer, open the RTF file in Word text editor, make the necessary changes (if needed, enter/change template elements), save the file and upload it again to the file field in the template modification form. Click the Save button on the template modification form.
Reply letter template condition
A documents module template can be given a condition based on the initiating document in Admin – Templates. The template's edit view has a Condition panel where you choose the Source form, the field and the value, and the Effect:
- Do not apply (the default) – the condition does not affect the choice of template.
- Filters the template – the template is in the template list only when the initiating document matches the condition. When it matches, the template is selected automatically.
- Default selection only – the template is always in the list, but when the condition matches it is selected automatically.
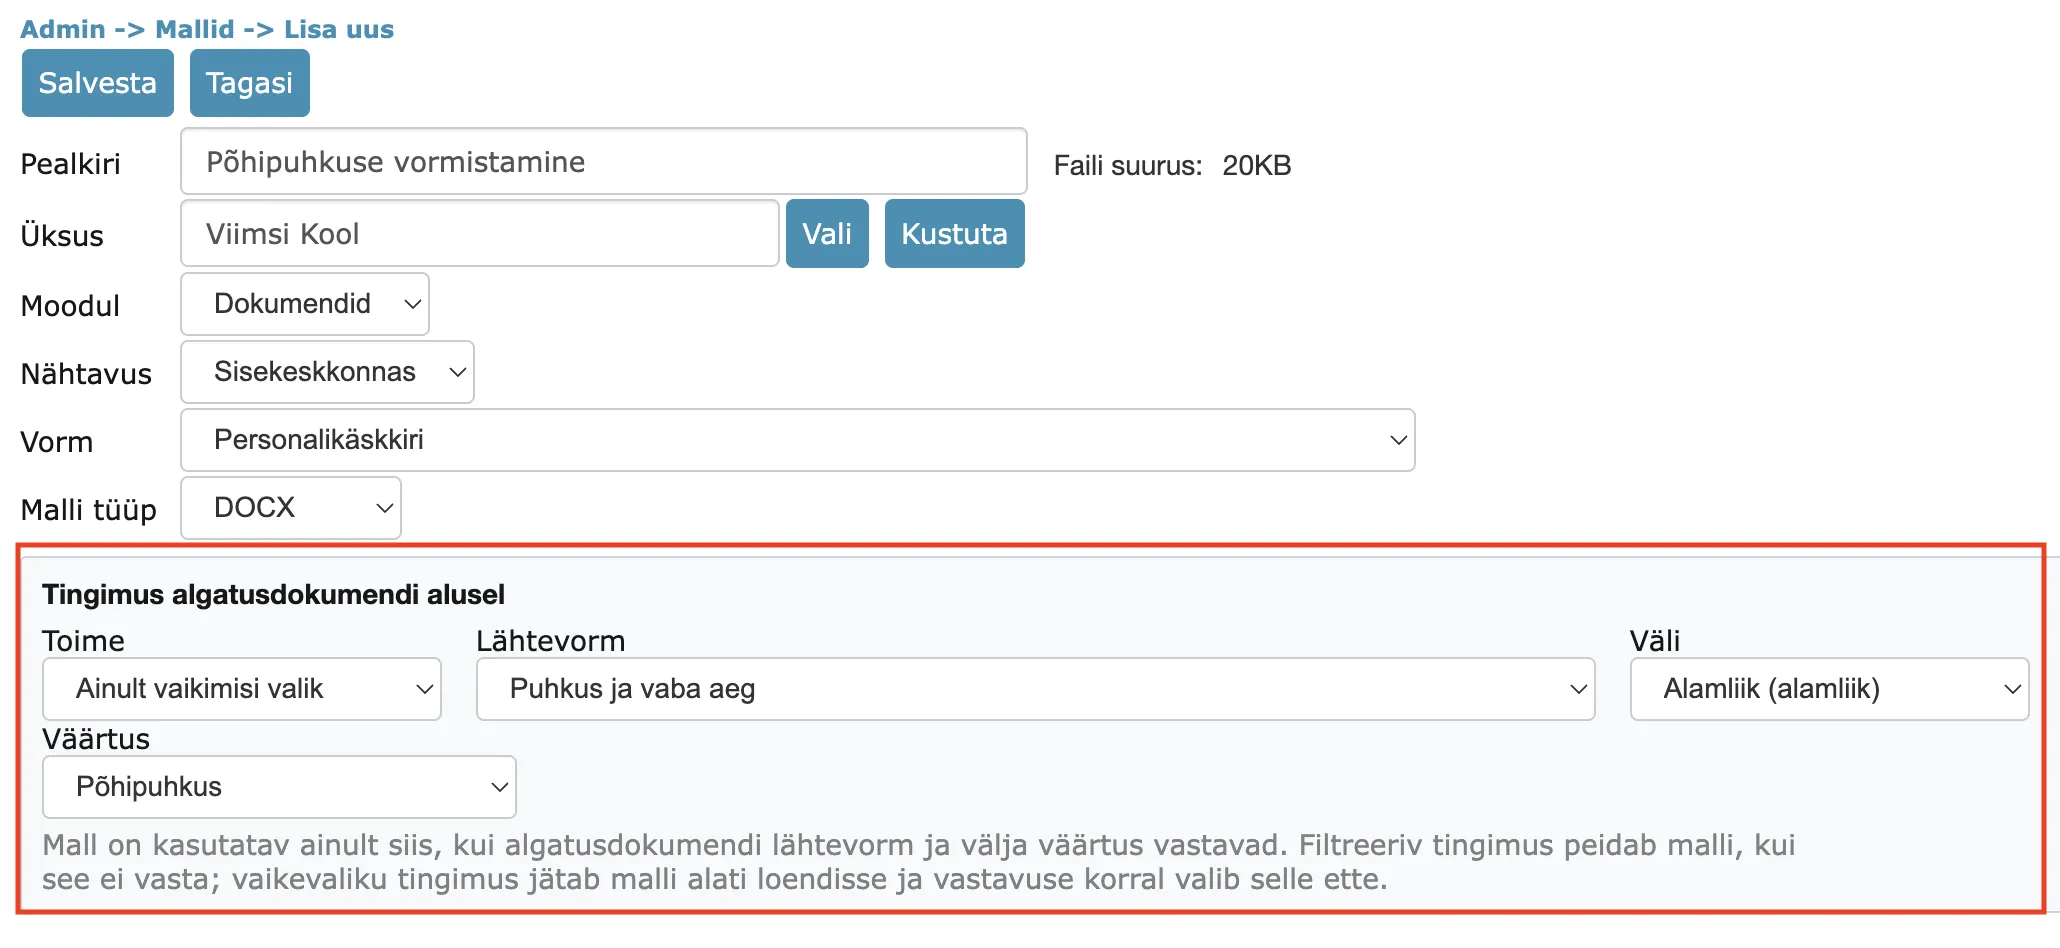
This makes it possible to offer different reply templates for different values on one initiating letter form.
Important
When there are several matching default templates, the template of the user's own unit is preferred.
Deleting templates
Open the Templates form from the Admin module submenu.
Find the template to be deleted from the list and click on the trash icon at the end of the row. The system asks if you want to delete the given template. If yes, click the OK button, if not, then Back.
HTML templates
HTML templates are displayed in the text editor when writing a new document. HTML templates can only be used with document writing forms.
Creating HTML templates
The prerequisite for creating an HTML template is having a suitable form.
HTML templates can be added under Admin -> Templates (Add new button). The template title is a mandatory field and needs to be filled. Unit selection is not mandatory. If a unit is selected, only users of that unit can see and use this template.
If unit selection is left empty, this template is visible to everyone. The module should be selected as Documents.
Default template selection by unit: The default HTML template for a letter form is automatically selected based on the unit. Amphora always selects the default template that is linked to the catalog unit where the document is being registered. If no default template is linked to the catalog unit, the default template without a unit is selected. When changing the catalog before the first save, the default template also changes if the new catalog is in a different unit. This is useful for users who have multiple units and send emails on behalf of different organizations.
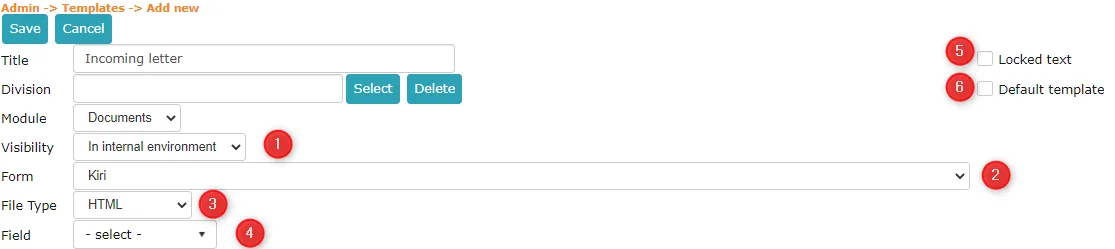 1. The default choice is Internal environment. This should be left as is.
2. Here the template must be linked to a form. By clicking on the dropdown menu, all document forms become visible and you need to select the appropriate form.
3. For HTML templates, the type is always HTML.
4. Field selection. The selection contains all fields of the selected form. Makes life easier when creating a new template or modifying an existing template.
5. With this selection, it is possible to lock the text on the template. By default, it is possible to change the template text in the text editor, but if the checkbox is checked for Locked text, then the text cannot be changed in the text editor.
6. With form selection, this template is selected by default.
1. The default choice is Internal environment. This should be left as is.
2. Here the template must be linked to a form. By clicking on the dropdown menu, all document forms become visible and you need to select the appropriate form.
3. For HTML templates, the type is always HTML.
4. Field selection. The selection contains all fields of the selected form. Makes life easier when creating a new template or modifying an existing template.
5. With this selection, it is possible to lock the text on the template. By default, it is possible to change the template text in the text editor, but if the checkbox is checked for Locked text, then the text cannot be changed in the text editor.
6. With form selection, this template is selected by default.
When the above points are completed, you can start composing the template. Below is a text editor where you need to write the template text. You can use different fonts, font sizes, tables, etc. To add an image (e.g. the organization's logo), copy the image and paste it into the text editor with Ctrl+V. The image is stored as part of the template and is carried into the new document when the template is used. Please note that a PNG image over 150 KB with a transparent background is stored as JPEG and the transparent area turns black, so use a small logo or one with a white background. See also Text editor.
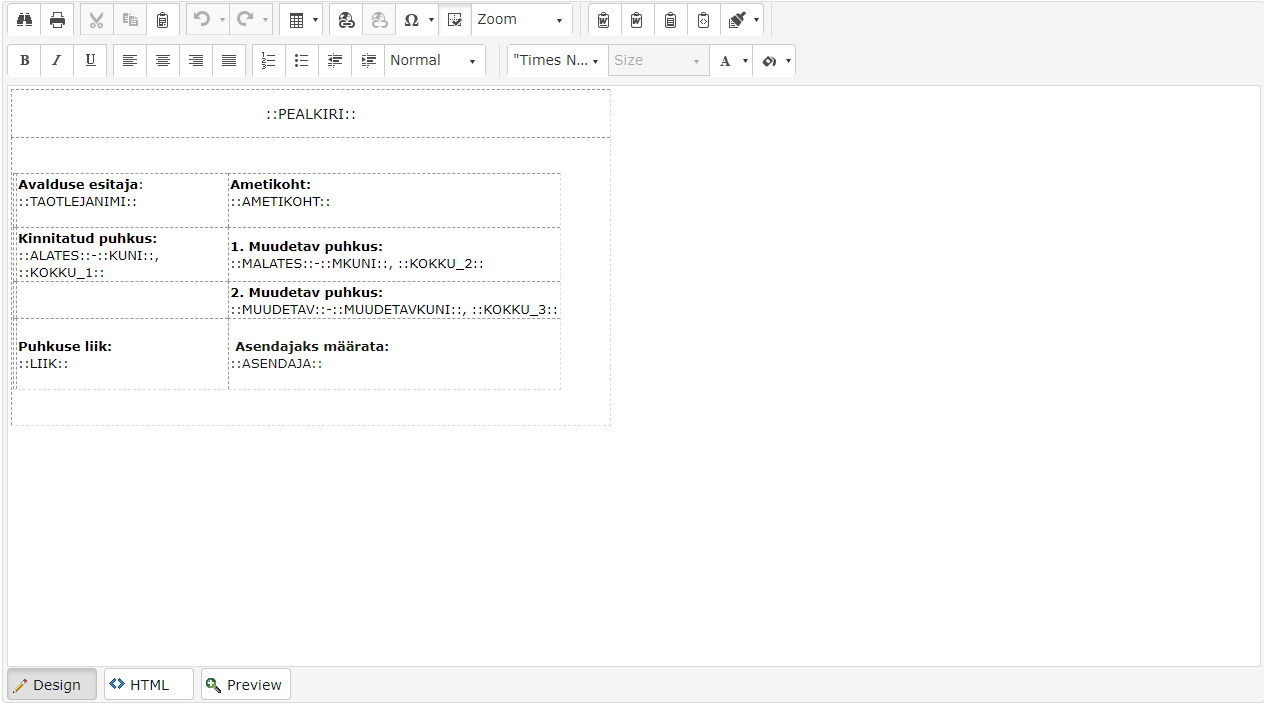
Example of a vacation application template:
 If the HTML template has a < meta > element within the < head > element, you should check that it is in the following form:
<meta http-equiv="Content-Type" content="text/html; charset=utf-8" />
If the element is in this form, conversion will start working correctly.
How data is transferred from form to template
The example HTML template has words/phrases that are surrounded by two colons. These words (or placeholders) are the IDs in template of form fields. Later, when transferring data from form to template, these words are replaced with the content of the corresponding form fields.
If you want to use a form with an HTML template, then every form field whose information you want to transfer to the template must have an ID in template.
The ID in template of form fields can be checked by going to Admin -> Form configuration (you need to select the correct form that you want to link the template to). Behind each form field there is a  icon, which can be used to open that field's settings.
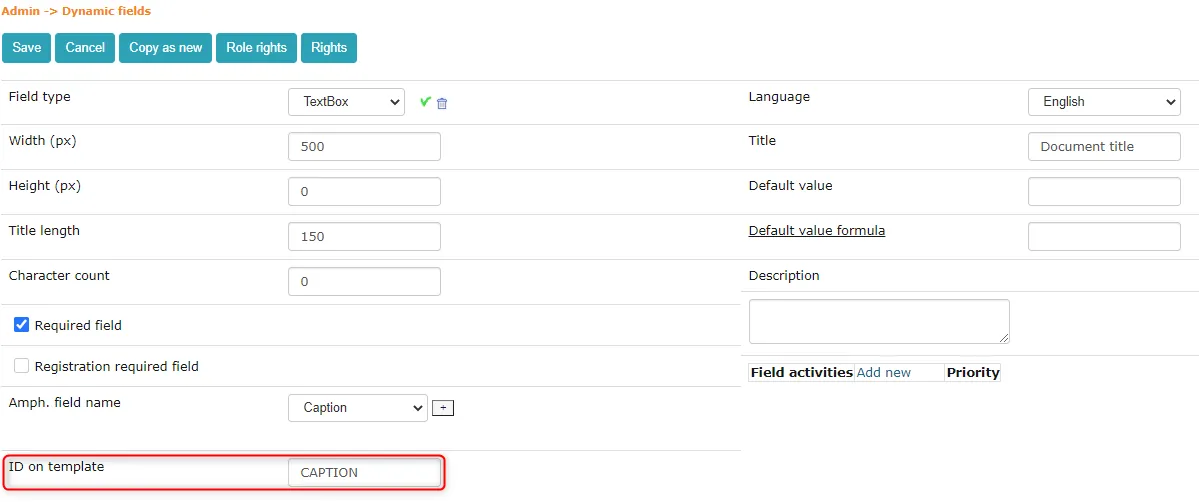 The ID in template word must not use accented letters or other non-alphabetic symbols (except numbers and underscore, but it is still recommended to avoid them). It is recommended to use capital letters, as these words need to be written in capital letters on the template. This way there will be no confusion.
Form fields can be added to the template in two ways:
- Manually write the ID in template between colons. In this case, you need to write down all form field IDs in template somewhere before creating the template, so you don't forget.
- Using the Field dropdown menu in the template addition view.
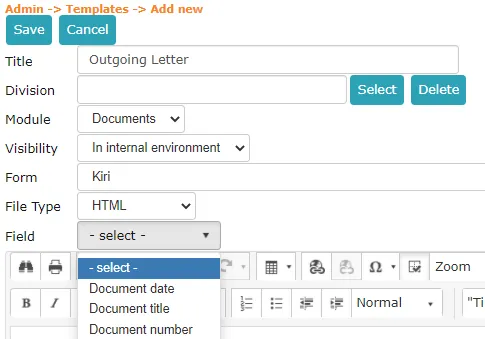 Here all form fields that the template is linked to are displayed. When the desired field is selected, an Add button appears on the right side.
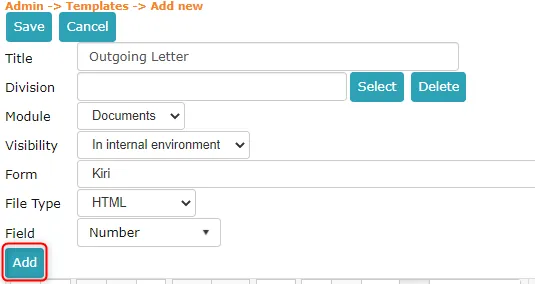 In the text editor, you need to left-click where the form field should be added and then click the Add button.
When the template is ready, you need to click the Save button and definitely check that all fields are transferred from form to template. To do this, you need to go to the Documents module:
- Write new (HTML templates only work with document writing forms)
- Select the correct form
- Make sure the correct template is selected.
 4. Fill in the form fields and click the Add to template button.

Static template elements
HTML templates can also use static template elements that are not linked to specific form fields. These template elements can be used with any document form.
::CREATEDATE:: - creation date of the document's first version
::CREATEDATETIME:: - creation date of the document's first version with time
::MODIFYDATE:: - modification date of the latest version
::MODIFYDATETIME:: - modification date of the latest version with time
::CURDATE:: - current date
::CURDATETIME:: - current date with time
::CURTIME:: - current time
::CURUSER:: - logged-in user's first and last name
::CURUSERPHONE:: - logged-in user's phone number
::CURUSEREMAIL: - logged-in user's email address
::CURUSERORG:: - logged-in user's organization
::CURUSERJOB:: - logged-in user's job title
In version 13.4.3, ACL template elements were added.
::ACLCAUSE:: - Access restriction basis ::ACLSTART:: - Date when restriction was made ::ACLEND:: - Restriction valid until date ::ACLOWNER:: - Data controller
Agenda protocol template elements
Two HTML template elements can be used in agenda protocol templates:
::PAEVAKORRAD_B:: -- table of contents template element. Displays the list of agenda items in table of contents format.
::PAEVAKORRAD5:: -- agenda items template element. Displays each agenda item's title, presenter's first and last name, and presenter's job title.
Response document ::SOURCE.EDITOR:: template
The ::SOURCE.EDITOR:: template element is intended for response document templates. When composing a response document, Amphora replaces the template element with the original document's text editor content.
Example of an HTML template that can use this template element:
Hello,


Best regards,
::CURUSER::

::SOURCE.EDITOR::
When composing a response document, we select this template (or Amphora selects the template itself if it is a default template) and Amphora replaces the ::SOURCE.EDITOR:: template element with the original document's text editor content. ::CURUSER:: in this example is the logged-in user's first and last name.
Auto-reply templates
Auto-replies can be configured in Amphora for incoming documents. When a document is registered and certain conditions are met, Amphora automatically sends a reply to the sender.
Conditions for sending an auto-reply:
- The document must have an inbound delivery with the sender's email address. Auto-reply does not work with DHX delivery method.
- An auto-reply has not been previously sent.
- The document must have a number.
- The document must have a response deadline.
- The document must have a responsible person with the Create task checkbox checked.
- The document must not have been registered more than 30 days ago.
Not all conditions need to be met at the time of registration. When conditions are met and saved on an existing document, Amphora will send the auto-reply.
Configuring auto-reply template
The auto-reply template must be created under Admin -> Templates -> Add new.
- Enter the template title.
- Unit does not need to be selected -- leave the selection empty.
- Select Emails as the module.
- Amphora automatically adds the Is reply checkbox.
- Enter the auto-reply content in the text editor.
The following template elements can be used in the auto-reply template:
::CAPTION:: - document's internal environment title
::PUBLIC_CAPTION:: - document's public title (Title on web)
::NUMBER:: - document number
::ANSWER_DEADLINE:: - document's response deadline date
::RESPONSIBLE_PERSON:: - name of the document's responsible person
::CREATEDATE:: - document creation date
::CURDATE:: - current date
::CURDATETIME:: - current date with time
::CURTIME:: - current time
::CURUSER:: - logged-in user's name
::CURUSERPHONE:: - logged-in user's phone number
::CURUSEREMAIL: - logged-in user's email address
::CURUSERORG:: - logged-in user's organization
::CURUSERJOB:: - logged-in user's job title
Linking auto-reply to a unit
After creating the template, it must be linked to a unit. Open Admin -> Directories and open the desired unit for editing. In the unit settings, there is an Auto-reply template dropdown menu from which the created template must be selected. Click Save.
When an auto-reply has been sent, an (a.r.) link appears under the delivery's Received status. Clicking on it displays the auto-reply content, recipient and sender email addresses, and sending logs. Information about the sent auto-reply is also displayed in the history panel.
Auto-reply translations can be customized in the Admin -> Translations view. For more details, see the translations guide.
NB!
There are currently no form restrictions. Auto-replies work with any form, provided the configuration is done.
RTF templates OLD CORRESPONDENCE MODULE TEMPLATES
Adding RTF templates
The basis for a letter template is an RTF format file that is used to generate the full text of the letter on outgoing letter forms (Simple sendable, Complex sendable, Sent via DHX).
The RTF file can contain special template elements that are replaced with real data taken from the letter form when generating the letter's full text.
To add a template, open the left menu link Admin -> Templates. Click the Add new button. The system opens the new template addition form.
Enter template metadata: title, unit (if unit is not selected, users of all units can use this template), select Correspondence for module, select the required form for form, select RTF for template type.
If needed, mark the template as default template (template opens first on the corresponding form).
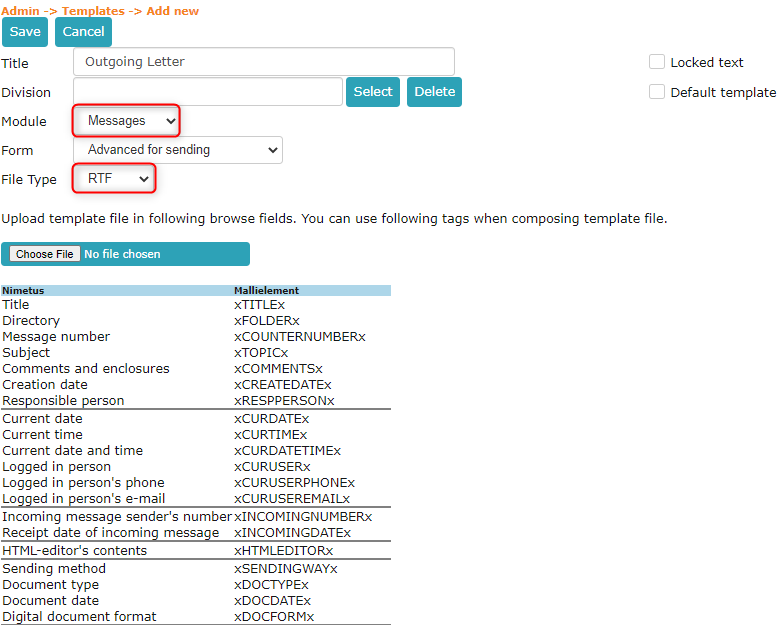 Then compose the RTF file that is the basis for the template. The RTF file can be composed in Word text editor (when saving the file, select File -> Save as… from Word's top menu, select Rich Text Format (.rtf) as file format and click Save).
When composing the file, you can use the template elements displayed in the template addition form. The list of template elements depends on the specific letter form that the user has previously selected in the Form dropdown menu.
The presence of a template element in the RTF template content means that when generating the letter's full text, this template element is replaced with real data taken from the letter form.
If a field is not filled in on the letter form, the corresponding template element remains unreplaced.
When the RTF file is composed, upload it to the file field in the template form using the Choose file button (see figure above). Click the Save button on the template addition form.
Template elements
The following template elements can be used in RTF files:
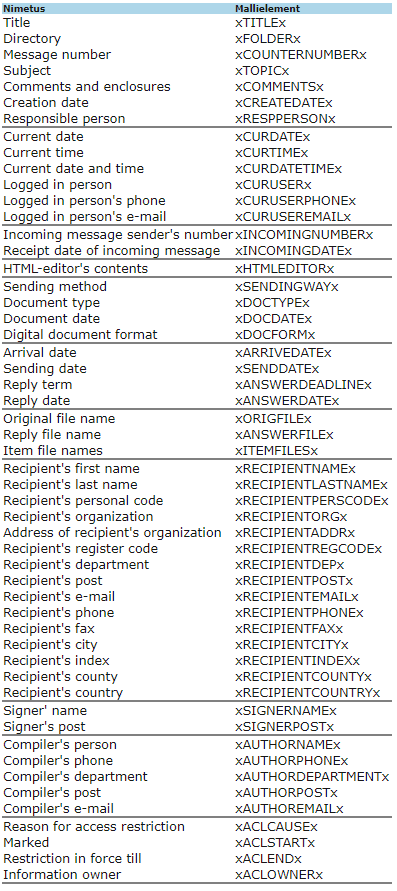
Adding template element to RTF file
To add template elements to an RTF file, it is most sensible to copy them:
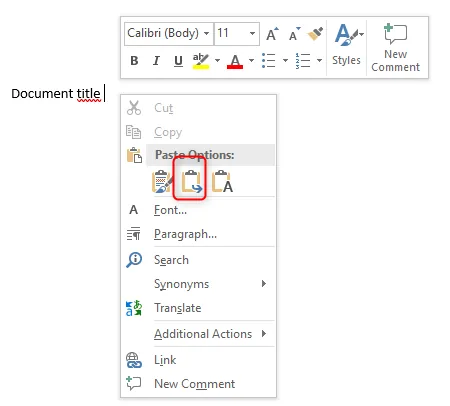
Double-click with the left mouse button on the required template element. Then right-click to open the context menu on the selected template element and select the Copy command (alternatively, you can double-click to select the required template element and press Ctrl+C).
 Copy the previously selected template element to the RTF file using the Paste command (or by pressing Ctrl+V).
 ***
***
DOCX templates
When creating DOCX templates, it is possible to use two types of template elements - colon template elements and Word Quick Parts template elements. The DOCX template needs to be created outside of Amphora and then loaded into the Amphora environment (Admin -> Templates).
Colon template elements
Colon template elements must be manually added to the template when composing in the form ::amphora field name::, i.e., the form field "amphora field name" between colons (two colons before and two colons after). These template elements only work with form fields, so logged-in user data, logged-in user position, etc. cannot be displayed with these template elements. The form field "amphora field name" can be found in the Amphora internal environment. To do this, go to Admin -> Form configuration and select the form for which you need to create a template from the list. Next to each form field on the right side, there is a  icon that needs to be clicked. The form field settings appear above, where every form has an "Amp. field name".
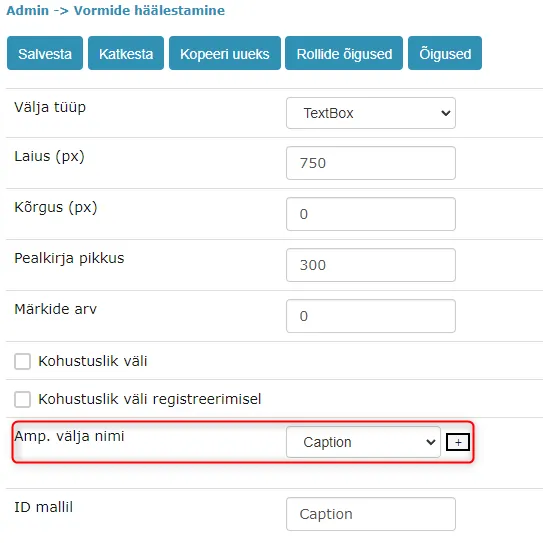 This field's template element is ::Caption::. Template elements are case-sensitive, so you need to consider that if there are uppercase and lowercase letters in "Amphora field name", then exactly the same letters must be in the template.
NB!
When adding template elements, you must definitely check that there are no extra colons and that the "Amphora field name" is correct. If the "Amphora field name" is not correct, then Amphora removes this template element and does not add anything to the template.
Response document template elements
Response document template elements can be used to add data from the initiating document to the response document template.
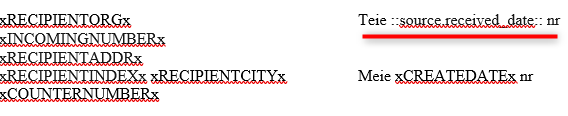
Response document template elements look like this - ::source.amphora field name::. So if the "Amphora field name" is Caption, then the template element should look like this - ::source.Caption::.
Response document template elements only work when the response document is correctly registered (using Create -> Response, "Add response" button in delivery panel, or "new response letter" option in Link to main document panel). Data can be obtained from the document that was responded to.
Example:
A SPOKU application comes in and the official needs to compose a response document. Response document template elements can be added to the response document template that automatically transfer data from the Spoku application form to the response document template, without the official having to copy or write anything themselves.
In addition to the response letter template, it is possible to add, for example, the sent initiating letter date (Your date, which is taken from the original document/letter).
Case template elements
Case template elements can be used to transfer the content of case fields related to the document to the template. Case template elements look like this:
::case.amp_field_name::
where amp_field_name is the case form field's "Amphora field name". Form fields' "Amphora field name" can be found in Admin -> Form configuration.
New template elements work in situations where the document is related to only one case. If there are multiple cases related to the document or the case is missing, then when saving the document, these template elements are replaced with an empty value.
For Amphora to replace template elements with the correct field value, you can add a new document both from the case modification view (Case objects panel) and directly from the Documents module. The main thing is that when saving the document, there is a relationship with one case.
Related case template elements make sense to use when the case form has fields whose information should ultimately reach the case object (document) template. For example, the case form has property information and when creating a new contract, the property information should reach the contract template.
Word Quick Parts template elements
Another way to create DOCX templates for Amphora is to use Word's Quick Parts functionality. Next, we will describe creating a DOCX template (using a simple "Additional payment" template as an example) using Word's Quick Parts functionality.
-
Open Word and start composing the template. In this guide, we will create an Additional payment template. As the first step, we need to add text to the template that does not need to be changed.
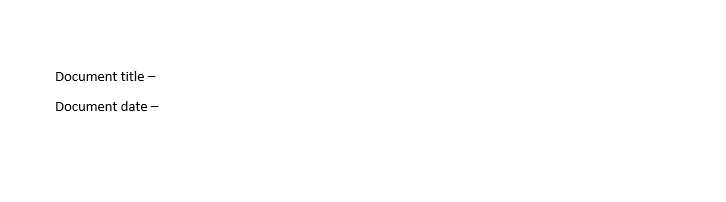 * The next step is to add variable text, i.e., those fields that you want to change each time with the template. To do this, we need to click on the Insert tab, then Quick Parts and Field.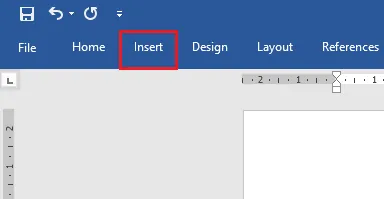
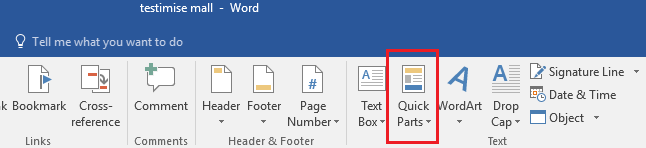
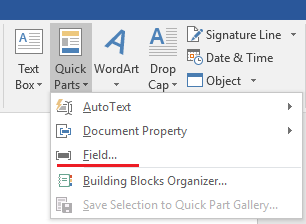 * In the opening window, you need to select Field names – DocVariable and Field properties is ID in template or if it doesn't exist, then Amp. field name.
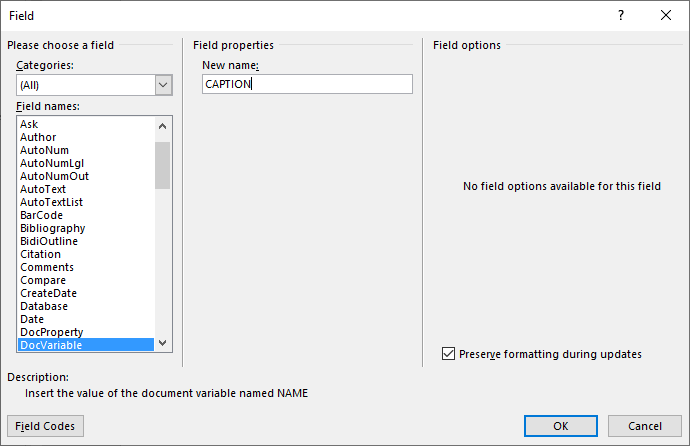 ID in template and Amp. field name can be found like this:
Admin -> Form configuration. There we select the form that interests us. Next to each field on the right side, there is a wrench icon.
 Clicking on this icon opens the field settings.
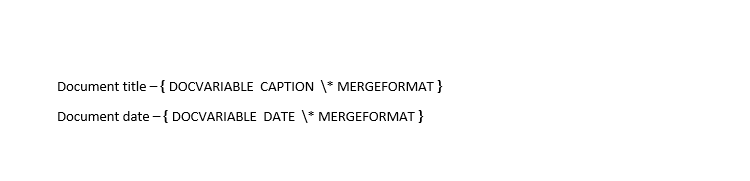
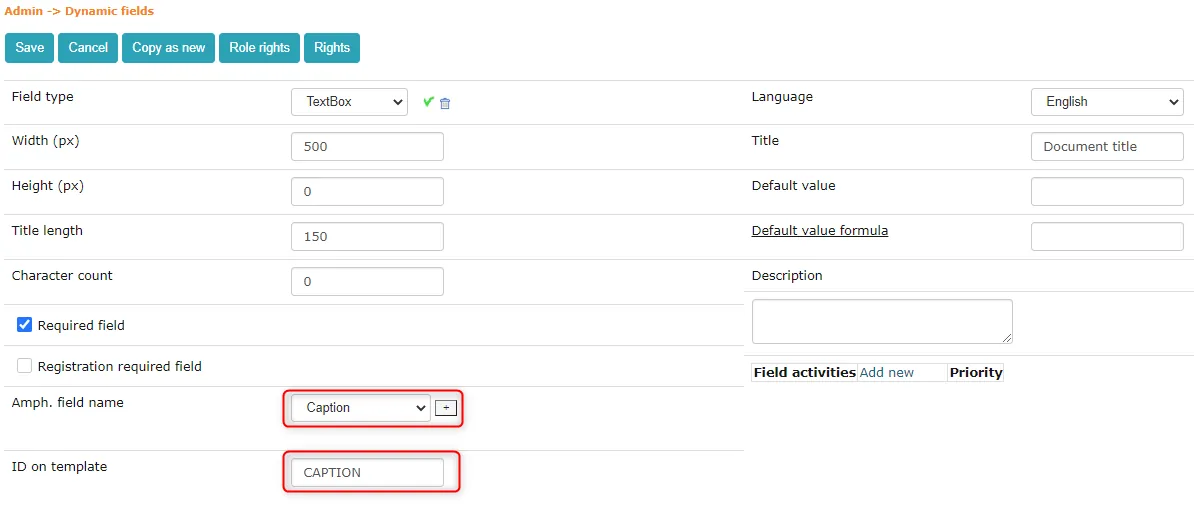 * We do this process for all variable fields. The only thing that changes each time is Field properties. Field name is always DocVariable!
- Finally, the template should look like this (to see the mut-fields, you need to press the ALT + F9 combination on the keyboard):
Attachment files template element
The template element ::ItemFiles:: can be used in DOCX templates. It adds all document attachment files to the template, separated by commas.
Example result: Attachment_file_1.docx, Attachment_file_2.docx, Attachment_file_3.docx
Loading DOCX template to Amphora
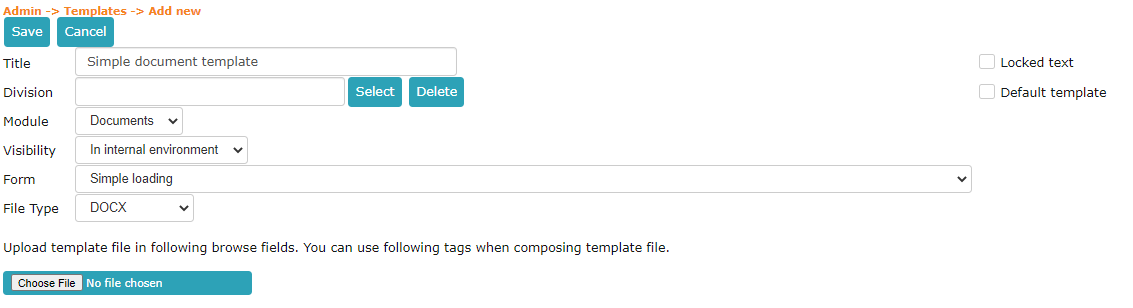
When the DOCX template is created outside of Amphora, the created template needs to be loaded into the Amphora environment. To do this, we need to go to Admin -> Templates -> Add new again.
- Title – template title.
- Unit – not a mandatory choice, but if only one unit's employees will use the template, then this unit needs to be specified. If the unit is left unselected, employees of all units will see this template.
- Module – Documents.
- Visibility – Internal environment.
- Form – the form that this template will work with.
- Template type – DOCX.
- Choose File – template file selection button.
When all steps are completed, we click the Save button and the template is loaded into Amphora.
Destruction act template elements
Generally static template elements
::CREATEDATE:: - creation date of the destruction act's latest version ::CREATEDATETIME:: - creation date of the destruction act's latest version with the time ::CURDATE:: - current date ::CURDATETIME:: - current date with the time ::CURTIME:: - current time ::CURUSER:: - logged-in user's first name and surname ::CURUSERPHONE:: - logged-in user's phone number ::CURUSEREMAIL: - logged-in user's email address ::CURUSERORG:: - logged-in user's organization ::CURUSERJOB:: - logged-in user's job title
Template elements related to the destruction act
::ActDocumentNumber:: - destruction act number ::ActDocumentNumber:: - destruction act number without the suffix ::ActDate:: - destruction act date ::ArchiveName:: - the archive that issued the appraisal decision ::DisposalDecisionInfo:: - appraisal decision data ::OrgName:: - organization name of the archive files ::DisposalMethod:: - method of destruction ::FileFolderCount:: - number of the archive files ::DisposalResponsiblePersonName:: - name of the person responsible for the destruction ::DisposalResponsiblePersonOccupation:: - job title of the person responsible for the destruction ::DocumentManagementResponsiblePersonName:: - name of the person responsible for document management ::DocumentManagementResponsiblePersonOccupation:: - job title of the person responsible for document management ::DisposalMinYear:: - earliest "From" date of the archive files ::DisposalMaxYear:: - latest "To" date of the archive files ::DisposalYear:: - year of the archive files
Template elements related to the destruction act that work ONLY IN A TABLE
::RowNo:: - archive file's sequence number ::Number:: - archive file's series code ::Title:: - archive file's title ::TemporalCoverage:: - archive file's limit dates (From and To dates) ::TemporalCoverageYears:: - archive file's limit dates (From and To years) ::ItemCount:: - number of objects in the archive file ::RetentionDeadline:: - retention deadline ::ParentId:: - archive file's folder ID ::OrgName:: - organization name of the archive file (determined from the archive file's folder) ::OrgId:: - organization ID of the archive file ::RetentionDeadlineText:: - retention deadline in years together with the word "years". Example "5 years" ::RetentionPeriodYears:: - retention deadline in years. For example "5" ::DateOpened:: - archive file's Opened date ::DateClosed:: - archive file's Closed date ::AppraisalDecisionReference:: - reference to the legal act (taken from the folder settings)
NB! For these template elements to work correctly in an HTML template table, you must add template="true" to the table element, for example
<tr template="true">
    <td style="width:25px;padding:5px;">::RowNo::.</td>
    <td style="width:75px;padding:5px;">::Number::</td>
    <td style="width:250px;padding:5px;">::Title::</td>
</tr>
PDF templates
PDF templates also need to be created outside of Amphora, but this process differs from the Word template creation process. In this guide, we will use LibreOffice software to create PDF templates. LibreOffice can be downloaded for free HERE.
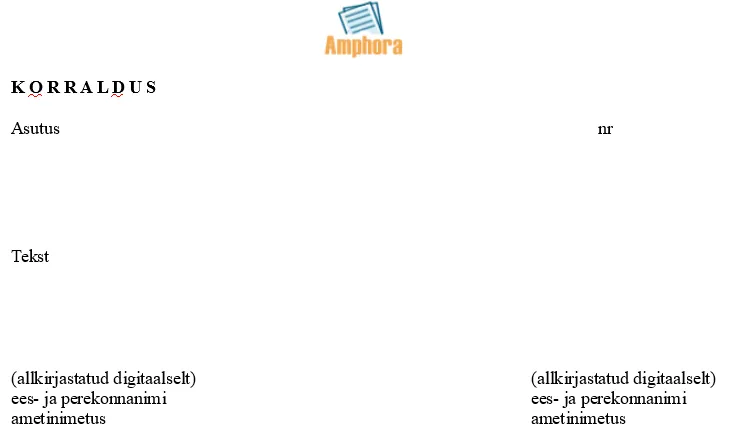
- Open LibreOffice Writer and start composing a new template. Initially, we need to add text to the template that is not variable. In the PDF template guide, we will compose a simple order template.
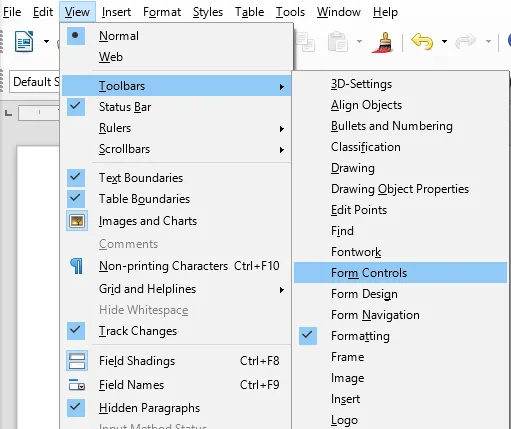
 * The next step is to add variable text, i.e., those fields that you want to change each time with the template. Here come the first differences compared to the Word template. To add variable text, we need Text Box. Click on View at the top, then Toolbars and Form Control.
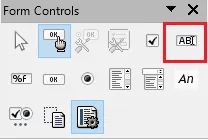
 * A small window appears on the screen with many different buttons. We need to select Text Box.
 * Then we create boxes in the places where there should be variable text.
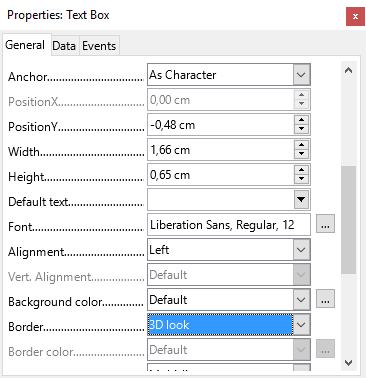
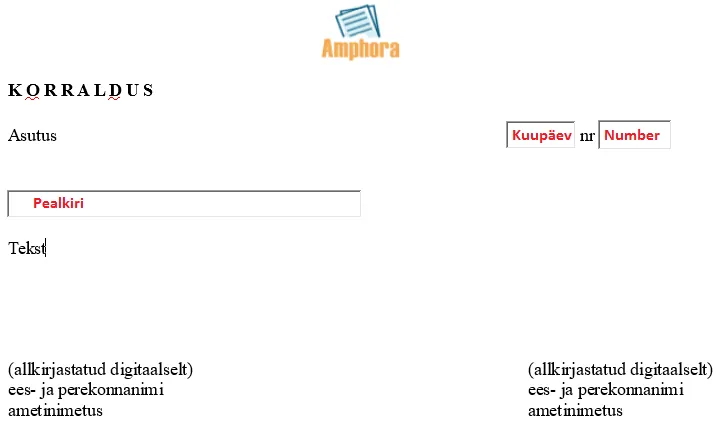 * Now we need to fix these text boxes a bit. First, we remove the borders. Click on the text box twice with the left mouse button and a window appears in front of us.
- Find Border and change 3D look -> Without frame.
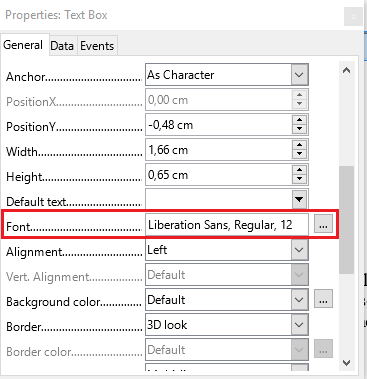
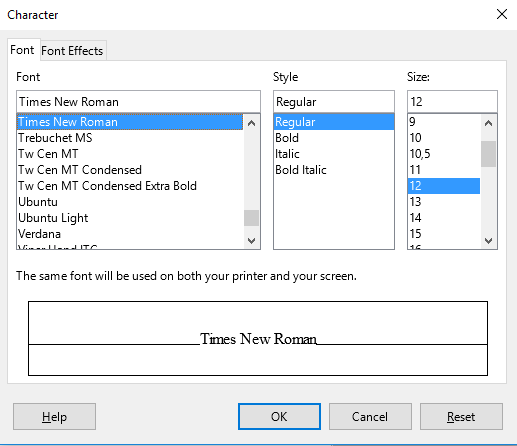
 * We also need to change the font. Similarly, we need to click twice with the left mouse button and find Font. By default, there is Liberation Sans and the size is 12. We change Liberation Sans -> Times New Roman (or some other font you want to use)
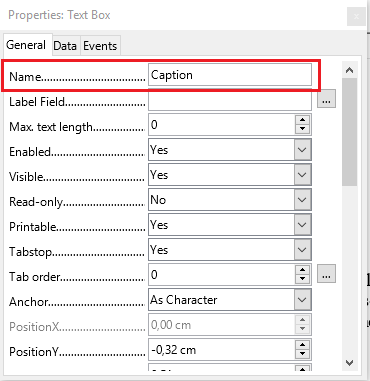
 * The last thing is to add Amp. field name to the text box. In the Word template guide, it is explained in detail where to get Amp. field names for different forms (Admin -> Templates).
- We need to click twice with the left mouse button on the text box and enter Amp. field name under Name.
 The template is created and now it needs to be loaded into Amphora. To do this, we need to go to Admin -> Templates -> Add new.
- Title – template title.
- Unit – not a mandatory choice, but if only one unit's employees will use the template, then this unit needs to be specified. If the unit is left unselected, employees of all units will see this template.
- Module – Documents.
- Visibility – Internal environment.
- Form – the form that this template will work with.
- Template type – PDF.
- Choose File – template file selection button.
When all steps are completed, we click the Save button and the template is loaded into Amphora.
Last modified: 17 October 2026, 11:05:57