Users
- Users module overview
- Adding user a. Adding to user group b. User permissions c. User who changed organizations d. Roles, substitute and responsible person
- Modifying user data
- User locking/unlocking
- IP restrictions
- Authentication as another user
- Superuser mode
- User personal code locking
In the Users module, you can add people who use this Amphora environment. Additionally, you can set their rights and permissions in the system, modify their information, and assign roles to them.
Amphora distinguishes between passive and active users:
- Passive user is a user who was previously entered in Amphora but is no longer allowed to log in. This could be, for example, a person who left the job. A passive user cannot be selected in the system (e.g., when sending tasks).
- Active user is a regular user who has the right to log into Amphora and perform regular operations.
As a special case, it is possible to enter Amphora as a guest (Guest) without username and password. Initially, however, the Guest account is configured as passive in Amphora. And if the Guest account is passive, then the corresponding button is not created on the login page. To enable the Guest account, the passive user status must be removed from the account and IP addresses for access must be configured.
The Guest account would also need some elementary Amphora-internal access rights, for which it is sensible to use the Guests user group added to Amphora.
Users module overview
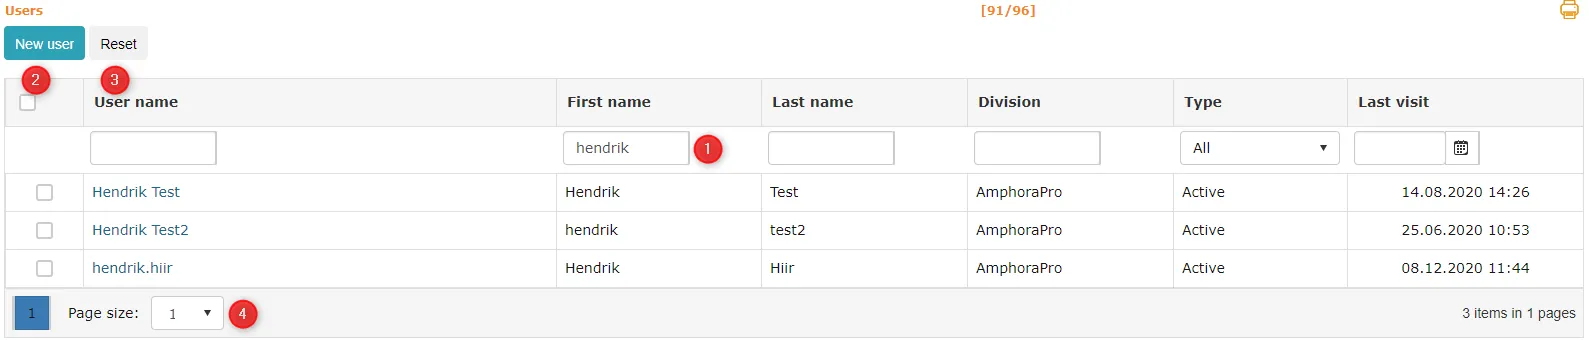 1. Search has been added to the users view. You can search by username, first and last name, last visit, and also by user type (active or passive user).
2. With the Add user button, you can add a new user.
3. With the Reset button, you can remove all search conditions.
1. Search has been added to the users view. You can search by username, first and last name, last visit, and also by user type (active or passive user).
2. With the Add user button, you can add a new user.
3. With the Reset button, you can remove all search conditions.
The Users view also has Personal code and GSM (mobile number) columns. These help verify user data without opening the user.
A user can be set as passive in the user view, i.e., from the opened user account form, check the Passive user checkbox and then press the Save button.
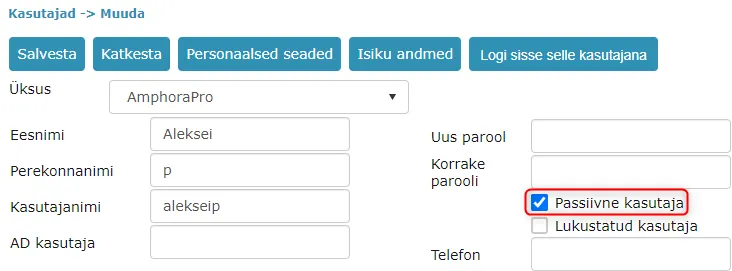 Activities performed by a user marked as passive (document loading, message sending, etc.) remain in the system.
Adding user
Using the system requires a named user account, which is necessary for saving all system operations and activities. When adding each user to the system, you can set their permissions for system use.
Users can be created both in the Admin module through the Add new function and by designating an existing person in the Persons module as a system user.
To add a new user, press the Add user button in the Users module. The Users form opens where you need to fill in mandatory fields: username, password, and if necessary, supplement contact information.
All mandatory fields are marked with an asterisk.
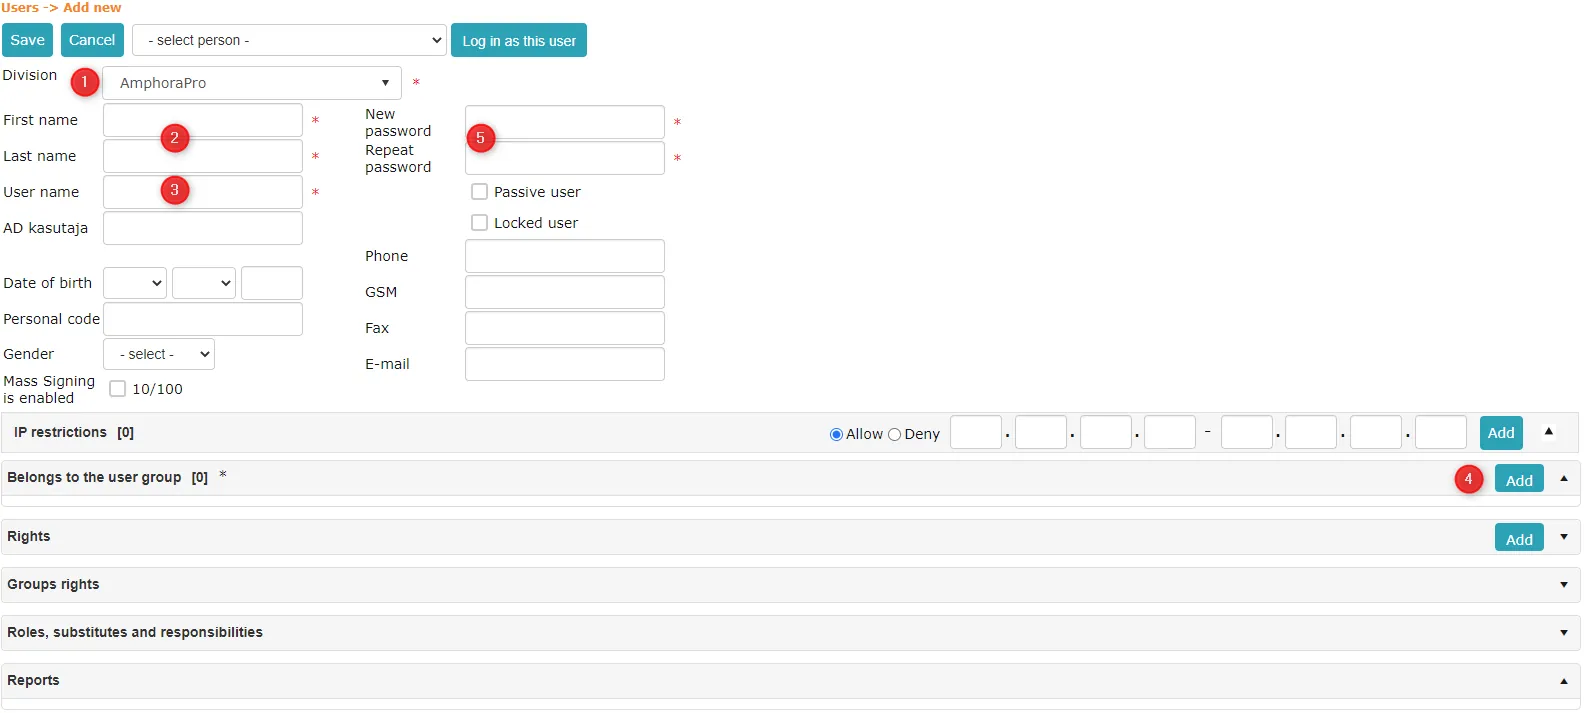 1. Unit or structural unit to which the user will belong. This determines the user's main work area in the system.
2. User's first name and last name.
3. Username - preferably in the form firstname.lastname. The system cannot have multiple users with the same username and the system automatically checks that there are no existing users with the same username.
4. User group assignment - gives the user corresponding rights in the system (policies and the right to see, modify, or administer folders). One user can belong to multiple different groups and these groups can be changed later as needed.
5. Initial password with which the user can enter the system for the first time. After the first login, the user can change the password according to their preference.
1. Unit or structural unit to which the user will belong. This determines the user's main work area in the system.
2. User's first name and last name.
3. Username - preferably in the form firstname.lastname. The system cannot have multiple users with the same username and the system automatically checks that there are no existing users with the same username.
4. User group assignment - gives the user corresponding rights in the system (policies and the right to see, modify, or administer folders). One user can belong to multiple different groups and these groups can be changed later as needed.
5. Initial password with which the user can enter the system for the first time. After the first login, the user can change the password according to their preference.
Although personal code, mobile number (GSM), and email address are not mandatory fields, filling them is still recommended. Personal code enables using ID card, Mobile-ID, and Smart-ID for both login and document signing. Mobile number is needed for Mobile-ID use. Email address ensures that the user receives all system notifications and emails sent from the system.
Adding to user group
Move to the Belongs to user group panel and press the Add button there. The system opens the Select groups form.
Select group(s) by clicking the group name (1) and then press the > button (2). To remove a selected group, click the name of the group to be removed in the Selected box and then <.
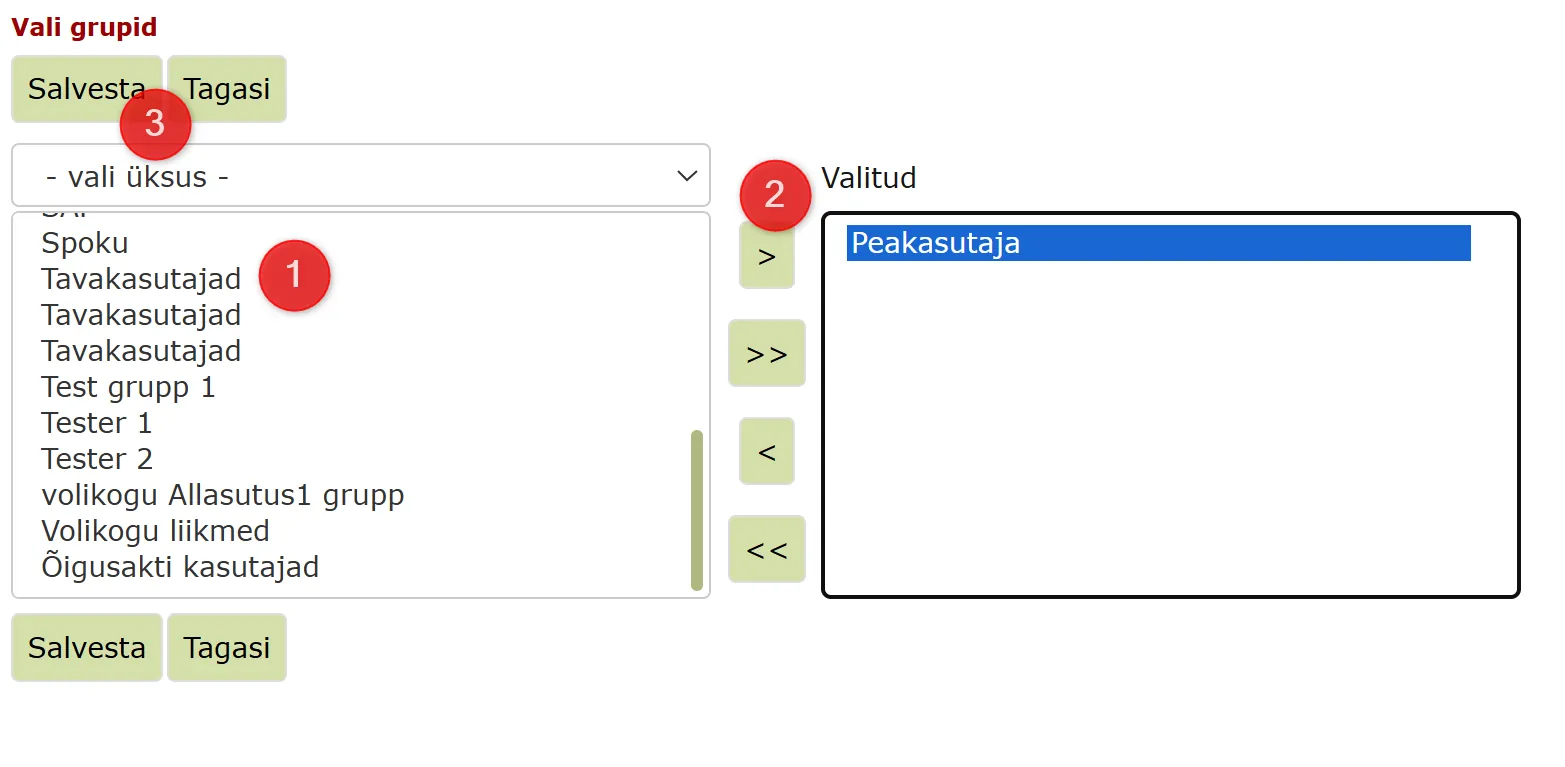 When groups are selected, press the Save button (3).
User permissions
Amphora users get permissions (view, modify, administer folders or units) according to their user group permissions, which can be seen in the "Group permissions" panel. If you want to give special permissions to only one user, you can do this in the Permissions panel through the Add button.
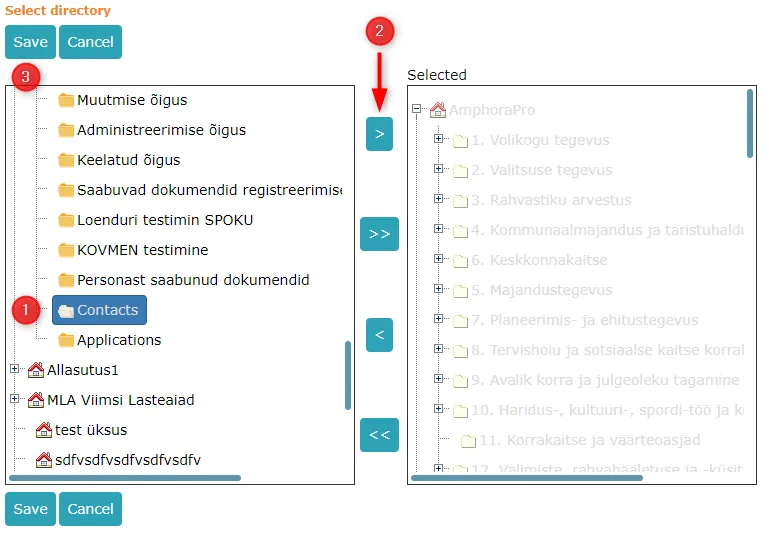
 In the opened form, move the appropriate folder or unit (1) to the right window using the > button (2). To confirm selections, press the Save button (3).
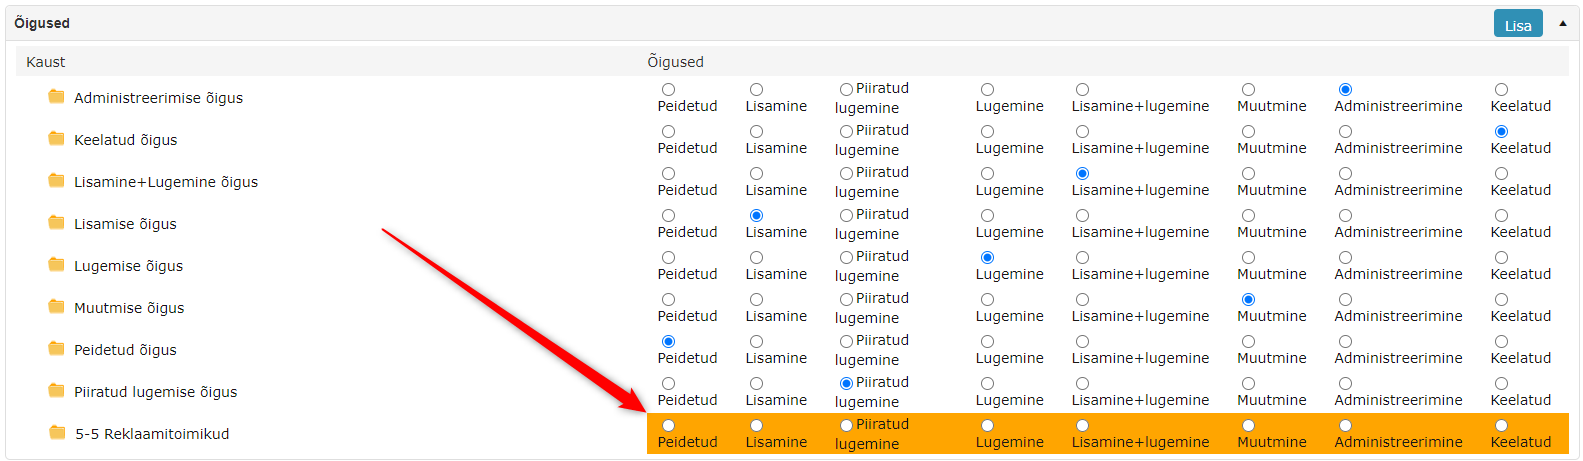
 After selecting folders, you need to set user permissions for folders by checking the appropriate permission.
Important
Newly added folders have orange background color! To save user permissions, set permissions for all folders, because Amphora will not save changes if even one folder has unassigned permissions.
 Permission explanations can be found here.
User who changed organizations
If a user moves from one subunit to another, it is recommended to create a new user account in Amphora and make the old one passive. In this case, the personal code should also be removed from the passive user, for this please contact client support.
Important
Although old user account settings can be changed to match the new position, a situation may arise where the user retains access to documents created in the previous workplace.
If the old account remains active, then when logging in with ID card, Smart-ID, or Mobile-ID, the system opens the old user account.
Roles, substitutes, and responsible person
This panel allows linking the user with other employees of the organization.
Roles describe the user's work tasks (main activities in the organization or job title). To assign a role, press the Add button from the panel.
Substitutes are substitute roles who can replace this user, for example, during vacation. To assign a substitute, press the Add button from the panel.
Responsible person is the user's direct superior to whom reports are made if, for example, the user has gone too far over time with completing their tasks.
Select Add from the Roles, substitutes and responsible person panel Roles subpanel. A new view opens (form Select roles).
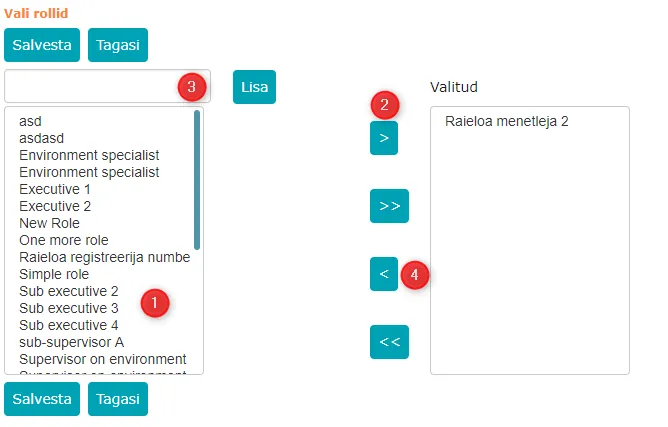 Make a selection by clicking the role (1) and then the > button (2). If the required role is not found in the role selection, you can enter it yourself. To do this, write the new role name in the field before the Add button and then press the Add button (3). To remove a selected role, click the name of the role to be removed in the Selected box and then < (4). When role(s) are selected, press the Save button.
If the user has multiple substitutes, they can be ordered by priority by pressing the arrows in the priority column. To save, press the Save button.
Substitute assignment
By pressing the Add button in the Substitute subpanel in the Roles, substitutes and responsible person panel, a new view opens (form Select roles). The following steps are exactly the same as in Role assignment.
Responsible person assignment
Select the responsible person using the panel dropdown menu. A selection opens where you can choose the responsible person role. To save, press the Save button.
Modifying user data
User data can be modified by an administrator by going to Admin -> Users module and clicking on the name of the user whose data you want to modify.
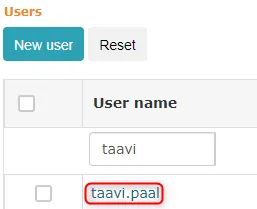 The Users -> Modify view opens. By pressing the Personal settings button, you can also modify data directly from that user's personal settings.
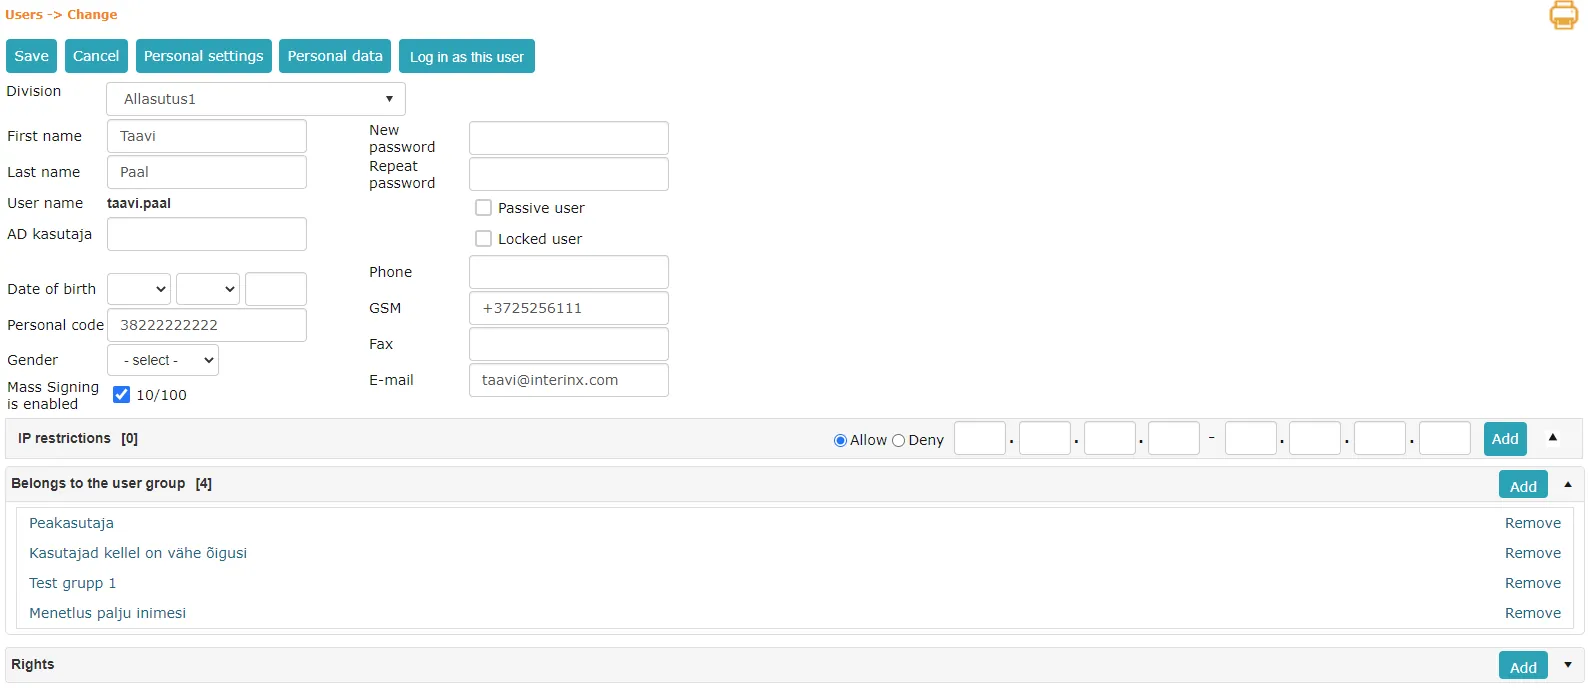 By pressing the Person data button, the system form Persons -> Modify opens, where you can add additional information displayed under the Persons module.
In this view, you can also change user group membership and give personal permissions to folders and units.
The user modification view has a Reports panel that contains two reports:
- User valid permissions - displays a list of all valid permissions the user has by folders, including unassigned permissions.
- User valid policies - displays a list of all valid policies the user has.
If the user group to which the user belongs has the policy Log in as another user enabled, then you can also log into other users by pressing the Log in as this user button in the user modification view.
User locking/unlocking
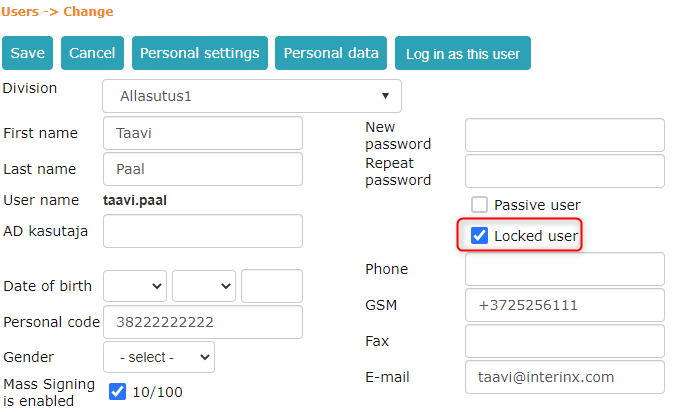
A locked user essentially means a temporarily rights-less user. A locked user cannot enter the system, but can be selected in the system (assign tasks, send messages, exists in calendar).
A user can also become locked without being set by someone else. This happens if you enter the wrong password five times when entering the system.
A user can be locked by going to Admin -> Users module and selecting the person you want to lock. In the person's modification view, check the Locked user checkbox. Similarly, for unlocking, you need to remove the checkmark from Locked user.
 ***
***
IP restrictions
In this panel, you can add an IP address range from which the user has access to this Amphora environment.
This is necessary, for example, in situations where you don't want the user to be able to log into the system from outside the workplace.
Authentication as another user
Amphora has a "Log in as another user" policy. This policy must be enabled to be able to log in as another user. Additionally, the user trying to log in as another user must have a personal code.
In Admin -> Users -> user view, a "Log in as this user" button becomes visible. With this button, you can log in as another user. You can log in as another user if the user is not passive. It is also possible to log in as a locked user.
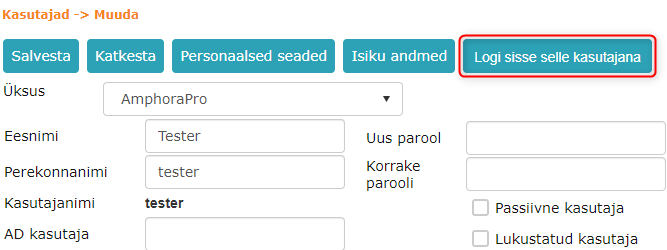 When logging in as another user, an "original user AS current user" notification is always displayed.
 In logs, the user is saved as "original user AS current user".
 To return to the original user, you need to log out of Amphora and then log back in.
NB!
This policy should only be added to administrators.
This functionality should primarily be used to transfer tasks from users who have left the job. First, the user who left should be locked, tasks should be forwarded, and only then should the user be made passive.
Superuser mode
Superuser mode gives the user extended access. In superuser mode, sub-organization folders and documents have administration rights by default. Additionally, superuser users can delete processes and delegations created by other users.
Superuser mode can be activated and deactivated through the icon in the upper right corner (the icon is active when the user has a confirmed personal identification code). When the mode is activated, the icon color changes to red and Amphora displays a notification.
NB!
For the administrator to have the superuser mode option, Amphora client support must be notified. By default, this functionality is not available to the user. The user must have a confirmed personal identification code.
User personal code locking
When a user logs in at least once with ID-card, Mobile-ID, Smart-ID or GovSSO, Amphora locks the personal identification code field for that user and the system person linked to the user. This prevents accidental modification of the personal identification code and authentication problems.
Last modified: 17 October 2026, 11:05:57