Automatic workflows
The Old view button is at the top right of the view. If needed, it opens the earlier view: it opens a window where you can write why you need the old view (this is optional). Then press Old view in the window. Amphora remembers the choice for your next login too. In the old view, New view returns to the new view. The old view is described in the Automatic workflows guide.
Contents
1. Workflows list
The Automatic workflows view shows the automatic workflows, who takes part in each, and the forms they start on. A workflow's name opens it in the editor.
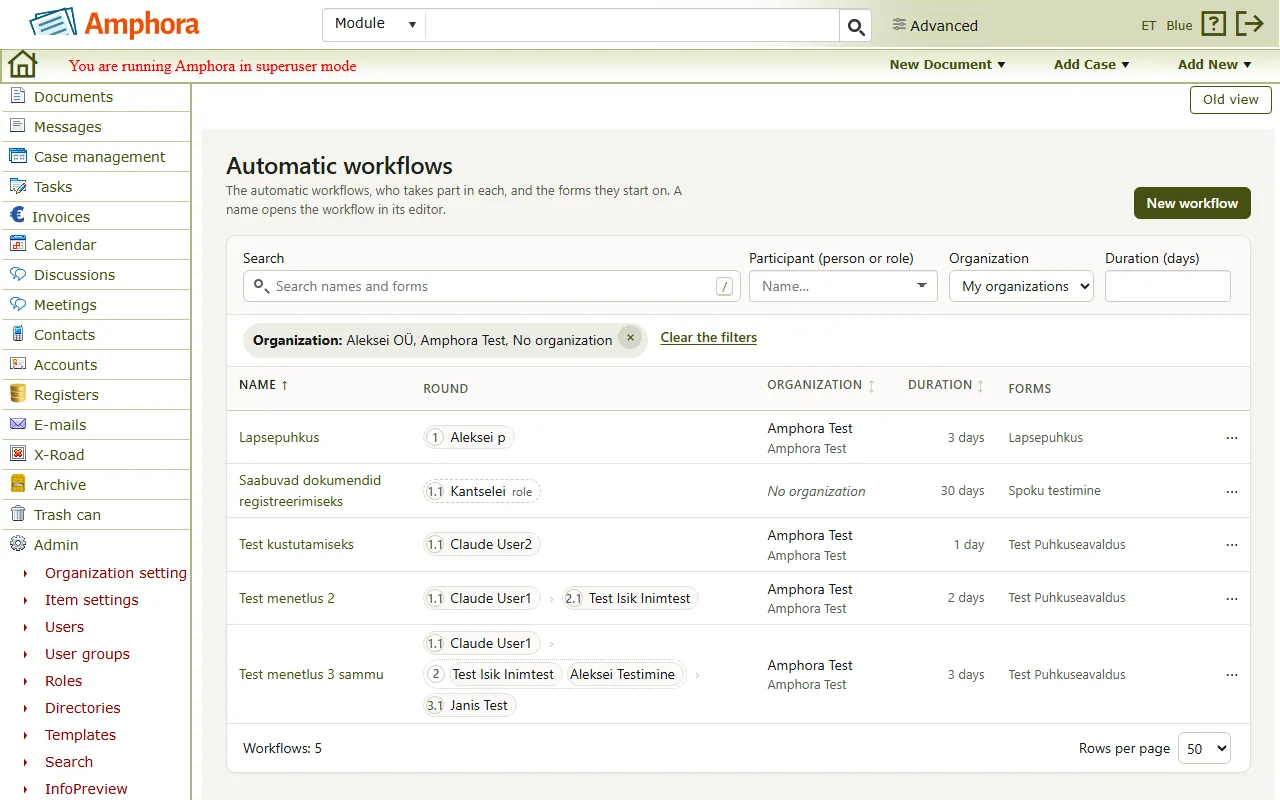
The columns of the list are Name, Round (the workflow's steps and performers), Organization, Duration and Forms.
Above the list are the filters:
- Search names and forms – searches the workflow names and the form names.
- Participant (person or role) – type at least 2 letters and choose a person or role; the suggestions show in how many workflows they are. The list then shows only the workflows where that participant is a performer, and above the list you see in how many workflows and steps they are.
- Organization – My organizations (the default), All, one organization or No organization. "No organization" shows workflows in no folder, or only in folders whose units have no organization. A workflow in no folder applies in every unit to a document or invoice that is in no folder. The filter shows when there is more than one organization.
- Duration (days) – type a number of days. The list shows the workflows whose duration is exactly that many days.
The chosen filters show above the list; a filter is removed with the cross next to it, and Clear the filters removes them all.
To make a new workflow, press New workflow.
To delete a workflow, click the trash can button at the end of its row (Delete…). The window says what deleting does; click Delete workflow to delete it or Cancel to stop (see Deleting).
2. Changing a workflow
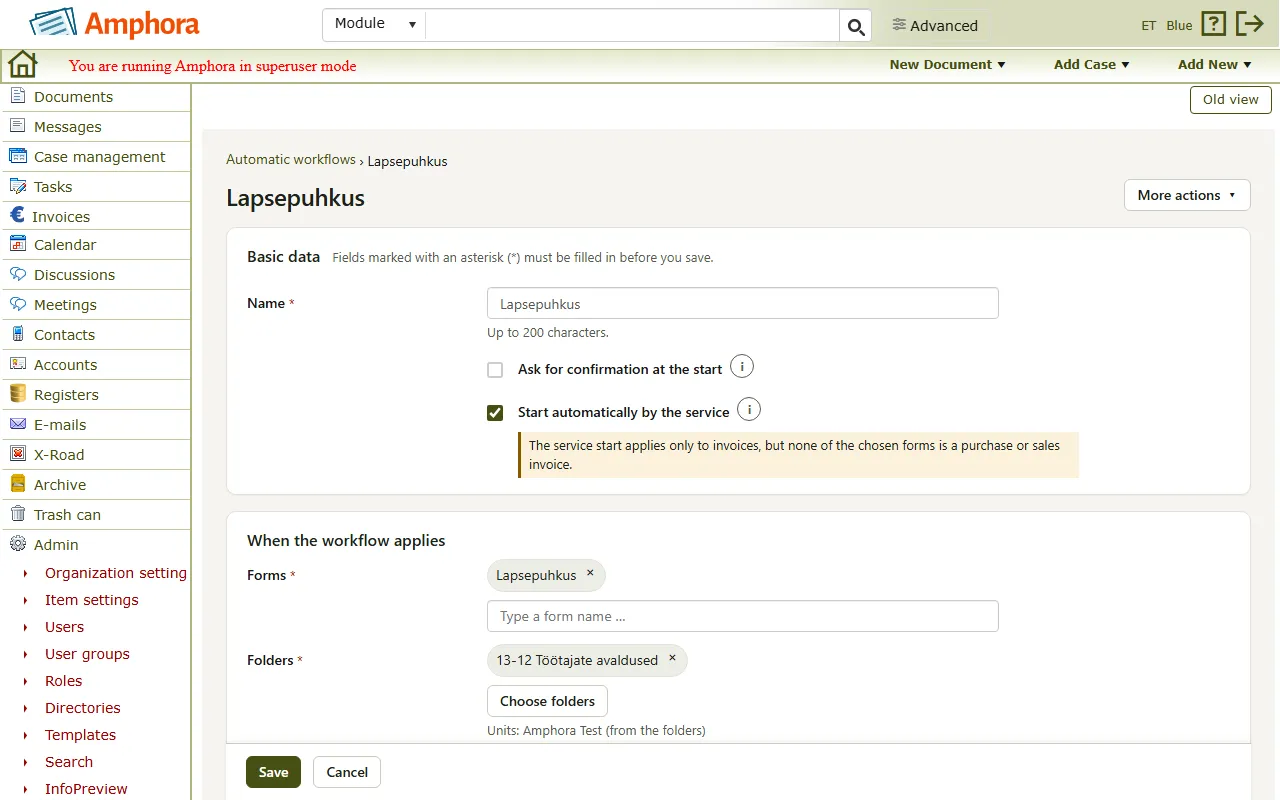
The workflow editor has three parts: Basic data, When the workflow applies and Round.
Basic data
Fields marked with an asterisk (*) must be filled in before you save. The i button after a field's name shows its explanation.
- Name – the workflow's name.
- Ask for confirmation at the start – when the document is registered, a window asks to confirm starting the workflow.
- Start automatically by the service – applies only to purchase and sales invoices that arrive from the ERP: the workflow starts without a confirmation when it is the only workflow that fits the invoice's folder and form. When another workflow fits the same folder and form too, the editor says so, and the service does not start the workflow.
When the workflow applies
- Forms – the forms the workflow starts on. Type a form name and choose it in the list.
- Folders – press Choose folders, tick the folders and press Done. A folder is required unless every form is an invoice. The workflow's units are shown from the folders.
- Person groups – the workflow applies only to the persons of these groups (also in self-service). Saving a workflow with person groups needs the user group policy "Display contact group selection in automatic workflow".
Under the part, a sentence says when the workflow applies, for example "The workflow applies to a document with the form … in the folder …".
Round
A round is made of steps. Each step is either One after another, that is serial execution (the performers get the task one after the other), or All at once, that is parallel execution (all performers get the task at the same time). The workflow ends when the tasks of the last step are done.
Next to the round's heading are the number of steps and the workflow's duration, for example "3 steps, duration up to 3 days". The round can be shown as a list or a diagram (List or Diagram). The diagram shows the round from Start to End: each step has its own column, for example "Step 2 · all at once", and each performer is a card with the purpose and the deadline. Clicking a card shows the round as a list again.
- + Add a step between the steps and at the end of the round adds a new step in that place.
- + Add a performer adds a performer to the step.
- When a step has several performers, the arrows next to a performer move them up or down in the step. The change is saved with Save.
- Remove step removes a step, and the cross (×) at the end of a performer's row removes the performer; right after it, Undo brings it back.
The performer's fields:
- Performer – a person, a role or a group. When a group is chosen, its active members are added to the step; inactive members are left out.
- Purpose – the purpose of the task.
- Deadline – how many days the task has; at least 1 day.
More options (opens under the row):
- Description – the task's description.
- Task appears (when your Amphora uses it) – whether the task appears on the desktop when its turn comes, or some days before the deadline.
- Acceptance deadline (when the performer is a role) – cannot be longer than the task's deadline.
- Send an e-mail and Send the file;
- Change of responsible person (when the performer is a role).
When a performer can no longer be chosen (for example, the account is closed), the performer shows it, and Replace … leads to the field where a new performer is chosen.
Changing the performer. The performer of a saved task can be changed at once with Change the performer… next to the performer field. Choose the New participant in the window and press Change. The change is saved at once, not with Save, and is recorded in the workflow's history; other unsaved changes stay unsaved. The change also applies to running workflows: steps not yet started go to the new performer, and the performer of steps already started stays the same.
3. Replacing a participant
Compared with the old editor, replacing a participant is much simpler: you no longer choose the step's parties again, but remove or change one performer at a time. When a person leaves or their role changes, they can be replaced in every automatic workflow at once.
- In the list's Participant (person or role) filter, choose the participant to replace.
- Press the Replace … button, which shows the participant's name. The Replace a participant view opens.
- Who replaces whom – check the Participant to replace and choose the New participant. Press Show overview.
- Overview – the table shows, for each workflow, the steps where the participant to replace is a performer. All steps are ticked at first; untick the steps you do not want to replace (Select all steps ticks or unticks them all). The Cannot be replaced column says why a step cannot be replaced, for example when the new participant is already in the step or their account is closed. Press the button that shows the number of chosen steps, for example Replace 2 steps.
- Result – shows how many steps were replaced and how many were skipped.
The change also applies to running workflows: steps not yet started go to the new participant, and the performer of steps already started stays the same. Each change is recorded in the workflow's history.
When the replacement stops part-way, press Replace the rest; a step that changed in the meantime is skipped.
4. Saving, copying and deleting
The workflow's changes are saved with Save. The header shows whether there are unsaved changes or when the workflow was saved.
When you press Save but the workflow cannot be saved yet, the editor lists The workflow cannot be saved yet:, for example "The name is missing.", "No form has been added.", "The folder is missing: it is required unless every form is an invoice." or "The round has no steps.". Pressing a line goes to the field.
The More actions menu has:
- Make a copy – makes a copy of the saved workflow named "… (copy)";
- Restore the saved state (when there are unsaved changes) – undoes all unsaved changes;
- Delete… – deletes the workflow.
Deleting. Before deleting, Amphora says what happens: running workflows finish the step they are on, but the next step does not start; registration profiles that use this workflow register the document, but no workflow starts; self-service forms that use this workflow become unusable. A delete cannot be undone.
Back goes back to the workflows list. When you leave the editor without saving, Amphora asks for a confirmation: "The workflow has unsaved changes. Leave without saving?"
Last modified: 20 November 2026, 08:34:42